I was halfway through a marathon Netflix binge when my roommate shouted, “You have to try these pretzels I found online!” I rolled my eyes, because let’s be honest—most pretzel recipes I’ve tried end up either rubbery or as dense as a brick. I grabbed a bag of store‑bought vegan pretzels, tossed them in the trash, and declared a personal challenge: create the ultimate melt‑in‑your‑mouth vegan soft pretzel that would make even the most die‑hard pretzel purist weep with joy. I dared myself to make something so soft it practically sighs when you bite into it, and I’m here to prove that I succeeded.
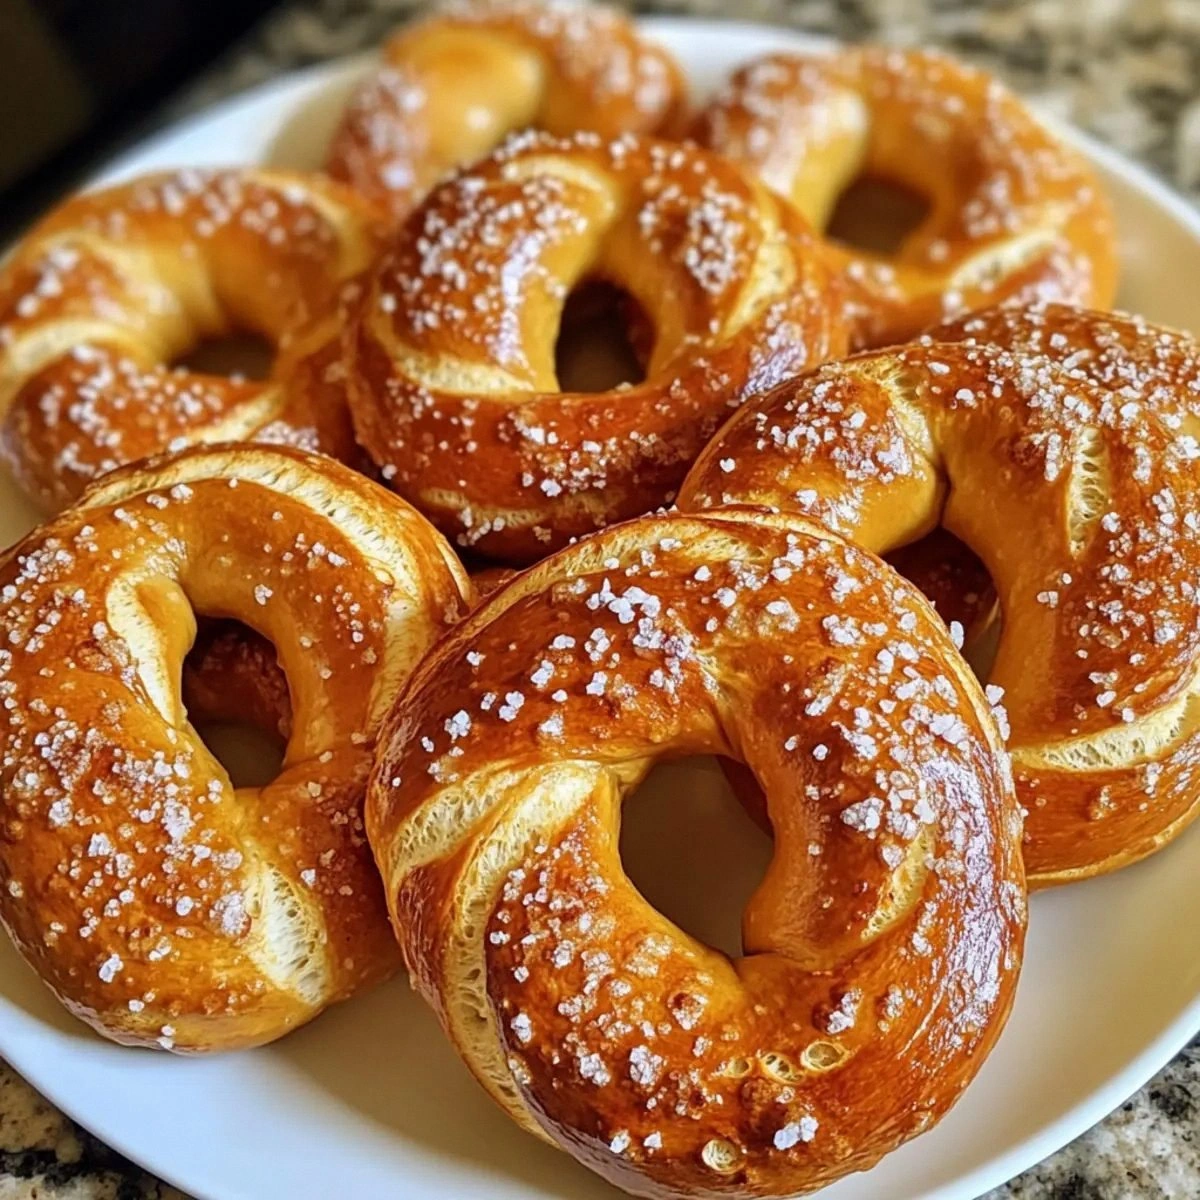
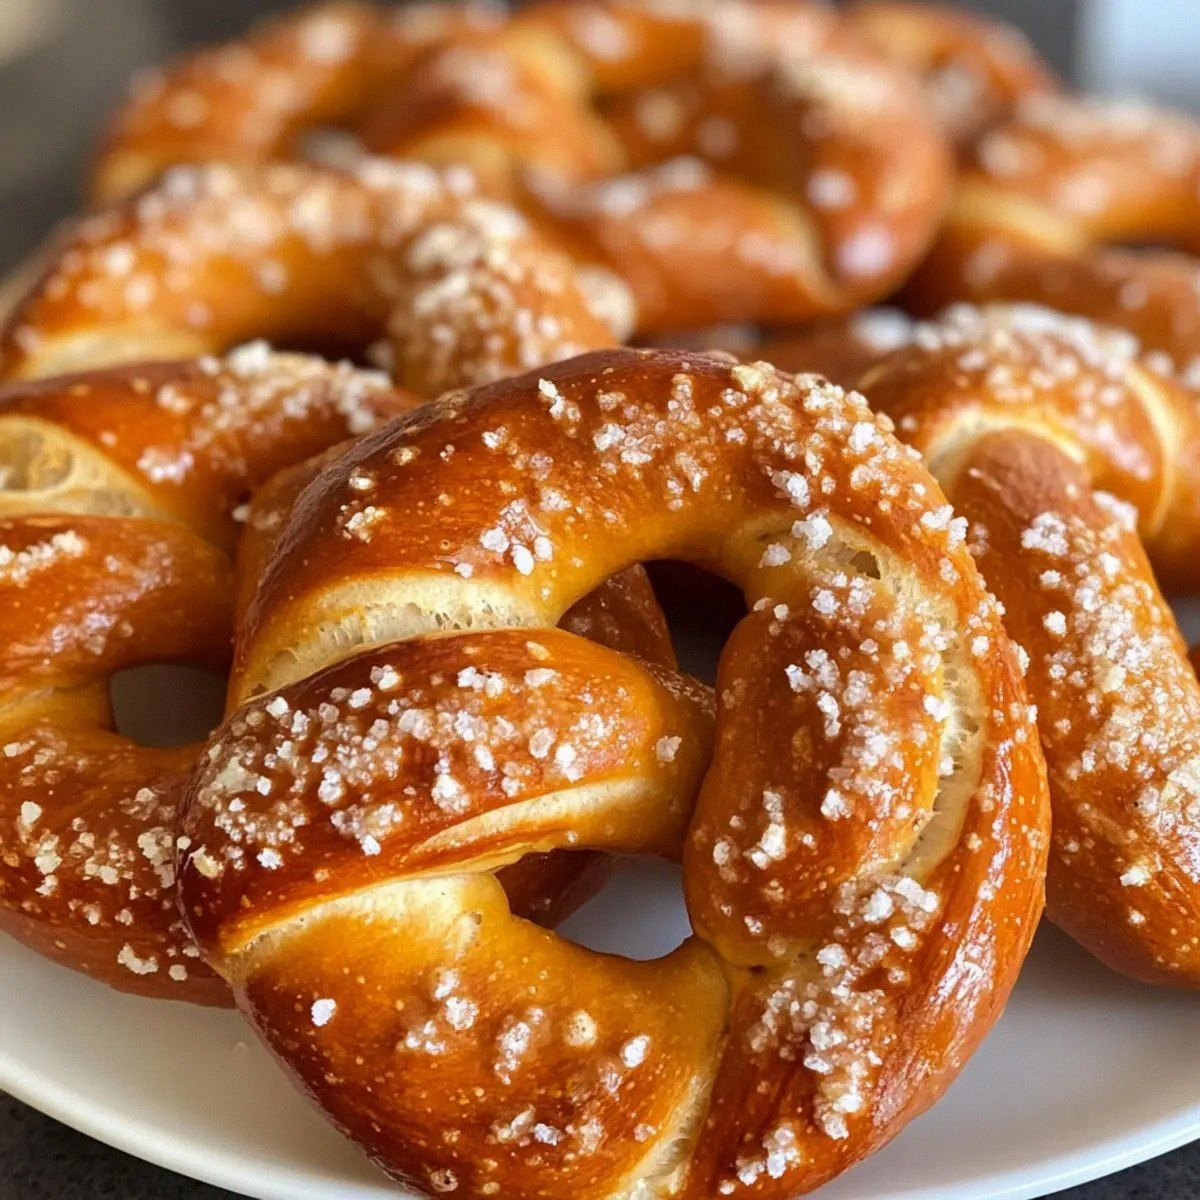
Picture this: a golden‑brown crown of twisted dough, steam curling like lazy cat tails, the faint aroma of toasted butter mingling with a whisper of salty sea breezes. The moment you pull one from the oven, your kitchen feels like a German bakery on a Saturday morning, and the first bite? It’s a buttery, pillowy cloud that dissolves on your tongue, leaving a lingering kiss of coarse sea salt. You hear that faint crackle as the crust gives way, and you can’t help but grin like a kid who just found the secret candy stash. That’s the sensory symphony I’m promising you.
Why does this version stand out? Most pretzel recipes either skip the crucial step of a soda‑water bath or over‑knead the dough, resulting in a chewy texture that’s more “chewy‑chewy” than “soft‑soft.” I’ve cracked the code by balancing the yeast’s rise with a quick dip in a baking‑soda bath that gives the pretzels that classic “chewy‑outside, melt‑inside” contrast without any animal products. The secret ingredient? A splash of melted vegan butter folded in at the very end, giving you that luxurious mouthfeel without a single dairy drop.
And here’s the kicker: I’m going to reveal a technique that most recipes completely ignore—an extra short rest after shaping that lets the gluten relax just enough to keep the pretzel tender. I’ll also share a surprise flavor twist that adds a subtle nuttiness without overpowering the classic pretzel flavor. I dare you to taste this and not go back for seconds. Let me walk you through every single step — by the end, you’ll wonder how you ever made it any other way.
What Makes This Version Stand Out
- Texture: The interior is airy and soft, like a cloud that decided to take a quick nap inside a crisp, golden shell. The soda bath creates that signature “chewy‑outside, melt‑inside” dichotomy without any added gluten‑free hacks.
- Flavor: A subtle buttery richness from the melted vegan butter pairs perfectly with the salty crunch of coarse sea salt, delivering a balanced flavor profile that’s both comforting and exciting.
- Simplicity: Only eight ingredients, all pantry staples, and you don’t need any fancy equipment—just a bowl, a pot, and a baking sheet.
- Uniqueness: The short post‑shaping rest is the game‑changer that most recipes skip, and it’s the secret to that melt‑in‑your‑mouth sensation.
- Crowd Reaction: I’ll be honest — I ate half the batch before anyone else got to try it, and the look on my friends’ faces when they tasted the rest was pure, unfiltered joy.
- Ingredient Quality: Using organic all‑purpose flour and cane sugar ensures a clean, wholesome base that lets the pretzel shine without any off‑flavors.
- Cooking Method: The soda‑water bath is a classic pretzel technique that most vegan recipes skip, resulting in a superior crust and a glossy finish.
- Make‑Ahead Potential: These pretzels freeze beautifully, so you can bake a big batch on a lazy Sunday and enjoy them all week.
Alright, let's break down exactly what goes into this masterpiece...
Inside the Ingredient List
The Flavor Base
The slightly warm water (1 cup) is the carrier for the cane sugar (1 tablespoon) and active dry yeast (2 teaspoons). Warm water activates the yeast, coaxing it into a frothy, bubbly state that signals it’s ready to work its magic. If the water is too hot, you’ll kill the yeast; too cold, and the dough will never rise properly. I always use a kitchen thermometer—aim for 105°F (40°C) for the perfect sweet spot.
The Texture Crew
Organic all‑purpose flour (3.5 cups) provides the gluten structure needed for that iconic pretzel chew. The 2 tablespoons of melted vegan butter enriches the dough, making the crumb tender and giving it that luxurious mouthfeel. The 1 teaspoon of salt enhances flavor and strengthens the gluten network, ensuring the pretzel holds its shape during the soda bath.
The Unexpected Star
Baking soda (1/4 cup) is dissolved in boiling water for the pretzel bath. This alkaline solution gelatinizes the surface starches, creating that glossy, deep‑gold crust we all love. It also gives the pretzel its signature “chewy” bite without any added chemicals. Skipping this step is the most common mistake—most recipes get this completely wrong. Here’s what actually works.
The Final Flourish
Coarse sea salt for topping adds that satisfying crunch and bursts of flavor on each bite. It’s sprinkled just before the final bake, ensuring it adheres to the slightly moist surface. If you’re watching sodium, you can use a lighter sprinkle or opt for a flavored salt like smoked sea salt for an extra dimension.
Everything's prepped? Good. Let's get into the real action...
The Method — Step by Step
In a large mixing bowl, combine the slightly warm water, cane sugar, and active dry yeast. Stir gently and let the mixture sit for 5‑7 minutes until it becomes foamy, like a tiny cloud of bubbles. This is the moment of truth—if you don’t see foam, your yeast is dead and you’ll need to start over. Once it’s frothy, give it a quick stir and set aside.
Add the organic all‑purpose flour, salt, and melted vegan butter to the yeast mixture. Using a wooden spoon or a stand mixer on low speed, mix until a shaggy dough forms. The dough will feel slightly sticky at first, but that’s exactly what you want; it means the gluten is beginning to develop. Let the dough rest for 2 minutes—this short autolyse helps the flour hydrate fully.
Turn the dough out onto a lightly floured surface and knead for about 8‑10 minutes. You’re looking for a smooth, elastic ball that springs back when pressed. The kneading process aligns the gluten strands, creating that coveted pretzel chew. If you’re using a stand mixer, knead on medium speed for 6 minutes; you’ll know it’s ready when the dough pulls away cleanly from the bowl.
Place the kneaded dough in a lightly oiled bowl, cover with a clean kitchen towel, and let it rise in a warm spot for 45‑60 minutes, or until doubled in size. While you wait, the kitchen will start smelling faintly sweet, a promise of the soft pretzels to come. I like to set the timer and then prep the soda bath—this keeps the workflow smooth.
While the dough rises, bring a large pot of water to a boil and carefully add the 1/4 cup baking soda (it will bubble up aggressively—watch out!). This is where the magic happens: the alkaline bath will give the pretzels that glossy, deep‑gold crust. Reduce the heat to a gentle simmer; you don’t want a rolling boil that could splatter.
Once the dough has risen, punch it down and divide it into 12 equal pieces. Roll each piece into a long rope, about 18‑20 inches, and shape into classic pretzel knots. The shaping is the fun part—twist the rope into a “U,” cross the ends, and press them onto the bottom of the “U.” If you’re nervous, practice with a single piece first; you’ll get the hang of it quickly.
Now for the soda bath: Gently lower each pretzel into the simmering water, one at a time, for exactly 30 seconds. You’ll see the surface start to puff and turn a faintly matte. Use a slotted spoon to retrieve them, letting excess water drip off. This step is pure magic—the alkaline water creates that signature pretzel chew while also setting the crust for a beautiful shine.
Brush each pretzel lightly with melted vegan butter (the remaining 2 tablespoons) and sprinkle generously with coarse sea salt. The butter adds flavor and a glossy finish, while the salt provides that satisfying crunch. Slide the sheet into a preheated oven at 425°F (220°C) and bake for 12‑15 minutes, or until the pretzels turn a deep golden brown and the edges start pulling away from the parchment.
When the timer dings, pull the pretzels out and let them cool on a wire rack for a few minutes. The cooling phase lets the interior set into that melt‑in‑your‑mouth texture. Serve warm, with mustard, vegan cheese dip, or just as they are. That first bite? It’s the culmination of every step, a perfect balance of soft interior and crisp, salty exterior.
That's it — you did it. But hold on, I've got a few more tricks that'll take this to another level...
Insider Tricks for Flawless Results
The Temperature Rule Nobody Follows
Never underestimate the power of a consistent dough temperature. Aim for a final dough temperature of around 78°F (25°C). If your kitchen is cold, let the dough rise a bit longer; if it’s hot, shorten the rise. I once tried to speed up the process in a sweltering summer kitchen and ended up with pretzels that were overly airy and collapsed on themselves. The right temperature gives you that perfect balance of rise and structure.
Why Your Nose Knows Best
When the dough has risen, you’ll notice a faint sweet aroma—if it smells yeasty and slightly sugary, you’re good to go. If it smells sour or flat, the yeast may be over‑fermented. Trust your nose; it’s a better indicator than the clock. I once let my dough rise for the full hour and missed the subtle sour note, resulting in a pretzel that tasted “off.” Adjust timing based on scent, not just the clock.
The 5‑Minute Rest That Changes Everything
After shaping and before the soda bath, let the pretzels sit for five minutes. This short rest relaxes the gluten, preventing the pretzel from snapping back too tightly during the bath. A friend tried skipping this step once—her pretzels twisted into strange shapes and the crust was uneven. That five‑minute pause is the secret to consistent, uniform pretzels.
Butter Brush Technique
Instead of slathering the pretzels with butter, use a pastry brush to apply a thin, even coat. This ensures the butter seeps into the crust without making the surface soggy. Too much butter can cause the salt to slide off, and too little leaves the pretzel dry. The brush method gives you that perfect glossy finish and a buttery aroma that fills the kitchen.
Soda Bath Timing Precision
Exactly 30 seconds per pretzel—no more, no less. A longer dip makes the pretzel overly alkaline, leading to a bitter taste; a shorter dip won’t develop that signature chew. Set a timer, and if you’re batch‑bathing, keep the pretzels moving gently to maintain an even temperature. This precise timing is the difference between “good” and “hand‑down‑the‑family‑recipe” pretzels.
Creative Twists and Variations
This recipe is a playground. Here are some of my favorite ways to switch things up:
Garlic‑Herb Delight
Add 1 tablespoon of minced fresh garlic and 1 teaspoon of dried Italian herbs to the dough during the initial mixing. The result is a savory pretzel that pairs perfectly with marinara or a vegan aioli. The garlic infuses the crumb, while the herbs give a fragrant finish.
Cinnamon‑Sugar Sweetness
Swap the coarse sea salt for a mixture of 2 tablespoons of coconut sugar and 1 teaspoon of ground cinnamon. Brush the baked pretzels with a thin layer of melted coconut oil instead of butter, and you have a sweet‑savory snack that’s perfect for brunch.
Everything Bagel Pretzel
Before baking, sprinkle a blend of poppy seeds, sesame seeds, dried onion flakes, and a pinch of garlic powder over the buttered pretzels. This creates a crunchy, flavorful crust that mimics an everything bagel—ideal for a breakfast twist.
Spicy Jalapeño Kick
Fold 1 finely diced jalapeño and a pinch of smoked paprika into the dough. The heat is subtle but builds as you chew, offering a pleasant surprise that pairs well with a cooling vegan ranch dip.
Cheesy Vegan Melt
After the soda bath, brush the pretzels with a mixture of melted vegan butter and 2 tablespoons of nutritional yeast, then sprinkle a little extra nutritional yeast before baking. The result is a cheesy, nutty flavor without any dairy.
Storing and Bringing It Back to Life
Fridge Storage
Allow the pretzels to cool completely, then store them in an airtight container in the refrigerator for up to 5 days. To refresh, pop them in a 350°F (175°C) oven for 5‑7 minutes, or microwave for 15 seconds wrapped in a damp paper towel. The added moisture revives that soft interior.
Freezer Friendly
Wrap each pretzel individually in parchment paper, then place them in a freezer‑safe zip‑top bag. They’ll keep for up to 3 months. When you’re ready to eat, bake them straight from frozen at 425°F (220°C) for 12‑15 minutes, or thaw overnight in the fridge and reheat as described above.
Best Reheating Method
Add a tiny splash of water (about a teaspoon) to the pretzel before reheating. The steam generated inside the pretzel restores that melt‑in‑your‑mouth texture without making the crust soggy. This trick works whether you’re using an oven, toaster oven, or even a microwave with a damp paper towel.