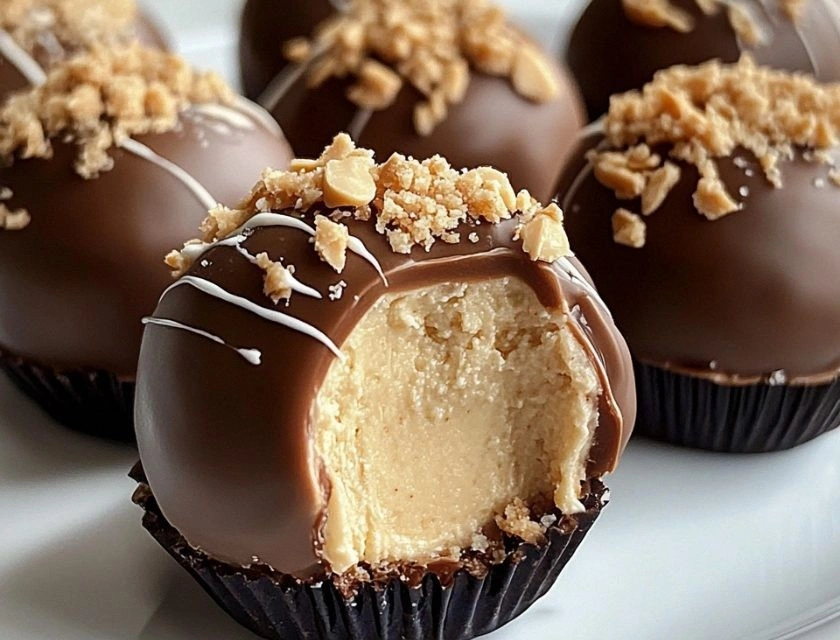
I was elbow-deep in a failed attempt at peanut butter fudge when the universe handed me a gift wrapped in cream cheese and desperation. The fudge had seized into a gritty, oily mess that looked like something you'd find at the bottom of an old coffee can, and I was muttering words that would make a sailor blush. My kitchen smelled like a peanut butter factory explosion, and there was no way I was serving this disaster to the book club ladies arriving in exactly two hours. In a moment of pure panic, I grabbed the block of cream cheese sitting on the counter and started mashing it into the wreckage with my bare hands like some kind of dessert cavewoman. That first taste stopped me dead in my tracks — it was like peanut butter cheesecake had been reincarnated into the most addictive form possible. The texture was silky, the flavor was perfectly balanced between sweet and salty, and I realized I had accidentally stumbled onto something magical. These little balls of heaven don't require any baking, any fancy equipment, or any culinary school training — just pure, unadulterated peanut butter love that comes together faster than you can say "I need dessert for the potluck tomorrow."
Here's the thing about most no-bake peanut butter desserts: they're either tooth-achingly sweet or they have that weird, chalky texture that makes you feel like you're eating peanut butter-flavored sawdust. I've tried them all, from the ones that use condensed milk (hello, sugar coma) to the versions that call for coconut oil and end up tasting like a beach vacation gone wrong. This recipe hits that perfect sweet spot where the cream cheese adds tang and body, the peanut butter brings that nostalgic comfort, and the powdered sugar just barely sweetens the deal. The texture is like rolling little clouds of peanut butter cheesecake between your palms, and when you pop one in your mouth, it melts into this creamy dream that makes you close your eyes involuntarily. I dare you to taste this and not go back for seconds — actually, I double-dog dare you, because I ate half the batch before anyone else got to try it, and I'm not even sorry.
What makes these little gems absolutely irresistible is how they walk that tightrope between candy and cheesecake, between snack and dessert, between "just one more" and "how did I eat twelve of these?" The peanut butter flavor is front and center but not overwhelming, thanks to the cream cheese that keeps everything in perfect balance. They have this way of disappearing from the container in a manner that would make you think you have dessert-eating ghosts in your house. I've made these for birthday parties where grown adults have literally hidden them in their purses, for office potlucks where they've caused actual arguments over the last one, and for midnight snacks that turned into midnight meals. If you've ever struggled with making impressive desserts that don't require turning on your oven, you're not alone — and I've got the fix that'll make you look like a pastry wizard.
Stay with me here — this is worth it. We're about to embark on a journey that starts with a bowl and a spoon and ends with you being the person everyone begs for the recipe. The best part? You probably have everything you need right now, and you can be rolling these babies in less time than it takes to watch an episode of your favorite show. Let me walk you through every single step — by the end, you'll wonder how you ever made it any other way.
What Makes This Version Stand Out
Silky Smooth: These balls achieve a texture that's almost mousse-like thanks to the perfect ratio of cream cheese to peanut butter. Most recipes get this completely wrong by adding too much powdered sugar, which creates that grainy, pasty texture that sticks to your teeth. This version uses just enough sugar to sweeten without overwhelming the natural creaminess, giving you a melt-in-your-mouth experience that'll have you rolling your eyes back in bliss.
Flavor Balance: The secret lies in that tiny pinch of sea salt that transforms the entire experience. It's like turning up the saturation on a photo — suddenly every flavor becomes more vivid, more pronounced, more addictive. The salt amplifies the peanut butter's nuttiness while keeping the sweetness in check, creating that perfect sweet-salty dance that makes you reach for another without thinking.
Zero Equipment Needed: No electric mixer, no food processor, no candy thermometer — just a bowl, a spoon, and about fifteen minutes of your time. This is the recipe that proves you don't need fancy gadgets to create something extraordinary. I've made these in vacation rentals, at friends' houses, even in a dorm room using nothing but plastic utensils and sheer determination.
Make-Ahead Magic: These actually get better after a day in the fridge as the flavors meld and deepen. Unlike those sad, dry peanut butter cookies that turn into hockey pucks overnight, these maintain their perfect texture for up to a week. Picture yourself pulling these out of the fridge after dinner, the anticipation building as you peel back the container lid, knowing you have something spectacular waiting for you.
Crowd Psychology: There's something about the size and shape that makes people lose all self-control. They're perfectly poppable, which means people who would normally decline dessert suddenly find themselves eating five without realizing it. I've watched self-proclaimed "not a sweets person" devour a dozen of these while insisting they don't like dessert.
Ingredient Flexibility: This recipe is like that friend who gets along with everyone — it plays well with whatever you have in your pantry. Natural peanut butter, conventional peanut butter, even that fancy artisanal stuff your aunt brought back from her trip to Portland. The cream cheese can be full-fat or neufchâtel, and you can roll these in everything from crushed pretzels to mini chocolate chips.
Texture Play: The optional graham cracker crumbs aren't just for show — they add this subtle crunch that takes the experience from good to legendary. It's like finding the perfect ratio of ice cream to cone, where each bite gives you that variety that keeps things interesting. Skip them if you want pure silk, add them if you want a little intrigue in your life.
Alright, let's break down exactly what goes into this masterpiece...
Inside the Ingredient List
The Flavor Foundation
Cream cheese is the unsung hero here, providing that tangy backbone that makes these taste like actual cheesecake rather than just sweetened peanut butter. Don't even think about using that "cream cheese spread" in a tub — you want the real deal in brick form, full-fat for maximum luxuriousness. When it's properly softened, it should bend willingly when you press on it, not crack or resist like a stubborn teenager. The magic happens when it melds with the peanut butter, creating this perfect marriage of tangy and nutty that makes people ask "what's IN these?" between bites.
The Star of the Show
Peanut butter choice matters more than you might think, but not in the way those snobby recipe blogs would have you believe. Yes, natural peanut butter works beautifully here, but so does the conventional stuff your kids eat on sandwiches. The key is going with creamy — crunchy peanut butter creates weird little hard bits that interrupt the smooth texture we're creating. If you're using natural peanut butter, give it a really good stir to incorporate all those separated oils, because nobody wants a greasy ball that weeps oil like it's crying.
The Sweetness Stabilizers
Powdered sugar does double duty here — obviously sweetening, but also providing structure that keeps these balls from turning into puddles at room temperature. Sifting might seem like an unnecessary fussy step, but trust me on this one. Nothing ruins the experience like biting into a tiny sugar pebble that didn't dissolve, creating a sweet explosion that throws off the whole balance. If you're in a pinch and only have granulated sugar, you can blitz it in a blender until powdery, but honestly, just keep powdered sugar in your pantry like a prepared adult.
The Game Changers
Vanilla extract is like the bass player in a band — you don't always notice it when it's there, but you definitely miss it when it's gone. That tiny teaspoon adds depth and warmth that makes the peanut butter taste more intensely peanut-buttery, like a flavor amplifier. The sea salt is your secret weapon, the ingredient that makes people say "I don't know what you did, but these taste like something from a fancy bakery." Just a pinch, barely enough to notice, but it creates this flavor complexity that has people chasing the taste long after the ball is gone.
The Optional But Life-Changing
Graham cracker crumbs add this nostalgic note that screams summer camp and childhood, but they're completely optional. If you do use them, pulse them in a food processor until they're like coarse sand — you want texture, not gravel. Mini chocolate chips are where things get really interesting because they stay suspended in the mixture rather than sinking to the bottom like their full-size cousins. If you're feeling fancy, you can melt some chocolate chips and dip the balls for that truffle effect, but honestly, they're pretty spectacular naked too.
Everything's prepped? Good. Let's get into the real action...
The Method — Step by Step
- Start with your cream cheese in a medium bowl, and here's where most people mess up — they don't soften it enough. You want it so soft that when you press a spoon into it, it gives way immediately without resistance. If it's still cold in the center, microwave it in 10-second bursts, checking between each one because melted cream cheese is a sad, unusable puddle. Once it's properly softened, add the peanut butter and prepare yourself for what looks like a hot mess. This is the moment of truth where you'll wonder if this is actually going to work, but keep stirring — within about 30 seconds, it transforms from a lumpy disaster into this smooth, unified mixture that looks like peanut butter clouds.
- Now comes the powdered sugar, and okay, ready for the game-changer? Add it in thirds, not all at once. Each addition should be fully incorporated before the next goes in, which prevents those dreaded sugar pockets that taste like sweet surprises nobody asked for. The mixture will thicken and become more dough-like with each addition, and you'll know you're on the right track when it starts pulling away from the sides of the bowl like it's getting shy. This is also when you add your vanilla and salt — just dump them in and keep mixing until you can't see any streaks of white from the sugar.
- Here's where we separate the rookies from the pros — stick the bowl in the freezer for exactly 10 minutes. Not 5, not 15, but 10. This brief chill firms up the mixture just enough to make rolling easier, but doesn't freeze it solid like a hockey puck. While you're waiting, line a plate or tray with parchment paper, and if you're using any mix-ins like chocolate chips or graham cracker crumbs, get them ready in small bowls. Your hands are about to get messy, but in the best possible way.
- Time to roll, and this next part? Pure magic. Scoop out tablespoon-sized portions — I use a cookie scoop for uniformity, but two spoons work fine. Roll between your palms with gentle pressure, like you're comforting them into shape. They should form easily into smooth spheres about the size of a walnut. If the mixture starts sticking to your hands, you've hit the sweet spot where they're warm enough to roll but cool enough to hold shape. Place them on your parchment-lined tray as you go, and don't worry if they're not perfectly round — rustic charm is totally a thing.
- If you're rolling in coatings, now's your moment. Graham cracker crumbs add a subtle crunch and visual appeal, while mini chocolate chips create these little pockets of chocolate that burst when you bite into them. Pour your coating into a shallow bowl and roll each ball gently — you want coverage but not a thick armor that overwhelms the delicate interior. The warmth from your hands will help the coatings adhere without needing any additional binding agents.
- Refrigerate for at least 30 minutes to let everything set up properly. This isn't just about firmness — it's about flavor development. As they chill, the cream cheese and peanut butter flavors meld into something greater than their individual parts. The texture transforms from soft and pliable to perfectly sliceable, where you can bite through without squishing the whole ball. That sizzle when you pull them from the fridge? Okay, there's no sizzle, but the anticipation crackles in the air like electricity.
- Storage is where these really shine, and now the fun part. They'll keep in an airtight container in the fridge for up to a week, getting better each day as the flavors deepen and mature. For longer storage, freeze them on the tray first, then transfer to a freezer bag where they'll keep for up to three months. Thaw in the fridge overnight, or if you're impatient like me, eat them partially frozen where they taste like peanut butter cheesecake ice cream bites. I've been known to hide these in the vegetable crisper behind the wilted lettuce, because nobody looks there and they're all mine.
That's it — you did it. But hold on, I've got a few more tricks that'll take this to another level...
Insider Tricks for Flawless Results
The Temperature Rule Nobody Follows
Room temperature isn't just a suggestion — it's the difference between smooth, professional-looking balls and a lumpy mess that looks like it was made by toddlers. Take your cream cheese out of the fridge at least an hour before you start, or use my microwave trick but be super careful. Peanut butter temperature matters too — if yours is stored in the fridge (who does that?), let it come to room temp as well. Cold ingredients don't blend; they just sit there stubbornly next to each other like strangers at a party.
Why Your Nose Knows Best
That moment when you're mixing and everything suddenly smells like a peanut butter factory? That's your cue that the ingredients have properly married. The aroma intensifies when the cream cheese and peanut butter fully incorporate, creating this heady, nutty perfume that fills your kitchen. A friend tried skipping this step once — let's just say it didn't end well, and her balls tasted like separate ingredients that refused to get along.
The 5-Minute Rest That Changes Everything
After rolling, let them sit at room temperature for exactly 5 minutes before refrigerating. This brief rest allows the exterior to develop a slight skin that prevents condensation in your storage container. Condensation is the enemy of perfectly coated balls — it makes graham crackers soggy and chocolate chips weep. Those five minutes feel like an eternity when you're impatient, but they're the difference between Instagram-worthy and sad, sweaty treats.
The Uniformity Secret
Use a small cookie scoop or melon baller for consistently sized portions. Not because we're obsessed with perfection, but because uniformly sized balls chill at the same rate and look professionally made. Plus, when they're all the same size, you can accurately count how many you've eaten (or not count, depending on your guilt level). I mark the bottom of one ball with a tiny chocolate chip to track my "quality control tastings" — currently holding at seven per batch.
The Flavor Amplifier
Add a whisper of espresso powder — just an eighth of a teaspoon — to make the peanut butter taste more intensely nutty without any coffee flavor. It's like turning up the contrast on a photo; suddenly everything becomes more vivid and defined. This trick works because coffee enhances our perception of roasted flavors, and peanut butter is essentially roasted peanuts in spreadable form. Your guests won't be able to put their finger on what makes these so addictive, but they'll keep coming back for more.
Creative Twists and Variations
This recipe is a playground. Here are some of my favorite ways to switch things up:
The Elvis Presley
Add a tablespoon of honey and roll in crushed banana chips for a tribute to the King's favorite sandwich. The honey adds floral sweetness that plays beautifully with peanut butter, while the banana chips provide that signature crunch. I like to add a tiny pinch of cinnamon to really sell the sandwich experience. These disappear faster than you can say "thank you, thank you very much" in your best Elvis voice.
The Dark Chocolate Dream
Replace half the peanut butter with dark chocolate peanut butter and roll in cocoa powder for a sophisticated twist. The bittersweet chocolate cuts through the richness, creating something that tastes like it came from a fancy chocolatier. Add a few drops of almond extract to amplify the nuttiness, and you've got something that'll make chocolate snobs weep with joy. I serve these at dinner parties where people assume I spent hours tempering chocolate.
The White Chocolate Wonder
Use white chocolate peanut butter (yes, it exists, and yes, it's amazing) and roll in toasted coconut flakes. The white chocolate adds vanilla notes that make these taste like a peanut butter coconut cream pie in ball form. Toast the coconut until it's golden and fragrant — that nutty aroma takes these from good to legendary. Kids go absolutely bananas for these, and adults pretend they're too sophisticated for white chocolate while sneaking thirds.
The Spicy Surprise
Add a quarter teaspoon of cayenne to the mixture and roll in crushed spicy peanuts. The heat builds slowly, creating this incredible contrast with the cool cream cheese. It's like a peanut butter Thai chili sauce in dessert form — sounds weird until you try it, then you can't stop eating them. The spice makes your mouth tingle in the most pleasant way, and the cream cheese soothes it immediately. Perfect for people who think dessert is too boring.
The Breakfast of Champions
Add a tablespoon of maple syrup and roll in crushed maple bacon for a breakfast-inspired treat. The maple enhances the peanut butter's natural sweetness while the bacon adds that smoky, salty element that makes people question everything they thought they knew about dessert. Crisp the bacon until it's almost burnt — you want it to shatter into dust when crushed. These are dangerous because they taste like breakfast, which means people eat them at 9 AM without guilt.
The Tropical Escape
Use coconut peanut butter and roll in toasted coconut mixed with a pinch of lime zest. The lime brightens everything, cutting through the richness like sunshine through clouds. Toast the coconut until it's deeply golden — almost burnt — for maximum flavor impact. These transport you to a beach somewhere, even when you're standing in your kitchen wearing fuzzy slippers. The tropical twist makes these perfect for summer gatherings or when you need to mentally escape February.
Storing and Bringing It Back to Life
Fridge Storage
These beauties will keep in an airtight container in the refrigerator for up to seven days, but honestly, they've never lasted more than three in my house. Layer them between sheets of parchment paper to prevent them from sticking together if you're stacking. The key is keeping them away from strong-smelling foods — nobody wants peanut butter cheesecake that tastes like last night's garlic pasta. I use a glass container with a tight-fitting lid, and I've noticed they actually improve after day two as the flavors meld and deepen into something even more spectacular.
Freezer Friendly
Freeze them on a parchment-lined tray first, then transfer to a freezer bag once they're solid. This prevents them from freezing into one giant peanut butter iceberg that requires an ice pick to separate. They'll keep for up to three months, though I've found forgotten bags from last Christmas that tasted perfectly fine. For best texture, thaw in the refrigerator overnight rather than at room temperature — this prevents condensation from forming and making your coatings soggy. If you're impatient (guilty), eating them partially frozen is like peanut butter cheesecake ice cream bites.
Best Serving Method
Let them sit at room temperature for about 10 minutes before serving — this takes the chill off and allows the flavors to bloom. Cold dulls sweetness, so letting them warm slightly brings out all the nuanced flavors you've worked so hard to create. If they've been frozen, this rest period is crucial for achieving that perfect, creamy texture. Add a tiny splash of water to the container before reheating if they've been refrigerated for more than a few days — it steams them back to perfection and prevents that dried-out texture that sometimes happens with cold desserts.