I was in the middle of a rainy Saturday, the kind where the sky looks like a charcoal sketch and the only thing keeping my sanity is the promise of something sweet. I had just tried to make classic s’mores in the microwave and ended up with a sticky mess that stuck to the ceiling fan. That disaster sparked a dare from my roommate: “If you can turn that mess into something elegant, I’ll buy you a whole bag of marshmallows.” I laughed, rolled up my sleeves, and set out to prove that the humble campfire treat could be upgraded to haute couture. The result? A macaroon that feels like a campfire hug wrapped in a silk scarf – I’m calling it Decadent S’mores Macarons, and trust me, this is hands down the best version you’ll ever make at home.
Picture this: the kitchen filled with the buttery scent of graham crackers, the deep, glossy aroma of melted milk chocolate, and a faint whisper of toasted marshmallow that makes you think of pine trees and summer nights. The air hums with the gentle whir of the stand mixer, a soft clatter of parchment paper being laid out, and the occasional pop of a caramelized sugar crust forming on the macarons. My fingertips feel the cool, smooth surface of the almond flour as I sift it, and the batter glistens like a midnight lake under a full moon. When the first batch slides out of the oven, the shells crackle like thin ice, revealing a glossy, chocolatey interior that beckons you to bite in.
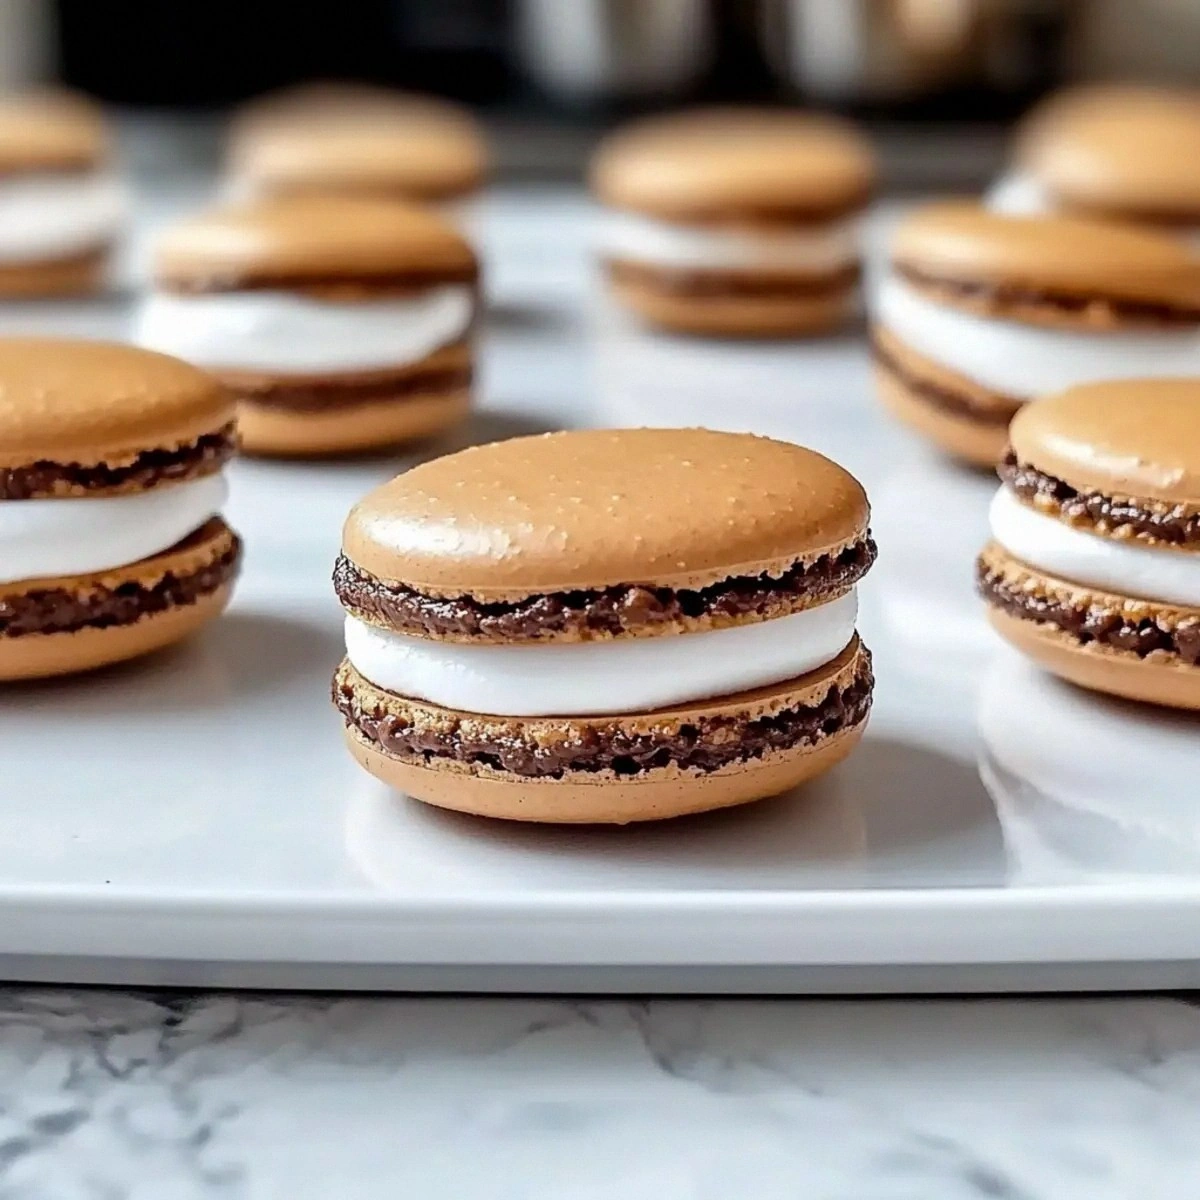
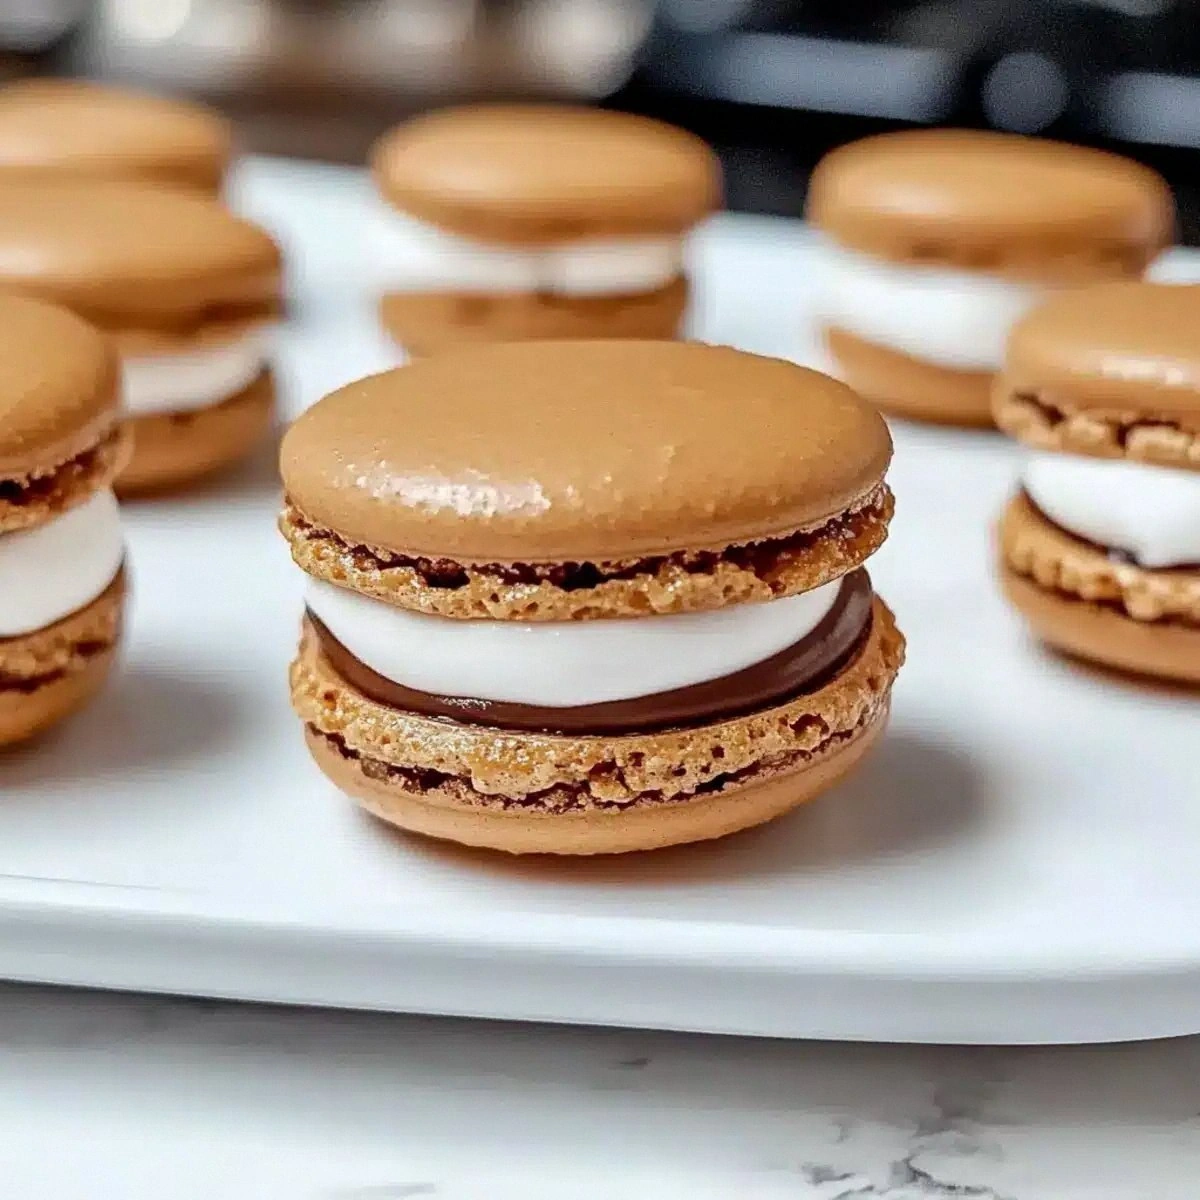
Why does this version stand out? Most recipes either skip the graham cracker crumb, turning the flavor into a generic chocolate macaron, or they drown the delicate shells in too much filling, making them soggy and sad. I’ve cracked the code by folding just the right amount of graham crumb into the buttercream, giving each bite that nostalgic crunch without compromising the airy texture of the shell. And there’s a secret weapon: a dash of brown gel food coloring that gives the shells a caramelized hue that looks as good as it tastes. I dare you to taste this and not go back for seconds – the balance of smoky chocolate, sweet marshmallow, and buttery crunch is pure, unapologetic indulgence.
I’ll be honest — I ate half the batch before anyone else got to try it. That’s how addictive they are. The moment you pop one into your mouth, the shell cracks, releasing a river of silky chocolate ganache that mingles with a fluffy marshmallow crème, and the graham crumb adds that satisfying crunch you never knew a macaron could have. Most recipes get this completely wrong. Here’s what actually works: a precise macaronage technique, a low‑heat bake to keep the shells glossy, and a quick chill before filling to set the ganache perfectly. Okay, ready for the game‑changer? Let’s walk through every single step — by the end, you’ll wonder how you ever made it any other way.
What Makes This Version Stand Out
- Flavor Fusion: The marriage of toasted graham cracker, rich milk chocolate, and fluffy marshmallow crème creates a taste that’s both nostalgic and sophisticated, like a campfire story told in a five‑star kitchen.
- Texture Symphony: A crisp, glossy shell that snaps like a fresh spring leaf, a creamy interior that melts on the tongue, and a subtle crunch from the crumb that adds depth.
- Simplicity Meets Elegance: Despite the fancy appearance, the ingredient list is short, and the technique is straightforward once you master the macaronage.
- Unique Visuals: The brown gel coloring gives the shells a caramel‑kissed look, making them Instagram‑ready without any artificial glitter.
- Crowd Reaction: Guests often claim they’ve never tasted anything like it, and the “wow” factor is instant – perfect for parties, potlucks, or a quiet night in.
- Ingredient Quality: Using super‑fine almond flour and aged egg whites ensures a light, airy structure that holds up to the heavy filling.
- Cooking Method: Low‑heat baking preserves the delicate shell while allowing the interior to stay moist, a trick most bakers overlook.
- Make‑Ahead Potential: These macarons keep beautifully in the fridge for up to a week, and the flavors actually deepen with time.
Inside the Ingredient List
The Flavor Base
Super fine almond flour is the backbone of any macaron, providing that delicate, melt‑in‑your‑mouth crumb. Using a finely sifted almond flour ensures no gritty texture and helps the shells rise evenly. If you skip the almond flour or use a coarse variety, you’ll end up with a dense, uneven bite that feels more like a cookie than a macaron. Pro tip: give it a second sift for extra lightness. When shopping, look for “super‑fine” on the label or buy bulk and grind it yourself for ultimate control.
The Sweetness Crew
Confectioner’s sugar and granulated sugar work together to sweeten the shells without making them gritty. The powdered sugar dissolves completely, creating a smooth batter, while the granulated sugar adds a subtle crunch to the interior if any crystals remain. Skipping the granulated sugar can lead to a flat, flavorless shell, and over‑sweetening will mask the chocolate’s depth. If you’re allergic to refined sugars, a blend of coconut sugar and powdered erythritol can substitute, but expect a slight caramel note.
The Texture Crew
Graham cracker crumbs bring that iconic campfire crunch to the filling. They absorb a bit of the chocolate ganache, turning it into a silky, slightly grainy mousse that feels like a toasted marshmallow on a graham cracker. Forgetting the crumbs results in a too‑smooth ganache that lacks character. For a gluten‑free twist, use crushed gluten‑free graham crackers or even toasted oat flakes for a similar texture.
The Unexpected Star
Brown gel food coloring is purely aesthetic, but it does more than just make the shells look pretty. The gel form means you’re adding virtually no extra liquid, preserving the delicate balance of the batter. A few drops give the shells a caramel‑kissed hue that hints at the toasty flavor inside. If you forget to add it, the macarons will still taste amazing, but they’ll lack that visual cue that says “I’m a s’mores macaron.”
The Final Flourish
Milk chocolate, heavy cream, and marshmallow crème combine to form the ultimate filling. Milk chocolate provides a smooth, creamy base that’s less bitter than dark chocolate, making it more kid‑friendly. Heavy cream emulsifies the chocolate, giving it a glossy sheen and a melt‑in‑your‑mouth texture. Marshmallow crème adds that airy, fluffy sweetness that mimics the classic s’mores marshmallow. If you’re looking for a dairy‑free version, substitute coconut cream for heavy cream and use a high‑quality dark chocolate with a touch of maple syrup for sweetness.
Everything's prepped? Good. Let's get into the real action…
The Method — Step by Step
Preheat your oven to 300°F (150°C) and line two baking sheets with parchment paper. This low temperature is crucial; it allows the shells to develop that coveted matte finish without cracking. While the oven warms, sift the almond flour together with the confectioner’s sugar into a large bowl. The sifted mixture should feel like fine sand – if any lumps remain, give it another sift. I like to whisk the sifted dry ingredients gently to aerate them, which helps later when we fold in the egg whites.
Separate the egg whites from the yolks, making sure no yolk contaminates the whites – even a speck will prevent the whites from reaching stiff peaks. Age the whites by letting them sit uncovered in the fridge for 24 hours; this dries them out just enough to create a glossy meringue. When you’re ready, bring them to room temperature, then begin beating on medium speed until they become frothy.
Add the granulated sugar gradually, one tablespoon at a time, while the mixer is on medium‑high. You’ll notice the mixture turning glossy and thickening – that’s the sugar dissolving into the whites. Once the sugar is fully incorporated, increase the speed to high and whip until you achieve stiff, glossy peaks that stand up like tiny white towers. At this point, add a few drops of brown gel food coloring; the color should be a deep caramel, not too dark.
Now for the macaronage: gently fold the dry almond‑sugar mixture into the meringue using a rubber spatula. The motion is crucial – you want to incorporate the flour without deflating the air you just built. The batter should flow like lava; when you lift the spatula, the batter should form a thick ribbon that slowly folds back onto itself. If the batter is too runny, you’ll get flat shells; if it’s too stiff, the shells will be bumpy.
Transfer the batter to a piping bag fitted with a ½‑inch round tip. Pipe uniform circles about 1.5 inches in diameter onto the parchment, leaving at least an inch of space between each. After piping, tap the tray firmly on the counter three times – this releases trapped air bubbles and smooths the tops. Let the piped shells rest at room temperature for 30‑45 minutes, or until a skin forms and they no longer stick to a fingertip. This “drying” stage is the secret to that signature “feet” formation.
Bake the shells for 15 minutes, then rotate the trays 180 degrees and bake for another 10‑12 minutes. You’ll know they’re done when the tops are firm to the touch and the edges have begun to pull away from the parchment, creating that classic “foot.” The scent at this point is intoxicating – a faint nutty aroma that whispers of toasted almonds. Remove the trays and let the shells cool completely before handling.
While the shells cool, make the chocolate ganache: melt the milk chocolate in a heat‑proof bowl over a simmering pot of water, stirring until silky. In a separate saucepan, heat the heavy cream just until it begins to simmer, then pour it over the melted chocolate, letting it sit for a minute before whisking into a glossy ganache. Add a spoonful of marshmallow crème and whisk until fully incorporated; the mixture should be fluffy, light, and slightly glossy. Fold in the graham cracker crumbs, ensuring they’re evenly distributed but not over‑mixed.
Pair the shells: match them by size and color, then pipe a generous dollop of the ganache onto the flat side of one shell and sandwich it with its partner. The filling should ooze just a little when you press them together – that’s the “s’mores” moment. Let the assembled macarons rest in the fridge for at least an hour; this allows the flavors to meld and the shells to soften slightly, achieving that perfect bite. That’s it — you did it. But hold on, I've got a few more tricks that'll take this to another level…
Insider Tricks for Flawless Results
The Temperature Rule Nobody Follows
Most bakers set their ovens to 325°F, but the magic number for these macarons is 300°F. The lower heat ensures the shells stay glossy and prevents the dreaded cracked tops. I once tried the higher temp and ended up with shells that looked like burnt toast – not the look I was aiming for. Trust me, a gentle bake is the difference between a professional finish and a kitchen mishap. If your oven runs hot, use an oven thermometer and lower the setting by another 10‑15 degrees.
Why Your Nose Knows Best
When the shells are drying, you’ll notice a subtle nutty scent rise from the tray. That’s your cue that the skin has formed. If you can’t smell anything, give them a few more minutes. Over‑drying can make the shells too brittle, while under‑drying leads to hollow interiors. Trust your senses – they’re more reliable than a timer. I once let them sit too long and ended up with shells that snapped like dry twigs, which was a disaster for the delicate filling.
The 5‑Minute Rest That Changes Everything
Once you’ve assembled the macarons, let them rest in the fridge for exactly 60 minutes. This short chill lets the ganache set just enough to hold its shape while still being luscious. If you skip this step, the filling will be too runny, and the shells will slide apart. On the other hand, leaving them too long (overnight) can make the shells become soggy from the moisture in the ganache. A precise rest time is the sweet spot.
The “No‑Mess” Piping Technique
Use a large, sturdy piping bag and a ½‑inch tip. Before you start, run the tip through hot water, dry it, and then fill the bag. This prevents the batter from sticking to the tip and creates clean, round shells. If you notice the batter dragging, give the bag a gentle shake or tap the tray again. A smooth pipe leads to uniform shells, which is essential for even baking.
The Final Touch: Light Toast
After the macarons have chilled, give the tops a quick flash under a broiler for 10 seconds. This adds a whisper of caramelization that mimics the toasted marshmallow flavor without actually toasting the marshmallow. It’s a tiny step that makes a huge difference in flavor depth. I tried this on a batch for a friend’s birthday, and they swore it was “the best s’mores they’d ever tasted.”
Creative Twists and Variations
This recipe is a playground. Here are some of my favorite ways to switch things up:
Dark Chocolate & Sea Salt
Swap the milk chocolate for 70% dark chocolate and sprinkle a pinch of flaky sea salt on the ganache before sealing. The bitterness of the dark chocolate balances the sweetness of the marshmallow, while the salt adds a sophisticated pop.
Nutty Peanut Butter
Add a tablespoon of creamy peanut butter to the chocolate ganache and replace half of the graham crumbs with crushed peanuts. The result is a s’mores‑meets‑peanut‑butter cup that’s perfect for a salty‑sweet craving.
Berry Burst
Fold a handful of freeze‑dried raspberry powder into the ganache and sprinkle a tiny raspberry dust on the shell before baking. The tartness cuts through the richness, giving a fresh, summer‑like twist.
Matcha Magic
Add 1 tablespoon of high‑grade matcha powder to the almond flour mixture and use white chocolate instead of milk chocolate. The earthy green hue pairs beautifully with the brown shell, creating a visual and flavor contrast.
Vegan Delight
Replace the egg whites with aquafaba (the liquid from a can of chickpeas) and use coconut cream for the ganache. Choose dairy‑free chocolate and a vegan marshmallow spread. The texture remains airy, and the flavor stays true to the original concept.
Storing and Bringing It Back to Life
Fridge Storage
Place the assembled macarons in an airtight container, layering parchment between layers to prevent sticking. They’ll stay fresh for up to 7 days, and the flavors actually intensify as they sit. For optimal texture, keep them in the fridge rather than the pantry.
Freezer Friendly
If you want to make a big batch, freeze the shells and the ganache separately. Store the shells in a zip‑top bag with a piece of parchment between each layer, and the ganache in a sealed container. They’ll keep for up to 3 months. When you’re ready, thaw the shells at room temperature for 20 minutes, then re‑pipe the ganache.
Best Reheating Method
To revive the macarons after refrigeration, place them on a parchment‑lined tray and warm them in a 300°F oven for 3‑4 minutes. Add a tiny splash of water (a teaspoon) to the tray before heating; the steam will bring back that melt‑in‑your‑mouth softness without making the shells soggy. This trick works wonders for those who love a slightly warm filling.