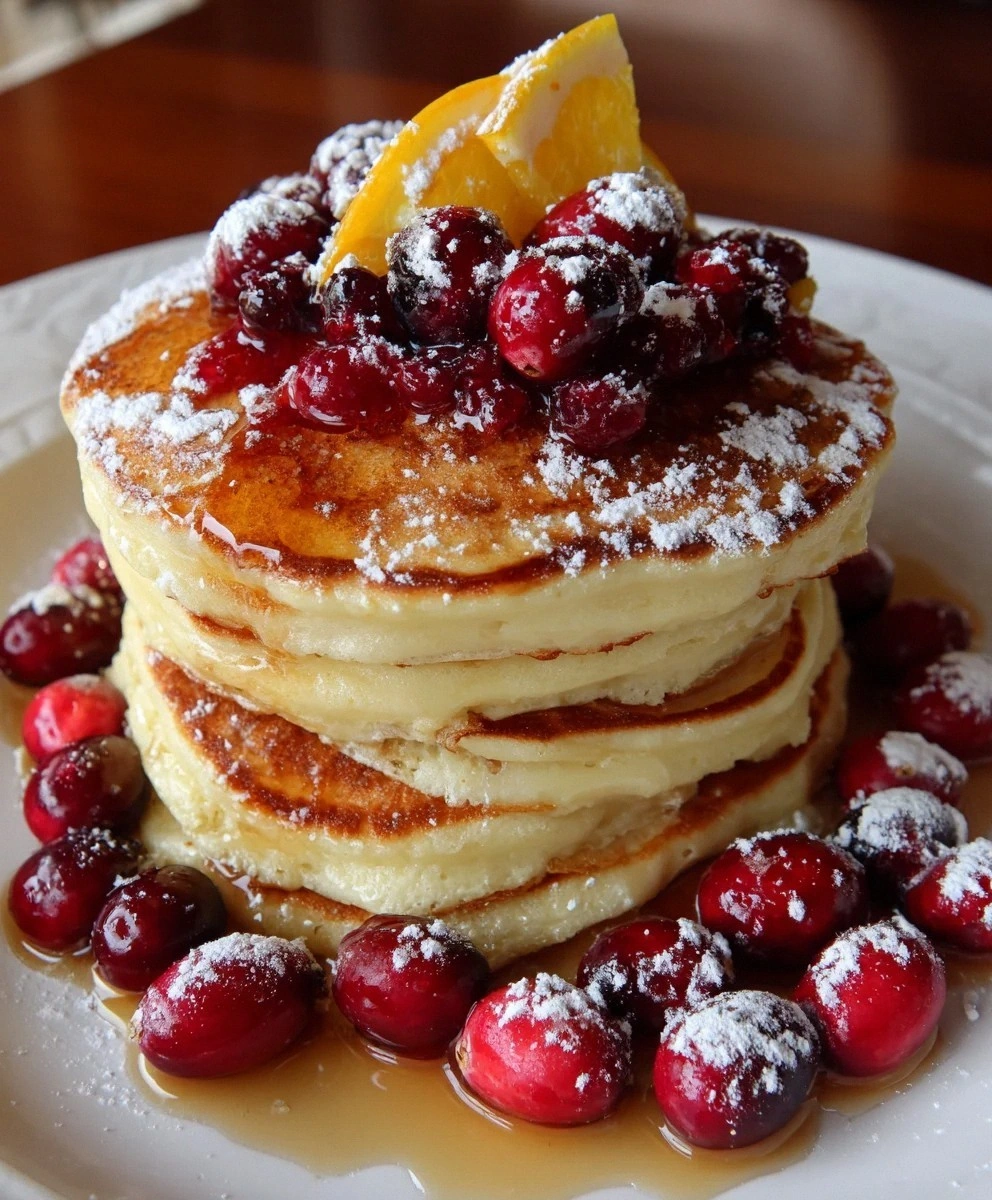
I burned an entire batch of pancakes last winter because I was too busy daydreaming about these exact flavors. The smell of scorched batter still haunts me, but it led to this revelation: cranberry orange ricotta pancakes aren't just another weekend breakfast — they're the breakfast that'll ruin all other pancakes for you forever. Picture this: it's 7 AM, your kitchen window is fogged with steam, and you're flipping these golden beauties that puff up like tiny clouds. The tart cranberries burst against your tongue while the orange zest dances through every bite, and that ricotta? It transforms everything into something so luxuriously tender that regular pancakes suddenly taste like cardboard.
Most recipes get this completely wrong. They dump in ricotta like an afterthought, toss in some sad dried cranberries, and call it a day. But here's what actually works: fresh cranberries that pop and bleed their ruby juice into the batter, orange zest so fragrant it perfumes your entire house, and ricotta whipped into the wet ingredients until it's silkier than your favorite cashmere sweater. I dare you to taste this and not go back for seconds. Actually, I'll be honest — I ate half the batch before anyone else got to try it, standing over the stove in my pajamas, flipping and eating like some kind of pancake-obsessed maniac.
The magic happens when those cranberries hit the hot pan. They don't just cook — they explode into jammy pockets of tartness that cut through the richness like a knife through butter. That sizzle when it hits the pan? Absolute perfection. Your neighbors will smell it and show up uninvited. Future pacing here: Picture yourself pulling these off the griddle, stacking them like edible gold coins, watching the steam rise as orange-scented clouds drift through your kitchen. This is hands down the best version you'll ever make at home, and I'm about to show you exactly why.
Let me walk you through every single step — by the end, you'll wonder how you ever made it any other way.
What Makes This Version Stand Out
- The Ricotta Revolution: Instead of just plopping ricotta into the batter, we whip it until it's lighter than air. This creates pancakes so tender they practically dissolve on your tongue, with a protein boost that keeps you satisfied until dinner. Most recipes miss this crucial step and end up with dense, heavy cakes.
- Fresh Cranberry Magic: Frozen or dried cranberries can't compete with fresh ones that burst in the heat, creating pockets of tart juice that balance the sweetness perfectly. It's like having little surprises hidden throughout each pancake, making every bite a tiny adventure.
- Orange Zest Technique: We use both zest and juice, but here's the trick — zest goes into the sugar first, getting rubbed together to release those essential oils. This distributes orange flavor through every molecule of batter, not just random bites.
- Temperature Precision: Most home cooks blast their pancakes on high heat, ending up with raw centers and burnt outsides. We use medium-low heat and a water droplet test that ensures even cooking, creating that coveted golden-brown crust.
- Make-Ahead Brilliance: The batter actually improves after resting 30 minutes, letting the flour hydrate and the flavors meld. Make it the night before and wake up to pancake perfection — no morning stress, just pure breakfast joy.
- Texture Contrast: By folding the cranberries in at the very end, we prevent them from bleeding too much, creating beautiful ruby streaks instead of pink batter. It's visual drama on your plate that tastes as good as it looks.
Alright, let's break down exactly what goes into this masterpiece...
Inside the Ingredient List
The Flavor Base
All-purpose flour forms the backbone of these pancakes, but not just any flour will do. You want the good stuff — unbleached, fresh from a bag you opened this month, not that ancient bag lurking in your pantry since 2019. The protein content here is crucial: too much and your pancakes turn tough, too little and they fall apart when you flip them. This isn't just about structure though — fresh flour actually tastes like something, with subtle nutty notes that get lost in old, stale flour. If you've ever wondered why restaurant pancakes taste better, start here.
Granulated sugar does more than sweeten — it's a texture wizard that helps create those lacy edges we all fight over. But here's what most recipes miss: the sugar needs to mingle with that orange zest first, creating a fragrant, citrus-infused sugar that perfumes the entire batter. Use regular white sugar here, not brown or coconut sugar, because we want clean sweetness that won't compete with our tart cranberries. And yes, you can reduce it if you're the type who puts kale in smoothies, but why would you want to?
The Texture Crew
Ricotta cheese is the secret weapon that separates amateur pancakes from breakfast nirvana. But don't just grab any ricotta — look for whole milk ricotta that's creamy, not grainy. The cheap stuff tastes like wallpaper paste and will ruin everything. Whip it with the eggs until it's smoother than a pick-up line at a coffee shop, and watch how it transforms your batter into something almost mousse-like. This isn't just about richness either; the protein in ricotta creates structure while keeping everything tender.
Baking powder and baking soda are your rise-and-shine team, but they're picky about their working conditions. Baking powder gives you lift, baking soda gives you browning, but they need acidic ingredients to activate properly. Enter: orange juice and ricotta. This dynamic duo creates carbon dioxide bubbles that make your pancakes puff up like proud peacocks. Use fresh leavening agents — if your baking soda has been open longer than your last relationship, it's time to replace it.
The Unexpected Star
Fresh cranberries are non-negotiable here, and I will fight anyone who says otherwise. Frozen ones turn to mush, dried ones taste like candy, but fresh cranberries? They're tiny explosions of autumn that transform these pancakes from good to legendary. Pick through them carefully, discarding any soft ones, and don't chop them — the whole berry creates dramatic pops of color and flavor. If you're making these in summer and fresh cranberries are harder to find than a parking spot at the beach, freeze your own when they're in season.
Orange zest carries the essential oils that make orange flavor sing, while the juice adds brightness and helps activate our leavening. Use a microplane for the zest — those old box graters will give you chunky pieces that taste bitter. And please, for the love of breakfast, use an actual orange, not that bottled stuff. Real zest smells like sunshine and happiness, while the bottled kind smells like disappointment and broken dreams.
The Final Flourish
Vanilla extract might seem boring, but it's the background singer that makes the stars shine brighter. Use pure vanilla, not imitation — yes, it's expensive, but you're worth it. The vanilla rounds out the sharp edges of citrus and cranberry, creating harmony in your mouth. Just a teaspoon does the trick, adding warmth and depth that makes people ask "what's that amazing flavor?"
Unsalted butter gives us control over our salt levels while adding richness that vegetable oil can't match. Melt it and let it cool slightly — hot butter will scramble your eggs, and nobody wants scrambled egg pancakes. The butter creates those crispy lacy edges that shatter like thin ice when you bite into them, contrasting beautifully with the tender interior.
Everything's prepped? Good. Let's get into the real action...
The Method — Step by Step
- Start by creating your orange-sugar base: In a large bowl, combine your granulated sugar with the orange zest. Now here's where the magic begins — use your fingertips to rub the zest into the sugar for a full minute. Don't rush this part. As you work, you'll notice the sugar becoming damp and intensely fragrant, like you've opened a window in a Florida orange grove. This step distributes orange oil through every grain of sugar, ensuring consistent flavor throughout your pancakes. Set this aside while you prep everything else, letting those flavors marry and intensify.
- In a separate medium bowl, whisk together your flour, baking powder, baking soda, and salt. This isn't just dumping ingredients together — whisk vigorously for 30 seconds to fully distribute the leavening agents. Nobody wants a pancake that rises on one side and stays flat on the other. Use a balloon whisk and really work some air into the dry ingredients. This also helps break up any lumps that could create dense spots in your finished pancakes. Think of it as giving your flour a little spa treatment before the main event.
- Now for the game-changer: In another bowl, beat your ricotta with the eggs until it's completely smooth and lighter in color. This takes about 2 minutes with a whisk, or 30 seconds with an electric mixer on medium. The ricotta should lose its grainy texture and become almost whipped cream-like. If you're still seeing lumps, keep going — those lumps will create dense, heavy spots in your pancakes. This step incorporates air into the ricotta, which translates to fluffier pancakes. It's like giving your pancakes a secret weapon they'll deploy in the pan.
- Melt your butter and let it cool slightly while you add the milk, vanilla, and orange juice to the ricotta mixture. Whisk everything together until it's smooth and homogenous. The mixture should look like a thin milkshake and smell like an orange creamsicle. If your butter is still hot, drizzle it in slowly while whisking constantly — we're making pancakes, not scrambled eggs. This wet mixture should be at room temperature when it hits the pan, so if it's cold from the fridge, let it sit for 10 minutes.
- Here's where most people mess up: Create a well in your dry ingredients and pour in the wet mixture. Use a rubber spatula to fold everything together with as few strokes as possible. The batter should be lumpy — I repeat, LUMPY — like it has an attitude problem. Overmixing develops gluten, which creates tough, chewy pancakes that could double as hockey pucks. You should still see streaks of flour and the batter should look like it barely got introduced to each other at a party. Trust the process here.
- Now comes the fun part: Gently fold in your fresh cranberries using the same minimal-stroke technique. They'll create beautiful ruby streaks throughout the batter, like edible art. Don't worry if some break — a few broken berries add color and distribute cranberry flavor throughout. The batter should look like a Jackson Pollock painting, all streaks and surprises. At this point, let the batter rest for 15-30 minutes if you have time. This allows the flour to hydrate and the baking powder to activate, creating taller, fluffier pancakes.
- Heat your skillet or griddle over medium-low heat. This is crucial — too hot and the outside burns before the inside cooks. Test by flicking a few drops of water onto the surface — they should dance and evaporate, not just sit there or disappear instantly. Lightly grease with butter or neutral oil, but don't go crazy. You want just enough to prevent sticking, not so much that your pancakes fry. Wipe out excess with a paper towel — your pan should look barely shiny, not greasy.
- Pour 1/4 cup batter for each pancake, spacing them about 2 inches apart. Resist the urge to press them down or swirl the pan — let them be. Cook for 2-3 minutes until bubbles form on the surface and the edges look set and slightly dry. The bottoms should be golden-brown with darker edges. This is the moment of truth — don't walk away from the stove here. Peek underneath by lifting with a thin spatula, but don't flip too early or you'll have a broken, misshapen mess.
- Flip once, confidently and quickly, like you mean it. Cook the second side for 1-2 minutes until golden. The second side cooks faster, so stay alert. Press gently on the center — it should spring back when done. If you're making a large batch, keep finished pancakes warm on a wire rack in a 200°F oven. Don't stack them or they'll steam and get soggy. Serve immediately with real maple syrup, or keep them warm while you cook the rest. Watch them disappear faster than free samples at Costco.
That's it — you did it. But hold on, I've got a few more tricks that'll take this to another level...
Insider Tricks for Flawless Results
The Temperature Rule Nobody Follows
Your pan temperature is everything, and most home cooks get this catastrophically wrong. Too hot and you get burnt outsides with raw centers — a culinary crime. Too cool and your pancakes absorb grease like tiny edible sponges, turning heavy and sodden. The sweet spot is medium-low, where a drop of water sizzles gently but doesn't disappear instantly. I keep a small bowl of water next to the stove and test every few batches. A friend tried skipping this step once — let's just say it didn't end well for her breakfast guests.
Here's the pro move: Start with a slightly cooler pan for your first batch, then adjust up. The first pancakes are always the ugliest anyway, so use them as your temperature gauge. As the pan heats up from use, you might need to reduce the heat slightly. Think of it as a conversation with your stove — you're constantly adjusting, listening, responding. The perfect pancake tells you when it's ready — bubbles form, edges set, and it releases easily from the pan.
Why Your Nose Knows Best
Trust your sense of smell more than your eyes. When the first hint of nutty, buttery aroma wafts up, your pancake is probably ready to flip. This happens about 30 seconds before visual cues appear. Professional cooks rely on this timing instinct, developed after thousands of pancakes. If you wait until you see perfect bubbles, you might have already missed the optimal flip moment. The smell should be warm and inviting, not sharp or burnt.
But here's what nobody tells you: every kitchen is different. Gas versus electric, cast iron versus nonstick, humid versus dry climates — all these factors change timing. So while I'm giving you guidelines, your nose is your ultimate guide. That first whiff of pancake perfection is like a secret handshake between you and breakfast. Once you recognize it, you'll never burn another pancake again.
The 5-Minute Rest That Changes Everything
After mixing your batter, walk away for five minutes. I know, I know — you're hungry and the coffee's ready. But this rest allows the flour to fully hydrate, baking powder to start working, and gluten to relax. The result? Taller, fluffier pancakes with a more complex texture. It's like the difference between a quick handshake and a proper greeting — both work, but one is so much better.
During this rest, you'll notice the batter thickening slightly as the flour absorbs liquid. This is good — it means your pancakes won't spread too thin in the pan. If you absolutely can't wait, even two minutes helps, but five is the magic number. Use this time to heat your pan, prep your syrup, or just breathe. Good things come to those who wait, especially in pancake form.
Creative Twists and Variations
This recipe is a playground. Here are some of my favorite ways to switch things up:
The White Chocolate Dream
Fold in 1/2 cup of chopped white chocolate along with the cranberries. The chocolate melts into creamy pockets that pair beautifully with tart cranberries. It's like having cheesecake for breakfast, but socially acceptable. The white chocolate adds richness without overwhelming the delicate orange flavor. If you've got a sweet tooth that won't quit, drizzle with orange-infused maple syrup.
Lemon Blueberry Bliss
Swap orange zest and juice for lemon, and replace cranberries with fresh blueberries. This creates a brighter, more summery version that tastes like sunshine on a plate. The lemon makes these incredibly refreshing, perfect for hot mornings when heavy breakfasts feel wrong. Blueberries are more forgiving than cranberries — they won't burst as dramatically, but they create beautiful purple swirls throughout.
The Tropical Escape
Replace orange with lime zest and juice, swap cranberries for diced fresh mango, and add 2 tablespoons of toasted coconut to the dry ingredients. Suddenly you're having breakfast in the Caribbean, even if you're stuck in a studio apartment in February. The lime and mango create a sweet-tart combination that's utterly addictive. Top with coconut flakes toasted in butter for extra crunch.
Chocolate Orange Indulgence
Add 3 tablespoons of cocoa powder to your dry ingredients and reduce flour by 2 tablespoons. Fold in dark chocolate chips instead of cranberries. This creates a sophisticated flavor profile that tastes like those fancy chocolate oranges, but in pancake form. The cocoa adds depth without making them heavy, and the chocolate chips create molten pockets of joy.
Savory Brunch Hero
Omit the sugar, swap orange for lemon, skip the cranberries, and fold in chopped fresh herbs and crumbled goat cheese. Serve with smoked salmon and hollandaise for a brunch that'll make you forget all about sweet breakfasts. The ricotta keeps them tender while the goat cheese adds tang. These are sophisticated enough for company but easy enough for lazy Sundays.
Protein Powerhouse
Add 2 tablespoons of vanilla protein powder to your dry ingredients and an extra egg white to the wet mixture. This creates pancakes that'll fuel your morning workout without tasting like punishment. The protein powder actually improves the texture, making them even fluffier. Perfect for those days when you need breakfast to work harder for you.
Storing and Bringing It Back to Life
Fridge Storage
Let your pancakes cool completely on a wire rack before storing — stacking them hot creates steam that leads to soggy, sad pancakes. Store in an airtight container with parchment paper between layers for up to 4 days. They'll firm up slightly in the fridge, but that's actually good for reheating. The flavors continue to meld and improve, making day-two pancakes almost better than fresh ones. Almost.
Don't make my mistake of wrapping them while warm — I ended up with a single, giant pancake brick that required a chisel to separate. If you're storing for more than a day, consider freezing instead. The fridge works best for short-term storage when you know you'll eat them within a few days.
Freezer Friendly
These freeze beautifully for up to 2 months. Cool completely, then flash-freeze on a baking sheet for 30 minutes before transferring to freezer bags. This prevents them from sticking together in one solid mass. Squeeze out as much air as possible — frozen pancakes are prone to freezer burn that'll ruin their delicate texture. Label with the date because trust me, you'll forget what month you made them.
The best part? They go straight from freezer to toaster for quick weekday breakfasts. Or microwave for 30 seconds, then toast for perfect texture — soft inside, crispy outside. If you've got a house full of teenagers, make a double batch and freeze half. They'll disappear faster than ice cream in July.
Best Reheating Method
Skip the microwave unless you're desperate — it makes them rubbery and sad. Instead, pop them in the toaster or toaster oven for 2-3 minutes until heated through and slightly crispy on the edges. Add a tiny splash of water before reheating — it steams back to perfection, recreating that fresh-off-the-griddle texture. For large batches, reheat on a baking sheet in a 350°F oven for 8-10 minutes.
If you're feeling fancy, reheat in a buttered skillet over medium heat for 2 minutes per side. This recreates that fresh-cooked flavor and texture that's almost indistinguishable from the original. It's worth the extra effort for weekend brunches when you want to impress without the morning effort.