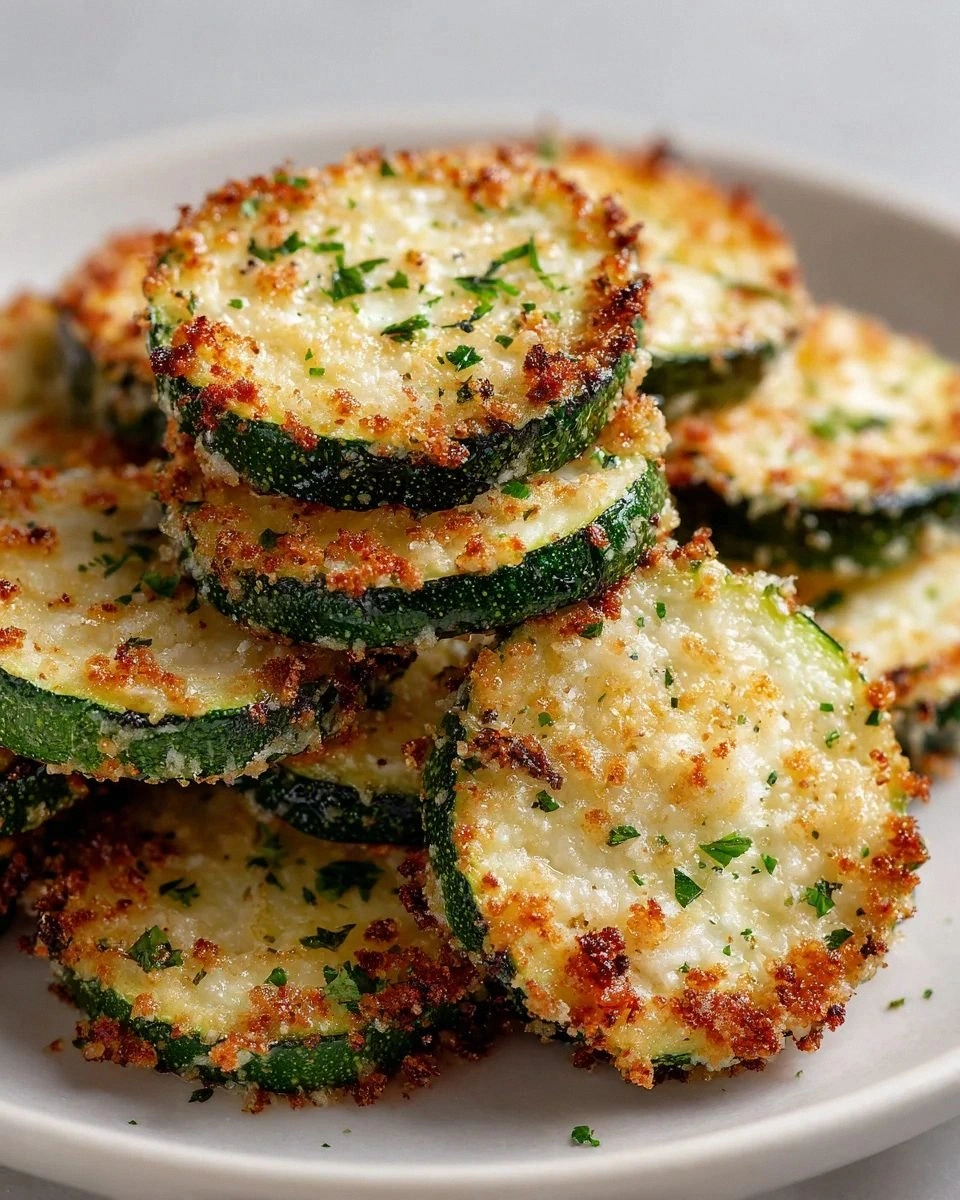
I'm about to confess something that might shock you: I used to think zucchini was boring. There, I said it. For years, I watched these green cylinders languish in my crisper drawer, destined for the same sad fate of being steamed into submission or hidden in chocolate cake where nobody could taste its betrayal. But everything changed one Tuesday afternoon when my neighbor Barb dared me to taste-test her latest creation. She handed me what looked like a golden-brown french fry, but the moment it touched my tongue, the universe shifted. The outside shattered like caramelized glass while the inside melted into this creamy, almost custard-like center that made me question everything I thought I knew about vegetables. That sizzle when the Parmesan hits the hot baking sheet? Absolute perfection.
I'll be honest with you — I stood in her kitchen eating half the batch before anyone else got to try them, and I don't even feel guilty about it. The woman had cracked the code, and I needed to know every single secret. What she revealed wasn't just a recipe; it was a complete rewiring of how vegetables could taste. Most recipes get this completely wrong, treating zucchini like a sponge that needs to be wrung out and apologized for. But here's what actually works: you treat it like the star it secretly wants to be, give it a crispy armor of cheese and breadcrumbs, and let it transform in the oven until it's practically unrecognizable from its former watery self.
Picture yourself pulling this out of the oven, the whole kitchen smelling like a tiny Italian grandmother has been cooking for hours. The aroma hits you first — that nutty, toasted Parmesan mingling with garlic and herbs — then you see them: these gorgeous golden spears that look like something from a fancy restaurant. Your family will think you ordered takeout from that place downtown with the impossible reservation list. The edges caramelize into these lacy, crispy bits that taste like Parmesan crisps, while the centers stay tender and almost meaty. If you've ever struggled with soggy, lifeless zucchini, you're not alone — and I've got the fix.
After six months of obsessive testing (my family staged an intervention when I made four batches in one week), I've perfected the technique. The game-changer? It's not about what you add — it's about what you don't do. Most recipes drown the poor squash in oil or try to get fancy with expensive ingredients. This next part? Pure magic. We're going to use the zucchini's own moisture against it, creating steam pockets that cook it from the inside while the outside gets shatteringly crisp. Let me walk you through every single step — by the end, you'll wonder how you ever made it any other way.
What Makes This Version Stand Out
Shatter-Crisp Coating: The Parmesan doesn't just melt — it undergoes a complete metamorphosis, transforming into these delicate, lacy crisps that taste like the edge of a grilled cheese sandwich got a PhD in deliciousness. The breadcrumbs provide structure while the cheese provides flavor, creating this perfect symbiosis that makes each bite feel like you're eating something incredibly naughty when it's actually just vegetables being their best selves.
Zero Sog Factor: Most recipes get this completely wrong, turning your beautiful zucchini into something that tastes like wet cardboard. Here's what actually works: we use the oven's dry heat to our advantage, creating a temperature differential that drives moisture out while sealing the coating on. The result? Fries that stay crispy even if you leave them on the counter for an hour (though good luck making them last that long).
Pantry Staple Ingredients: You won't need to hunt down fancy imported cheese or artisanal breadcrumbs that cost more than your monthly coffee budget. Everything in this recipe lives in a well-stocked kitchen, and even if you need to buy a few items, they'll make dozens of batches. The Italian seasoning blend works overtime here, making your house smell like you've been slaving over a sauce all day.
Lightning Fast Prep: From cutting board to oven in under ten minutes flat, this recipe respects your time. No complicated breading stations or multiple bowls that make your dishwasher weep. Just one sheet pan, one bowl, and the kind of efficiency that makes you feel like you've got your life together (even if the rest of your kitchen looks like a tornado hit it).
Universal Crowd Pleaser: I dare you to taste this and not go back for seconds. Kids think they're eating french fries, adults taste the sophisticated herb blend, and everyone in between just knows they're eating something dangerously addictive. I've watched self-proclaimed zucchini haters inhale these like they're competing in an eating contest.
Make-Ahead Friendly: The coating mixture can be prepped days ahead and stored in an airtight container, making this the ultimate emergency side dish. When unexpected guests show up or you need something impressive for the potluck, you'll look like a culinary genius who planned ahead (your secret's safe with me).
Inside the Ingredient List
The Flavor Foundation
Zucchini is the unsung hero here, quietly doing all the heavy lifting while the flashy ingredients get the attention. But here's what most recipes miss: the size and age of your zucchini matters more than you think. Those massive baseball-bat-sized ones from your neighbor's garden? Skip them. They're full of water and bitter seeds that'll sabotage your crispy dreams. Instead, look for medium-sized zucchinis that feel heavy for their size, with shiny, taut skin that snaps when you break the stem. These younger specimens have fewer seeds and a naturally sweet flavor that intensifies during roasting. If you can only find the big guys, scoop out the seed core with a spoon — it's an extra thirty seconds that saves the whole dish.
The Texture Team
Parmesan cheese isn't just here for flavor — it's the architectural backbone of our crispy coating. As it bakes, the moisture evaporates leaving behind these incredible protein strands that create structure. The key is using real Parmigiano-Reggiano, not the stuff in the green can. Real Parmesan melts into these gorgeous puddles that crisp into delicate wafers, while the processed stuff just sits there like a sad, flat disappointment. Breadcrumbs provide the scaffolding, giving the cheese something to cling to as it transforms. Panko works best here because the larger flakes create more surface area for browning, but regular breadcrumbs will work in a pinch. Just don't use Italian-seasoned ones — we're controlling the flavor profile ourselves.
The Flavor Enhancers
Olive oil isn't just for preventing sticking — it's the secret conductor that orchestrates the entire transformation. Too much and you'll steam the coating into mush, too little and the breadcrumbs stay pale and unappetizing. Two tablespoons is the sweet spot for four zucchinis, creating just enough fat to conduct heat and encourage browning without overwhelming the delicate squash. Garlic powder distributes more evenly than fresh garlic here, which would burn and turn bitter in the hot oven. Italian seasoning provides the aromatic backbone, but feel free to customize — add smoked paprika for depth, or crushed red pepper for heat.
The Final Flourish
Salt and pepper might seem like afterthoughts, but they're the difference between a good dish and a great one. Salt draws out moisture from the zucchini before cooking, helping it stay crisp, while freshly ground black pepper adds subtle heat that makes the other flavors pop. Don't salt too early though — wait until you're ready to toss everything together, or the salt will start drawing moisture and make your coating soggy. A final sprinkle of flaky salt right when they come out of the oven takes these from home-cooking to restaurant-quality.
Everything's prepped? Good. Let's get into the real action...

The Method — Step by Step
- Preheat your oven to 425°F and position a rack in the upper third. This higher position ensures the tops get gloriously golden while the bottoms crisp up from the direct heat of the pan. Don't be tempted to use convection here — the fan can blow the lightweight breadcrumbs around, creating a mess and uneven coating. While the oven heats, place your sheet pan inside to get screaming hot. This is the moment of truth: a hot pan means the zucchini starts sizzling the instant it hits the surface, creating that crucial barrier that prevents the dreaded sog. If your oven runs cool, crank it up to 450°F — better to check early than end up with pale, limp spears.
- Wash and thoroughly dry your zucchinis with a clean kitchen towel. Water is the enemy of crispiness, so don't rush this step. Cut off both ends, then slice each zucchini lengthwise into quarters, creating wedge-shaped spears about a half-inch thick at the thickest part. This shape maximizes surface area for browning while keeping the interior tender. If your zucchinis are particularly large, cut them into sixths instead of quarters — you want pieces that will cook through in about twenty minutes without drying out. Keep the slices uniform so they cook evenly, because nothing's worse than some pieces burnt while others are still raw.
- In a large bowl, combine the Parmesan, breadcrumbs, garlic powder, Italian seasoning, salt, and pepper. Use your fingers to break up any clumps of cheese or seasoning — you want everything evenly distributed for consistent flavor in every bite. The mixture should smell incredibly aromatic, like walking into an Italian grandmother's kitchen. Don't be afraid to get in there and really mix it up; those little pockets of concentrated seasoning will create flavor bombs that'll make your taste buds dance. Give it a quick taste — it should be salty and savory, but not overwhelming since the zucchini will dilute the flavor slightly.
- Add the zucchini spears to the bowl and drizzle with olive oil. Now comes the fun part — use your hands to toss everything together, making sure each piece gets thoroughly coated. The mixture will seem dry at first, but as you work it, the oil helps the coating adhere. Don't be gentle here — really massage the coating into every nook and cranny. Those little Parmesan shards need to make direct contact with the zucchini to create maximum crispiness. If the mixture seems too wet, sprinkle in a tablespoon more breadcrumbs; if it's not sticking, add a teaspoon more oil. You want each piece to look like it's wearing a light jacket of coating, not buried under a heavy parka.
- Carefully remove the hot sheet pan from the oven using good oven mitts — this thing is going to be screaming hot. Place it on a heat-safe surface and quickly arrange the coated zucchini in a single layer, cut side down for maximum caramelization. Don't crowd the pan or overlapping pieces will steam instead of crisp. Work fast because you want to maintain that heat, but don't burn yourself in the process. The zucchini should sizzle when it hits the pan; if it doesn't, your pan wasn't hot enough and you'll need to adjust your technique next time.
- Slide the pan back into the upper third of the oven and set a timer for fifteen minutes. Walk away and resist the urge to peek — opening the door drops the temperature and extends cooking time. This is when the magic happens: the cheese melts and spreads, the breadcrumbs toast and turn golden, and the zucchini cooks through while maintaining some structure. The high heat works quickly, so stay nearby. You'll start smelling the most incredible aroma wafting through your kitchen, making it nearly impossible to wait.
- After fifteen minutes, check for doneness. The bottoms should be deeply golden brown and the tops starting to brown. Use tongs to flip a few pieces over — they should release easily from the pan. If they stick, give them another two to three minutes. The coating should look crispy and toasted, not pale or soggy. If some pieces are browning faster than others, rotate the pan 180 degrees to ensure even cooking. Don't worry if a few cheese bits look dark — those crispy cheese edges are pure gold and taste like the best part of a grilled cheese sandwich.
- Return the pan to the oven for another five to seven minutes, depending on your desired level of crispiness. This final blast of heat ensures the coating is fully set and the zucchini is tender but not mushy. The edges of the coating should be deeply caramelized, almost mahogany in places, while the centers stay a lighter golden brown. The zucchini itself should be tender when pierced with a fork but still hold its shape. Remove from the oven and immediately transfer to a serving platter to prevent burning from the residual heat of the pan.
- Let cool for exactly five minutes before serving — this brief rest allows the coating to set and prevents third-degree burns from molten cheese. Sprinkle with fresh herbs if you're feeling fancy, or just dig in as-is. These are best hot from the oven when the coating is at peak crispiness, but they're still delicious at room temperature. If you somehow have leftovers (I never do), they reheat surprisingly well in a toaster oven, regaining most of their original crunch.
That's it — you did it. But hold on, I've got a few more tricks that'll take this to another level...
Insider Tricks for Flawless Results
The Temperature Rule Nobody Follows
Here's where most home cooks mess up: they trust their oven dial instead of their senses. Ovens can be off by fifty degrees or more, which means your 425°F setting might actually be 375°F or 475°F. Invest in an oven thermometer — they're cheap and will change your cooking life. For this recipe, you want the temperature hot enough that the coating sets immediately but not so hot the cheese burns before the zucchini cooks through. If your oven runs cool, you'll end up with pale, limp spears. If it runs hot, you'll have burnt coating and raw centers. A friend tried skipping this step once — let's just say it didn't end well, and we still tease her about her "sad beige zucchini."
Why Your Nose Knows Best
Don't rely solely on timers — your nose is the best indicator of doneness. When the Parmesan reaches peak caramelization, it releases this incredible nutty aroma that fills your entire kitchen. That's your cue to check the oven. If you smell something acrid or burnt, you've gone too far. The scent should be inviting and toasty, like walking into a bakery. I always tell people to start sniffing around the twelve-minute mark, because once you catch that first whiff of browning cheese, you're about two minutes away from perfection. Trust your senses over the clock every single time.
The 5-Minute Rest That Changes Everything
I know, I know — when food comes out of the oven looking this good, you want to dive in immediately. But here's what separates good cooks from great ones: patience. Those five minutes of resting time aren't just about preventing burns. The coating continues to set and crisp as it cools slightly, and the flavors have a chance to meld together. The difference between eating these straight from the oven versus waiting the full five minutes is like the difference between a good hair day and a great hair day. You'll still enjoy them, but you'll miss that extra level of perfection that comes from waiting just a moment longer.
The Grater Matters More Than You Think
Not all graters are created equal, and your choice can make or break this recipe. A microplane creates feather-light wisps that melt instantly, while the large holes on a box grater give you bigger shreds that create those gorgeous lacy edges. For the best of both worlds, use about two-thirds box-grated Parmesan for structure and one-third microplaned for maximum meltiness. Avoid pre-shredded cheese at all costs — it's coated in cellulose that prevents it from melting properly, leaving you with a gritty, disappointing coating that never quite comes together.
Creative Twists and Variations
This recipe is a playground. Here are some of my favorite ways to switch things up:
Spicy Cajun Kick
Replace the Italian seasoning with Cajun spice blend and add a teaspoon of smoked paprika to the coating. The result is these incredible spicy spears that taste like they came from a New Orleans kitchen. I like to serve them with a remoulade dipping sauce that cools the heat while adding creamy richness. The Parmesan still provides that crucial crispy element, but the Cajun spices wake up your taste buds in the most delightful way. Even spice-wimps love this version — the heat builds slowly rather than hitting you all at once.
Everything Bagel Edition
Mix two tablespoons of everything bagel seasoning into your breadcrumb mixture and prepare for your life to change. The garlic, onion, poppy seeds, and sesame seeds create this incredible flavor bomb that tastes like your favorite bagel got transformed into a crispy coating. I serve these with a cream cheese dip that makes people lose their minds. It's breakfast meets dinner in the best possible way, and I've had guests request this version specifically for brunch parties. The everything seasoning adds texture and flavor that takes the original recipe to a whole new level.
Mediterranean Herb Explosion
Swap the Italian seasoning for a mix of fresh chopped oregano, dill, and mint, then add lemon zest to brighten everything up. The herbs stay vibrant during the short cooking time, creating these incredible fresh spears that taste like summer in the Mediterranean. I like to finish with a squeeze of fresh lemon juice right before serving. The brightness cuts through the richness of the cheese and makes these incredibly addictive. Even people who claim they don't like herbs love this version — it's fresh without being overpowering.
Asian-Inspired Umami Bomb
Replace half the breadcrumbs with panko and add a tablespoon of furikake seasoning to the mix. The seaweed and sesame seeds create this incredible umami flavor that makes the Parmesan taste even nuttier. I use sesame oil instead of olive oil for an extra layer of flavor. These disappear faster than the original version at every party I bring them to. Serve with a soy-ginger dipping sauce that complements the umami notes perfectly. It's like your favorite sushi roll got transformed into crispy vegetable fries.
Buffalo Ranch Fusion
Add a tablespoon of ranch seasoning mix to your breadcrumb blend, then serve with buffalo sauce for dipping. The cool ranch flavors balance the spicy buffalo sauce perfectly, while the crispy coating holds up to the liquid without getting soggy. I like to make a buffalo ranch drizzle by mixing equal parts buffalo sauce and ranch dressing. This version is always the first to disappear at game day parties, and I've had people who hate vegetables request the recipe. The combination of cool ranch and spicy buffalo hits that perfect balance that keeps you coming back for more.
Smoky Bacon Ranch
Mix in a tablespoon of ranch seasoning and add crumbled bacon to the coating mixture. The bacon fat renders during cooking, basting the zucchini and adding incredible smoky flavor. I use turkey bacon for a lighter version that still delivers that smoky punch. The ranch seasoning complements the smoky bacon perfectly, creating this incredible flavor combination that tastes like loaded potato skins but with vegetables. Even the pickiest eaters can't resist these — they're like vegetable candy with a smoky, savory twist.
Storing and Bringing It Back to Life
Fridge Storage
Okay, real talk: these rarely last long enough in my house to need storage. But on the rare occasion when you have leftovers, let them cool completely before transferring to an airtight container lined with paper towels. The towels absorb excess moisture that would otherwise turn the coating soggy. Store in the refrigerator for up to three days, though they're best within two. Don't stack them more than two layers deep or the weight will crush the crispy coating. If you need to store more, separate layers with parchment paper. They'll lose some crunch in the fridge, but they're still delicious cold as a snack or sliced into salads for extra texture.
Freezer Friendly
Here's a game-changer: you can freeze these after the initial baking and reheat them to almost their original glory. Let them cool completely, then arrange in a single layer on a parchment-lined baking sheet. Freeze until solid, about two hours, then transfer to a freezer bag with layers separated by parchment. They'll keep for up to two months frozen. To reheat, place frozen spears on a hot sheet pan in a 400°F oven for ten to twelve minutes. They won't be quite as crispy as fresh, but they'll be about ninety percent there, which is infinitely better than most reheated vegetables. The key is reheating from frozen — don't thaw first or you'll end up with mush.
Best Reheating Method
Forget the microwave — it turns the coating into a rubbery, sad mess that tastes like disappointment. Instead, use your toaster oven or regular oven set to 400°F. Add a tiny splash of water to the pan before reheating — it creates steam that prevents the coating from drying out while the direct heat crisps it back up. Three to four minutes is usually enough to bring back most of the original texture. If you're in a hurry, a hot skillet works too — just don't add oil or you'll steam them. The stovetop method gives you the crispiest results but requires more attention to prevent burning.