I still remember the exact moment my love affair with chile crema began — and it wasn't in some fancy restaurant or during a culinary vacation to Oaxaca. Nope, it started with a complete kitchen disaster that would have sent most people running for the nearest takeout menu. Picture this: it was 11:47 PM on a Tuesday, I'd just burned my third batch of enchiladas (don't ask), and all I had left in my fridge was a sad bag of wrinkled chiles, some heavy cream that was dangerously close to expiring, and an avocado that looked like it had seen better days. In my desperation, I started tossing things into my blender, half-expecting to create something barely edible. What emerged was this silky, smoky, addictively spicy concoction that had me standing at my kitchen counter, eating it straight off the spoon like it was liquid gold. My roommate walked in, caught me in the act, and after one taste, we ended up demolishing the entire batch with nothing but stale tortilla chips and zero shame.
That midnight miracle became my obsession. For the next six months, I tested every possible combination of chiles, creams, acids, and aromatics. I drove my friends crazy, showing up to every gathering with a mason jar of "just one more version" that I swore was the ultimate recipe. They stopped complaining after the third party when people started following me around asking for the recipe. Here's what I discovered: most chile crema recipes are playing it way too safe, creating something that tastes like spicy sour cream. That's not what we're making today. This version is bold, complex, and has layers of flavor that make people close their eyes after the first bite. It's the sauce that transforms everything it touches — from eggs to grilled vegetables to that sad rotisserie chicken you grabbed on the way home.
What makes this chile crema different? It's all about the technique, baby. We're not just blending ingredients and calling it a day. We're going to toast, char, bloom, and layer flavors like we're conducting a symphony. The result is a sauce that's simultaneously bright and deep, creamy yet with a clean finish, spicy but not in that one-note way that makes your tongue go numb. This is the sauce that'll have you planning entire meals around it, the condiment that makes you excited to open your fridge at midnight. I dare you to taste this and not go back for seconds — actually, I double dare you, because I still haven't met anyone who can resist it.
Let me walk you through every single step — by the end, you'll wonder how you ever made it any other way.
What Makes This Version Stand Out
Before we dive into the nitty-gritty, let me tell you why this chile crema will ruin all other creamy sauces for you. This isn't just another recipe floating around the internet — it's the result of countless trials, errors, and midnight epiphanies. Every element has been tested and perfected to create something that tastes like it came from the kitchen of a Michelin-starred Mexican restaurant, but requires zero fancy equipment or hard-to-find ingredients.
- Smoky Complexity: Most recipes miss the crucial charring step that transforms ordinary chiles into something extraordinary. We're talking deep, campfire-smoky notes that make people ask "what IS that incredible flavor?" after just one taste.
- Texture That Defies Physics: This sauce coats your tongue like velvet but somehow feels light and almost airy. It's not that heavy, gloopy texture that sits in your stomach like a rock. The secret lies in the temperature control and blending technique that creates micro-bubbles for that cloud-like consistency.
- Heat That Builds Beautifully: Instead of that harsh, upfront spice that overwhelms everything, this crema delivers heat that arrives fashionably late to the party. It starts creamy and bright, then the warmth creeps in slowly, building to a pleasant tingle that makes you want another bite immediately.
- Make-Ahead Magic: Here's what nobody tells you — this sauce actually gets BETTER after a day in the fridge. The flavors meld and deepen in a way that'll make you want to double the batch every single time. I've had friends hide it from their families just so they could have it all to themselves.
- Ingredient Integrity: Every component pulls its weight. No fillers, no unnecessary thickeners, nothing that dilutes the pure chile flavor we're celebrating. It's like the difference between a mass-produced chocolate bar and single-origin craft chocolate — once you taste the good stuff, there's no going back.
- Versatility That'll Blow Your Mind: This isn't just for tacos (though it's incredible on them). I've used it as salad dressing, stirred it into scrambled eggs, dolloped it on grilled fish, and even used it as a dip for apple slices when I was feeling adventurous. It's the Swiss Army knife of condiments.
- Zero Waste Philosophy: The recipe uses every part of the chiles, including the seeds and membranes that most people discard. That's where a lot of the heat and flavor live, and toasting them separately gives you control over the spice level while adding incredible depth.
Alright, let's break down exactly what goes into this masterpiece...
Inside the Ingredient List
Here's where we get intimate with every component that makes this sauce sing. I'm not just giving you a shopping list — I'm telling you exactly what each ingredient does, why it matters, and what happens if you try to cheat (spoiler: don't). Each element has been carefully selected and tested to create a sauce that's greater than the sum of its parts. Trust me, I've tried the shortcuts, and they lead to disappointment and sad tacos.
The Flavor Foundation
The dried chiles are the heart and soul of this recipe, and using the right ones makes the difference between "meh" and "where has this been all my life?" Guajillo chiles bring that beautiful red color and complex berry-like sweetness with mild heat. They're like the reliable friend who always shows up and makes everything better. Ancho chiles add deep, raisin-like sweetness and chocolatey undertones that give the sauce its mysterious complexity. These two work together like a perfectly matched couple — each brings out the best in the other. If you can't find guajillos, New Mexico chiles will work in a pinch, but they lack that subtle fruitiness that makes this sauce special.
The Texture Crew
Mexican crema is the gold standard here, but I know it's not always easy to find. It's thinner than sour cream, tangier than heavy cream, and has this luxurious texture that clings to food without overwhelming it. If you can't find it, full-fat sour cream works, but you'll need to thin it with a splash of milk or water to get the right consistency. Heavy cream adds richness and helps emulsify everything into that silky smooth texture we're after. The fat content is crucial — it carries all those chile flavors and helps distribute them evenly across your taste buds. Skimp here and you'll end up with a grainy, separated sauce that breaks your heart (and your tacos).
The Unexpected Star
Here's where things get interesting. A small piece of ripe avocado adds body and creates this impossibly smooth texture that makes people think you've added butter or some kind of fancy technique. It's not enough to taste like guacamole — just enough to add richness and help emulsify everything into sauce perfection. The avocado also helps stabilize the sauce, keeping it from separating in the fridge. I've had batches last a week with the avocado addition, while versions without it start to break down after three days.
The Final Flourish
Lime juice adds brightness and cuts through the richness, but timing is everything. Add it too early and the acid can curdle the dairy, add it at the end and you get this beautiful, fresh lift that makes all the other flavors pop. Cilantro stems (not leaves!) provide that herbal note without the sometimes overpowering flavor of the leaves. The stems are milder, more complex, and they blend seamlessly into the sauce. Garlic gets roasted until sweet and mellow, adding depth without that harsh raw bite that ruins so many sauces.
Everything's prepped? Good. Let's get into the real action...
The Method — Step by Step
This is where the magic happens, and I'm not being dramatic when I say that following these steps precisely will change your sauce game forever. I've broken down every single movement, every visual cue, every moment where you need to pay attention because this is where most people go wrong. They rush, they skip steps, they think "close enough" will cut it. But you're not going to do that, because you want the sauce that makes people write songs about (okay, maybe just enthusiastic Instagram posts).
-
Start by toasting your dried chiles in a dry cast iron pan over medium heat. This isn't the time to check your phone or start chopping other ingredients — stay present and watch them like a hawk. You're looking for them to become pliable and fragrant, about 30-45 seconds per side. They should puff up slightly and you might see a few wisps of smoke, but don't let them burn or they'll turn bitter. The smell should be intoxicating, like walking into a Mexican spice market, not acrid or sharp. Remove them immediately and place in a bowl of hot water to rehydrate for 20 minutes.
-
While the chiles soak, char your fresh chile (jalapeño or serrano) directly over a gas flame or under your broiler. You want blistered, blackened skin that's practically falling off. This charring adds a smoky depth that you can't get any other way. Place it in a plastic bag or covered bowl for 5 minutes — this steaming makes the skin slip right off. Peel, seed, and roughly chop. That sizzle when the skin hits the flame? That's the sound of flavor being born.
-
Drain the soaked dried chiles, but don't throw away that soaking liquid — it's liquid gold. Reserve at least a cup of it. Remove the stems and seeds from the chiles, but save the seeds separately. These seeds are your heat control panel; we'll toast them separately to add back in gradually until we hit the perfect spice level. It's like having a volume knob for heat instead of just an on/off switch.
-
Heat a tablespoon of oil in your pan and toast the chile seeds and membranes over medium-low heat. This is where patience pays off big time. Stir constantly for about 3 minutes until they turn a shade darker and smell nutty and toasty. This transforms the harsh heat into something complex and almost sweet. Add these gradually to your sauce, tasting as you go. Most people skip this step and wonder why their sauce tastes one-dimensional.
-
In the same pan, roast your garlic cloves, unpeeled, until the skins are charred and the insides are soft and sweet. This takes about 10 minutes, turning occasionally. The garlic transforms from sharp and pungent to mellow and almost caramel-like. Once cool enough to handle, slip the cloves out of their skins. Your kitchen should smell like heaven right about now.
-
Now for the blending magic. Start with your drained dried chiles, the charred fresh chile, roasted garlic, cilantro stems, and a quarter cup of that reserved soaking liquid. Blend until you have a smooth paste, stopping to scrape down the sides as needed. The mixture should be thick but pourable, like a very thick smoothie. Add more soaking liquid a tablespoon at a time if needed.
-
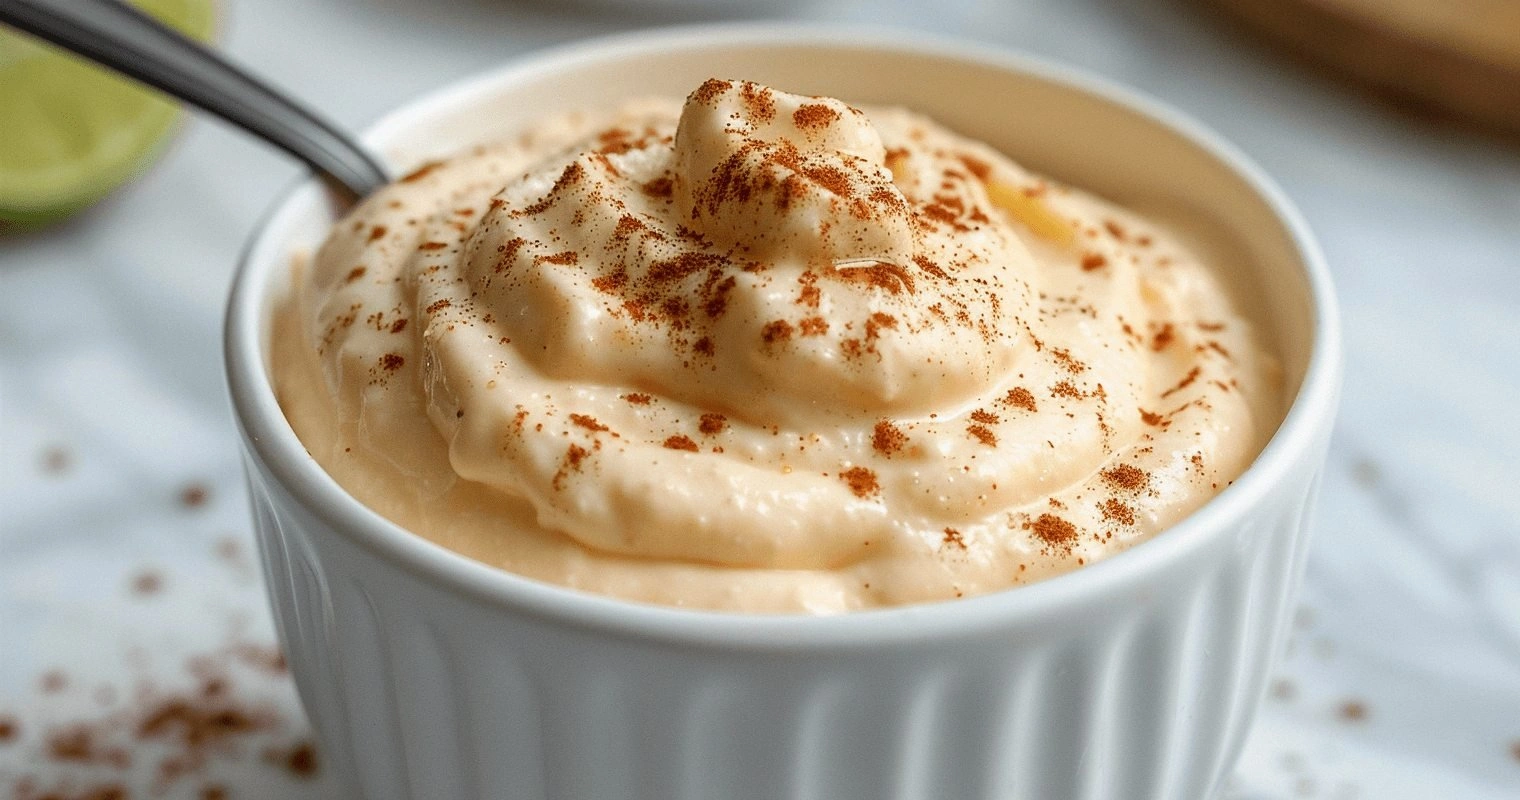
Add your Mexican crema, heavy cream, avocado, and half a teaspoon of salt. Blend until absolutely smooth and creamy, about 2 minutes. The color should be a beautiful terracotta red, and the texture should coat the back of a spoon. If it's too thick, thin with more cream or milk. Too thin? Blend in a bit more avocado. The sauce should ribbon off a spoon when you lift it.
-
Here's the crucial step that separates good chile crema from life-changing chile crema: taste and adjust. Add your toasted chile seeds gradually, blending and tasting between additions. You want heat that builds, not punches you in the face. Add lime juice a teaspoon at a time, stopping when the sauce tastes bright and fresh. Season with salt until it tastes almost too salty on its own — it'll mellow when served with food.
-
Strain the sauce through a fine-mesh sieve into a clean bowl. This step is non-negotiable for that restaurant-quality smoothness. Use a rubber spatula to press and scrape, getting every last bit of liquid gold. You'll be amazed at how much silkier the sauce becomes. Discard the solids, cover the bowl, and let it rest in the fridge for at least 30 minutes. This resting time lets the flavors meld and the texture set up perfectly.
-
Before serving, give it a good stir and taste again. Sometimes it needs a touch more lime juice or salt after chilling. The consistency should be pourable but thick enough to cling to whatever you're putting it on. If it's too thick, thin with a splash of milk or water. Too thin? Whisk in a bit more crema or let it sit uncovered in the fridge to thicken. Your chile crema is now ready to transform everything it touches.
That's it — you did it. But hold on, I've got a few more tricks that'll take this to another level...
Insider Tricks for Flawless Results
After making this sauce more times than I care to admit (my blender practically has a permanent spot on my counter), I've discovered some game-changing secrets that separate the good from the legendary. These aren't just nice-to-know tips — they're the difference between a sauce that's merely tasty and one that makes people close their eyes and sigh with pleasure. Some of these I learned through happy accidents, others through stubborn determination to squeeze out every last drop of flavor.
The Temperature Rule Nobody Follows
Here's something that'll blow your mind: the temperature of your ingredients dramatically affects the final texture. Cold crema straight from the fridge will seize up when blended with warm chiles, creating a grainy texture that no amount of straining will fix. Let your dairy come to room temperature for 30 minutes before blending. Conversely, your chiles should be warm from toasting and blending. This temperature harmony creates an emulsion that's so smooth, it's almost glossy. A friend tried skipping this step once — let's just say it didn't end well, and she ended up with a sauce that looked like cottage cheese.
Why Your Nose Knows Best
Don't underestimate the power of smell during every step of this process. Your nose is your built-in quality control system. The chiles should smell toasty and slightly sweet, never bitter or acrid. The garlic should smell sweet and mellow, not sharp. When blending, the sauce should smell complex and inviting, not harsh or one-note. If something smells off, trust your instincts and start over. I've saved countless batches by catching problems early through smell alone. That moment when everything comes together and you get that perfect aroma? Pure magic.
The 5-Minute Rest That Changes Everything
After blending, let the sauce rest for exactly five minutes before straining. This brief pause allows the flavors to meld and any air bubbles to rise to the surface, making the straining process cleaner and more effective. During this time, the color often deepens slightly as the chile particles fully hydrate. Use these five minutes to clean your blender and prep your straining setup — it's efficient and makes cleanup way easier. This tiny pause also lets you taste the sauce at its peak, when the flavors have had a moment to get to know each other properly.
The Acid Balance Secret
Most people add lime juice at the end and call it a day, but here's the real secret: acid needs to be added in stages for maximum impact. Start with a small amount (half a teaspoon) during the initial blend to brighten the base flavors. Then add more at the very end to lift and balance. This two-stage approach creates layers of brightness that evolve as you eat. Sometimes I'll even serve the sauce with lime wedges on the side for people who want extra zing. The acid also helps preserve the vibrant red color, keeping it from turning muddy over time.
The Storage Game-Changer
How you store this sauce can make or break its longevity. Always use a glass container with a tight-fitting lid, and press plastic wrap directly onto the surface before sealing. This prevents oxidation, which can dull both flavor and color. Store it in the coldest part of your fridge (usually the back), not in the door where temperature fluctuates. If you're making it for a party, you can prep it up to three days ahead — the flavors actually improve as they meld. Just give it a good stir before serving, as some separation is natural and totally fine.
Creative Twists and Variations
This recipe is a playground. Here are some of my favorite ways to switch things up when I'm feeling adventurous or when I want to match the sauce to a specific dish. Each variation maintains the soul of the original while exploring new flavor territories. The beauty of mastering the base recipe is that you can riff endlessly once you understand how each component works.
The Smoky Chipotle Version
Swap out one of the dried guajillos for a chipotle pepper in adobo sauce. This version brings serious smoke and a deeper, more complex heat that pairs beautifully with grilled meats. The adobo sauce adds a subtle sweetness that balances the chipotle's intensity. I love this version on grilled corn or as a dip for sweet potato fries. It keeps for a week in the fridge and the smoky flavor intensifies over time. If you really want to go all-in, add a teaspoon of the adobo sauce to the blend.
The Verde Variation
Replace the dried red chiles with roasted tomatillos and poblano peppers for a green version that's bright and tangy. The method stays the same — char everything for depth, blend with crema and avocado, strain for smoothness. This version is incredible on fish tacos or as a salad dressing. The tomatillos add a citrusy note that makes it taste almost like it has lime even before you add any. It's lighter than the red version but still packed with flavor.
The Breakfast Edition
Add a roasted red bell pepper to the original recipe for extra sweetness and body. This version is milder and slightly sweeter, perfect for morning palates. It's incredible on breakfast burritos, eggs Benedict, or even just good toast with avocado. The bell pepper adds vitamin C and makes the sauce a gorgeous coral color. Kids who might find the original too spicy often love this version.
The Asian-Fusion Take
Add a tablespoon of miso paste and swap the lime juice for rice vinegar. This umami bomb is incredible on grilled salmon or as a dip for dumplings. The miso adds depth and saltiness while maintaining the creamy texture. Use it as a base for noodle bowls or thin it out for a unique salad dressing. It's like your chile crema went on vacation to Japan and came back with stories to tell.
The Dessert-Inspired Twist
This sounds crazy, but hear me out: add a tablespoon of cocoa powder and an extra teaspoon of honey. The result is a mole-like sauce that's incredible on grilled pork or as a dip for jicama sticks. The chocolate enhances the chile's complexity without making it taste like dessert. It's sophisticated and unexpected — the kind of thing that makes dinner guests ask for the recipe before they've even finished eating.
The Extra-Hot Challenge
Keep the base recipe but add a scorpion or ghost pepper (just one!) during the initial blend. This is for serious heat seekers only — we're talking endorphin-rush, might-make-you-cry levels of spice. The dairy helps tame the heat slightly, but this version still packs a serious punch. I dare you to taste this and not go back for more, even as your taste buds beg for mercy. Serve with plenty of cold beer and brave friends.
Storing and Bringing It Back to Life
Nothing breaks my heart more than watching good sauce go bad because someone didn't store it properly. After all the love and care you've put into making this chile crema, let's make sure it lives its best life for as long as possible. These storage methods have been tested through countless batches, and they work whether you're meal-prepping for the week or saving that precious sauce for a special occasion.
Fridge Storage
Your chile crema will keep beautifully in the refrigerator for up to 5 days when stored correctly. Always use a clean glass container with a tight-fitting lid — plastic can absorb flavors and odors that will mess with your sauce. Press plastic wrap directly onto the surface before sealing with the lid; this prevents oxidation that can dull both color and flavor. Store it in the back of the fridge where temperature is most stable, not in the door where it fluctuates every time someone opens it. The sauce may thicken when cold, so let it sit at room temperature for 15 minutes before serving, then give it a good stir. If it separates (which is natural), just whisk it back together or give it a quick blitz with an immersion blender.
Freezer Friendly
Here's some great news: this sauce freezes beautifully for up to 3 months! I like to freeze it in ice cube trays for easy portioning. Once frozen solid, pop out the cubes and store them in a freezer bag. Each cube is about 2 tablespoons, perfect for adding to soups or sauces. Thaw overnight in the fridge or at room temperature for about an hour. The texture might be slightly grainy after thawing, but a quick whisk or blend brings it right back to silky smoothness. Never refreeze thawed sauce — plan your portions accordingly. Pro tip: label your freezer bags with the date and heat level, because trust me, you will forget which batch was which.
Best Reheating Method
Most of the time, you'll use this sauce cold or at room temperature, but if you need to warm it up (say, for drizzling over hot food), do it gently. Microwave in 10-second bursts, stirring between each burst, until just warm. Or place the container in a bowl of warm water for 10-15 minutes. Never let it boil or even simmer — the dairy will curdle and you'll end up with a broken, grainy mess. If it does separate (it happens), you can often rescue it by whisking in a teaspoon of warm water or milk. For a quick fix, add a splash of fresh crema and whisk like your life depends on it.