Okay, picture this: it’s a scorching July afternoon, the kind where the air feels like a warm blanket you can’t shake off, and you’ve just walked into the kitchen after a marathon of lawn mowing. Your sweat‑drenched shirt clings to you, the grill is still humming, and somewhere in the distance a kid is yelling, “Ice cream!” I was in the exact same spot, half‑heartedly promising myself a store‑bought treat, when my old friend—who happens to be a self‑appointed ice‑cream guru—dared me to whip up something that would make the neighborhood kids forget about their candy‑filled pockets. I took the challenge, and let me tell you, the result was nothing short of a nostalgic time‑machine that slams you straight into a carnival of pink swirls and sugary joy.
The first thing that hit me was the smell—sweet vanilla hugging the air like a warm hug from a grandma who also happens to be a secret flavor alchemist. As the heavy cream swirled with the condensed milk, it created a glossy river of pink that looked like a sunset over a candy‑coated lake. The sound of the whisk against the bowl was a rhythmic, almost hypnotic tick‑tock, reminding me that good things take a little patience but reward you with a texture that’s smoother than a silk scarf sliding over a marble countertop. When the bubble‑gum extract finally joined the party, it released an aroma so unmistakably playful that even the houseplants seemed to perk up, as if they too wanted a taste of that childhood‑daydream vibe.
Most bubble‑gum ice creams you find online either skimp on the flavor or end up tasting like a watered‑down pink milkshake. This version, however, is a game‑changer because it uses a no‑churn method that preserves the richness of the cream while still delivering that airy, melt‑in‑your‑mouth feel you crave on a hot day. I’ll be honest—I ate half the batch before anyone else could even get a spoonful, and that’s the kind of confession that proves you’ve truly nailed a recipe. The secret? A pinch of pink food coloring that doesn’t just color the ice cream but also amplifies the flavor, and a generous handful of mini gumballs that add a playful crunch that pops like fireworks in your mouth.
And now, the tease you’ve been waiting for: there’s a little trick involving the temperature of the heavy cream that most recipes completely overlook, and it’s what gives this ice cream its velvety body without ever needing an ice‑cream maker. I dare you to taste this and not go back for seconds—because once you’ve experienced this level of summer bliss, ordinary ice cream will feel like a bland apology. Let me walk you through every single step — by the end, you’ll wonder how you ever made it any other way.
What Makes This Version Stand Out
- Flavor Explosion: The combination of pure vanilla and bubble‑gum extract creates a layered taste that starts sweet and finishes with a nostalgic chew.
- Texture Perfection: No‑churn means you get that custard‑like creaminess without the grainy texture that can happen with over‑mixed mixes.
- Simplicity: Only six ingredients, no fancy equipment, and a total hands‑off time of under an hour.
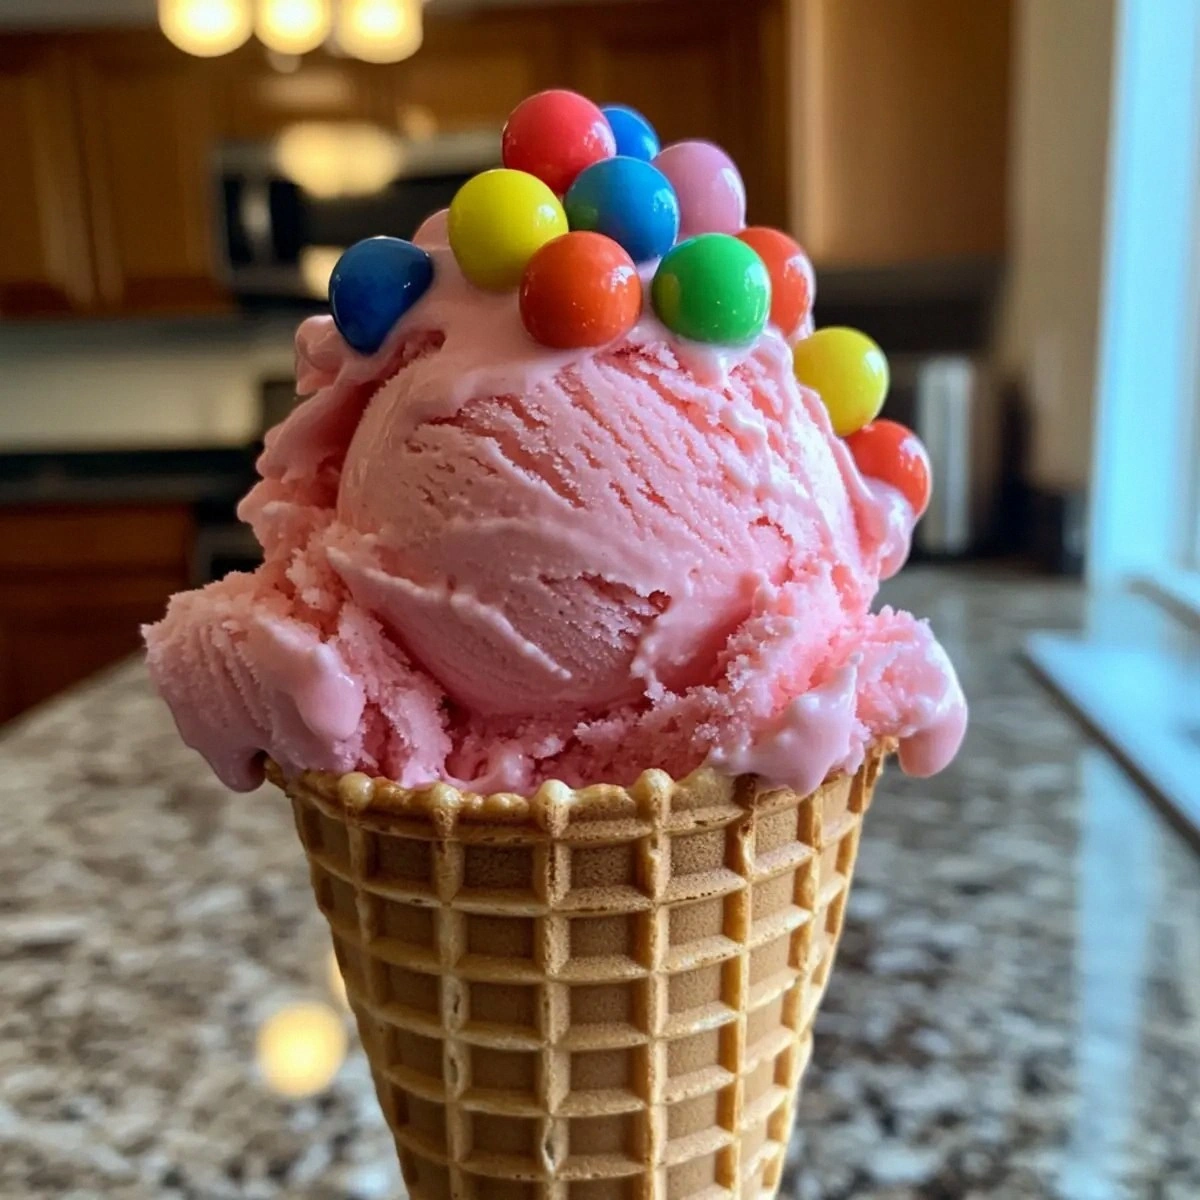
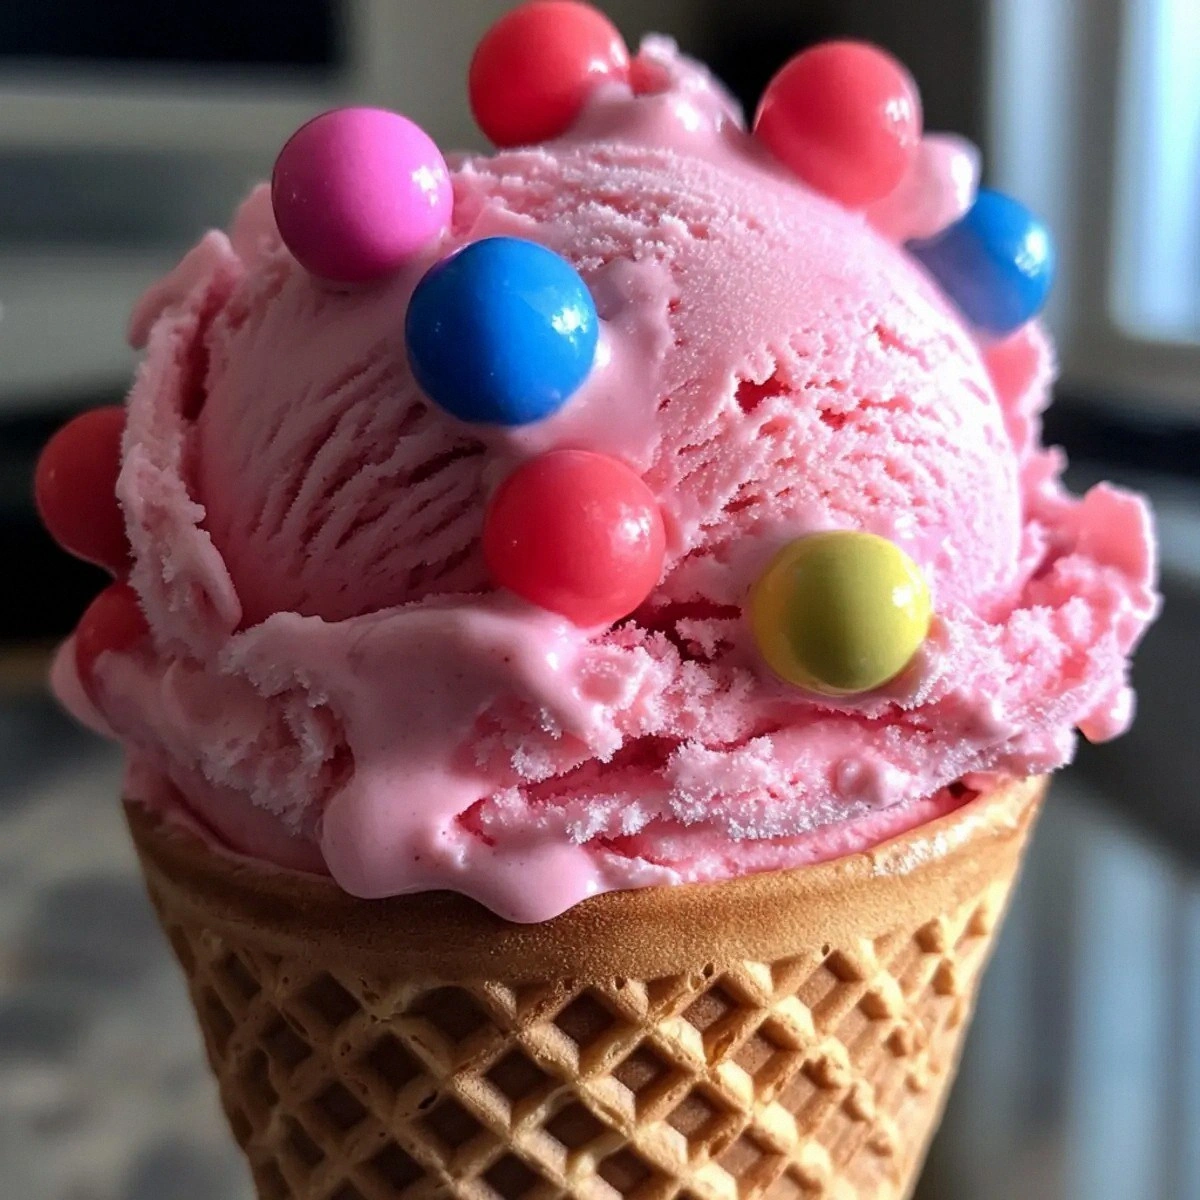
- Visual Wow: The pink hue paired with sparkling mini gumballs makes it a centerpiece for any summer gathering.
- Crowd Reaction: Kids and adults alike can’t resist the playful crunch, turning a simple dessert into a conversation starter.
- Ingredient Quality: Using premium heavy cream and real bubble‑gum extract ensures the flavor isn’t artificial or watery.
- Make‑Ahead Magic: It freezes beautifully, so you can prep it the night before and have it ready for a surprise party.
- Versatile Base: The neutral cream base invites endless variations—think strawberry swirls or chocolate ribbons.
Inside the Ingredient List
The Flavor Base
Heavy cream is the backbone of any no‑churn ice cream. Its high fat content gives the final product that luxurious mouthfeel, coating your palate like a silk scarf. If you skimp on the cream, you’ll end up with a watery, icy mess that screams “store‑bought.” For the best results, choose a cream with at least 36% butterfat and give it a quick sniff—if it smells buttery and fresh, you’re set. As a swap, you could use half‑and‑half, but expect a thinner texture and a less indulgent experience.
Sweetened condensed milk is the hidden hero that adds both sweetness and a custard‑like density without any cooking. This thick, caramel‑gold liquid brings the sugar and dairy together in perfect harmony, preventing ice crystals from forming during freezing. If you’re watching sugar, you can replace half of it with a sugar‑free condensed milk, but be aware that the texture will be a touch lighter and the flavor slightly less rich.
The Texture Crew
Pure vanilla extract is more than a flavor enhancer; it acts as a flavor bridge, smoothing the transition between the buttery cream and the bright bubble‑gum notes. A high‑quality vanilla will have a deep, aromatic profile that lingers long after the first bite. Cheap imitation vanilla can introduce a harsh, chemical aftertaste that ruins the delicate balance. When shopping, look for “pure” on the label and consider the price—a little goes a long way.
Bubble gum extract is the star that delivers that unmistakable nostalgic punch. It’s a concentrated oil that, when used sparingly, provides an intense bubble‑gum flavor without turning the mixture into a syrupy mess. If you can’t find pure extract, a high‑quality bubble‑gum flavored syrup can work, but you’ll need to reduce the added sugar elsewhere to keep the sweetness in check.
The Unexpected Star
Pink food coloring does more than just make the ice cream look Instagram‑ready; the slight acidity in many food‑grade colorings helps brighten the overall flavor profile, making the bubble‑gum taste pop. You can use natural beet juice for a healthier twist, but be prepared for a subtle earthiness that might compete with the bubble‑gum notes. Aim for 1‑2 teaspoons depending on how vivid you want the hue—more color doesn’t always mean more flavor.
The Final Flourish
Mini gumballs are the surprise element that turns this dessert from “nice” to “wow.” Their chewy interior stays firm even when frozen, offering a delightful contrast to the creamy base. If you prefer a softer bite, you can soak the gumballs in a splash of warm water for a minute before folding them in; they’ll swell slightly and become more tender. For a more adult‑oriented version, consider swapping half the gumballs for crushed pink candied nuts.
Everything's prepped? Good. Let's get into the real action...
The Method — Step by Step
First, gather all your ingredients and give them a quick visual check—this is your pre‑flight checklist. I always line up the heavy cream, condensed milk, extracts, coloring, and gumballs on the counter so nothing gets lost mid‑mix. Make sure the heavy cream is cold; if it’s been out for a while, pop it in the freezer for 10 minutes. The moment you pour the cream into the chilled bowl, you’ll hear a faint sigh as the metal welcomes the cold, setting the stage for a perfect whip.
Grab a large mixing bowl (preferably stainless steel) and start whisking the heavy cream on medium‑high speed. The goal is soft peaks—think of a cloud that’s just about to burst. This should take about 3‑4 minutes; you’ll notice the volume swelling dramatically, and the cream will turn a pale ivory. This is the moment of truth—if you over‑whip, you’ll end up with butter, and nobody wants that in bubble‑gum ice cream.
Kitchen Hack: Stop whisking the moment the cream holds a soft peak; you can test by lifting the whisk—if the peak folds over gently, you’re golden.While the cream is resting, open the can of sweetened condensed milk and give it a quick stir to smooth out any skin that may have formed. Then, in a separate small bowl, combine the vanilla extract, bubble‑gum extract, and pink food coloring. The extracts should mingle into a vivid pink syrup that smells like a carnival in a bottle. Pro tip: Add the coloring gradually; you can always deepen the hue later, but you can’t lighten it once it’s too dark.
Now, gently fold the condensed milk into the whipped cream. Use a spatula and a gentle, sweeping motion—think of folding a love letter, not slamming a door. The mixture should turn from ivory to a soft pink, and it will have a glossy sheen that hints at the richness to come. If you see any streaks, keep folding until the texture is uniform; this ensures a silky final product.
Add the flavored syrup (vanilla‑bubble‑gum‑color mix) into the cream‑condensed milk blend. Stir slowly, allowing the flavors to fully integrate. You’ll notice the aroma intensify, filling the kitchen with that unmistakable bubble‑gum perfume. Watch out: Over‑mixing can cause the air you whipped into the cream to escape, resulting in a denser texture.
Watch Out: If the mixture starts looking grainy, you’ve likely over‑mixed; gently fold it back together and add a splash of cold milk to smooth it out.Time for the fun part: fold in the mini gumballs. Sprinkle them over the surface and use a rubber spatula to incorporate them evenly. The gumballs should stay whole, creating little pink jewels throughout the ice cream. If you prefer a more uniform crunch, you can crush half of them before folding, but I love the surprise of whole ones popping out of each bite.
Transfer the mixture into a loaf pan or a freezer‑safe container. Smooth the top with a spatula, then press a piece of parchment paper directly onto the surface to prevent ice crystals from forming. This is where the magic of no‑churn really shines—no ice‑cream maker, just a freezer and a little patience.
Place the container in the freezer. For the first 2‑3 hours, avoid moving it; this allows the base to set solidly. After that, take it out and give it a quick stir with a clean spoon to break any forming crystals. Return it to the freezer for another 2‑3 hours, or until fully firm. The result will be a creamy, pink‑marbled block that’s ready to scoop.
When you’re ready to serve, let the ice cream sit at room temperature for 5‑7 minutes. This softens the edges just enough for a smooth scoop that glides like butter. Serve in chilled bowls, and watch as the pink hue dazzles your guests. And now the fun part—watch their faces light up as they bite into the creamy base and the delightful chew of the gumballs.
That's it — you did it. But hold on, I've got a few more tricks that'll take this to another level. The next section dives into insider tips that will make your bubble‑gum ice cream not just good, but legendary at every summer gathering.
Insider Tricks for Flawless Results
The Temperature Rule Nobody Follows
Never, ever use room‑temperature heavy cream. The colder the cream, the quicker it whips and the more stable the peaks become. I once tried a shortcut with warm cream and ended up with a soupy mess that never set. Keep your cream and mixing bowl in the freezer for at least 15 minutes before you start. This tiny step can be the difference between a velvety scoop and a grainy disappointment.
Why Your Nose Knows Best
When you add the bubble‑gum extract, trust your sense of smell more than the clock. If the aroma feels muted, let the mixture sit for a minute—flavors intensify as the oils mingle. I once added too much extract too quickly and the scent became overpowering; a quick sniff and a brief pause saved the batch. Your nose is the ultimate flavor gauge.
The 5‑Minute Rest That Changes Everything
After folding in the gumballs, let the mixture rest for five minutes before freezing. This brief pause allows the gumballs to absorb a whisper of the surrounding cream, preventing them from sinking to the bottom during the freeze. I’ve seen batches where the gumballs clumped at the base, turning the top into a bland plain—this rest eliminates that issue.
The “No‑Ice‑Crystal” Cover
Press a sheet of parchment paper directly onto the surface of the ice cream before sealing the container. This barrier stops ice crystals from forming, preserving that silky texture you love. If you skip this step, you’ll notice a slightly gritty mouthfeel after a few days in the freezer. Trust me, the extra piece of parchment is worth the minimal effort.
The Secret of the Mini Gumball Pop
If you want the gumballs to pop even more dramatically, give them a quick flash freeze on a baking sheet before folding them in. The cold shock makes their outer coating harder, so when they hit your tongue they crack like tiny candy fireworks. I tried this at a backyard party and the reaction was priceless—kids squealed, adults laughed, and the ice cream became the talk of the night.
Creative Twists and Variations
This recipe is a playground. Here are some of my favorite ways to switch things up:
Strawberry Swirl Surprise
Swap half of the pink food coloring for a fresh strawberry puree and swirl it in after folding the gumballs. The result is a pink‑red marble that tastes like a summer berry patch meeting a candy store. Perfect for guests who love fruit but still crave the novelty of bubble‑gum.
Chocolate‑Covered Gumball Delight
Melt dark chocolate and dip half of the mini gumballs before folding them in. The chocolate coating adds a bittersweet crunch that balances the sugary base, making it a hit for more sophisticated palates. It’s a great way to transition this dessert from a kids’ party to an adult soirée.
Coconut‑Infused Dream
Replace half of the heavy cream with coconut milk and add toasted coconut flakes to the mix. The tropical aroma pairs beautifully with bubble‑gum, creating a beach‑vacation vibe in every bite. This variation is a hit for anyone who loves a hint of the exotic.
Spiked Summer Night
For an adult‑only version, add a tablespoon of vodka or rum to the cream before whipping. The alcohol doesn’t freeze, keeping the texture soft and giving a subtle warmth that pairs surprisingly well with the sweet bubble‑gum notes. Serve in martini glasses for a playful twist.
Nutty Crunch Fusion
Fold in a handful of toasted almond slivers or pistachio pieces alongside the gumballs. The nutty crunch adds depth and a savory counterpoint, making each spoonful a complex experience. It’s perfect for those who love a little extra texture.
Storing and Bringing It Back to Life
Fridge Storage
If you plan to serve within 24 hours, keep the ice cream in the refrigerator (yes, you can, though it will be softer). Store it in an airtight container with a thin layer of parchment paper on top to prevent freezer burn. It will stay creamy for up to two days, making it ideal for a quick dessert after a spontaneous BBQ.
Freezer Friendly
For longer storage, keep the container tightly sealed and place it in the back of the freezer where temperature fluctuations are minimal. The ice cream maintains its texture for up to three weeks. When you’re ready to serve, let it sit at room temperature for 5‑10 minutes; this softens the edges without melting the core.
Best Reheating Method
If the ice cream has become too hard, add a tiny splash (about a teaspoon) of cold water or milk and let it sit for a minute before scooping. The added moisture creates a gentle steam that revives the creamy texture without diluting the flavor. This trick works wonders after a week in the freezer and keeps the experience consistently luscious.