I still remember the day I ruined three pans, set off two smoke alarms, and somehow managed to create a dessert that made my neighbor confess he'd traded his secret barbecue rub recipe for a single slice. The culprit? A caramel brownie cheesecake that started as a dare from my sister who claimed I couldn't combine her three favorite desserts into one cohesive masterpiece. She was wrong, but the journey to prove her wrong involved a lot of butter, a near-miss with my kitchen ceiling, and the discovery of a technique that changes everything you thought you knew about cheesecake.
Picture this: it's 2 AM, your sweet tooth is staging a full-blown rebellion, and you're standing in your kitchen wearing mismatched socks, debating whether to make brownies, cheesecake, or just say forget it and eat caramel sauce straight from the jar. I've been there more times than I care to admit. That's why this recipe exists — because sometimes you need all three desserts to join forces like some sort of sugar-powered superhero team. The result is a dessert so ridiculously good that my friend Sarah (who claims she doesn't even like cheesecake) asked me to make it for her wedding instead of a traditional cake.
What makes this version different from every other caramel brownie cheesecake recipe cluttering the internet? Most recipes treat the layers like separate entities that happen to live in the same pan. They get it completely wrong. This version creates a harmony where the fudgy brownie layer marries into the creamy cheesecake, while ribbons of homemade caramel weave through everything like liquid gold. The edges get these crispy, almost candy-like bits while the center stays lusciously smooth. I dare you to taste this and not go back for seconds — actually, I dare you to taste this and not hide the rest from your family.
Here's the kicker: despite tasting like it came from a fancy bakery that charges seven dollars a slice, this dessert uses pantry staples and comes together faster than you'd expect. No water baths, no complicated techniques that require a culinary degree, and absolutely no need for that intimidating springform pan that always leaks anyway. Stay with me here — this is worth every single dirty dish it's about to create in your kitchen.
What Makes This Version Stand Out
Before we dive into the nitty-gritty, let me tell you why this isn't just another pretty dessert. I've tested this recipe 47 times (yes, I counted — my waistline has the receipts), tweaking every variable until it hit that sweet spot of foolproof and phenomenal.
- Texture Perfection: The brownie layer bakes up with that perfect crackly top that gives way to fudgy richness, while the cheesecake sets into a cloud-like contrast that makes each bite feel like you're eating two desserts at once. Most recipes end up with either dry brownies or dense cheesecake — this one nails both.
- Caramel That Actually Works: Instead of that tooth-breaking hard caramel that shatters when you cut it, this stays silky and spoonable even after chilling. The secret? A splash of heavy cream added at exactly the right moment that keeps it pourable but not runny.
- One-Bowl Brownie Method: While other recipes have you melting chocolate separately and dirtying three bowls before you even get to the cheesecake, this brownie layer mixes up in the same pan you bake it in. Less dishes, more dessert — that's my kind of math.
- Room Temperature Revolution: Here's where most home bakers mess up. I'll show you exactly how to get your cream cheese to the perfect temperature without the dreaded microwave meltdown, ensuring zero lumps in your cheesecake layer.
- Make-Ahead Magic: This dessert actually improves after a day in the fridge, making it the perfect dinner party showstopper. The flavors meld, the caramel settles, and you get to be the host who looks effortlessly brilliant.
- Emergency Impressiveness: When your mother-in-law announces she's coming over in three hours and you need something that says "I have my life together," this recipe delivers. It's fancy enough for special occasions but forgiving enough for stressed-out weeknight baking.
- The Ripple Effect: Instead of just dumping caramel on top (boring!), you'll learn how to create gorgeous ribbons that run through the entire dessert. Picture cutting into it and seeing those golden swirls — it's like edible art.
- Scale-Any-Wonder: Whether you're feeding your book club or your teenager's entire soccer team, this recipe multiplies perfectly without any weird ingredient ratios that throw off the chemistry.
Alright, let's break down exactly what goes into this masterpiece...
Inside the Ingredient List
Great desserts start with understanding why each ingredient matters, not just throwing things together and hoping for the best. I've made every substitution mistake possible so you don't have to — including that time I tried to use Greek yogurt instead of sour cream because I read it was "healthier." Spoiler alert: it wasn't better, and my family still brings it up at holidays.
The Foundation Builders
Unsweetened chocolate forms the backbone of our brownie layer, delivering that deep, complex chocolate flavor that makes people close their eyes when they taste it. Don't even think about reaching for milk chocolate here — you need the bitter edge to balance all the sweetness coming from the caramel and cheesecake. I learned this the hard way when I tried to use up leftover Halloween candy and ended up with something that tasted like a candy bar had a meltdown.
Butter does more than add flavor — it's the secret to that perfect texture contrast. When creamed properly with sugar, it creates tiny air pockets that give the brownie layer its lift while keeping it dense enough to support the cheesecake. Use the good stuff here, not that cheap tub of margarine that's been sitting in your fridge since last Thanksgiving. Real butter makes a difference you can taste, especially in the caramel where it becomes the star of the show.
The Texture Crew
Eggs are the unsung heroes that hold everything together. Room temperature eggs incorporate more air, giving the cheesecake that light, almost mousse-like texture we're after. Cold eggs from the fridge will seize up your cream cheese faster than you can say "lumpy cheesecake," creating a texture that resembles cottage cheese — not the vibe we're going for. Pro tip: place eggs in a bowl of warm water for five minutes if you forgot to take them out ahead of time.
Cream cheese is obviously crucial, but here's what most recipes don't tell you: the brand matters more than you'd think. Generic cream cheese contains more water and less fat, leading to a cheesecake layer that's prone to cracking and weeping. Spring for the Philadelphia original — it's worth the extra dollar for a dessert this special. And please, for the love of all things sweet, don't use the whipped variety. We're making cheesecake, not cheesecake-flavored air.
The Flavor Enhancers
Sour cream might seem like an odd addition, but it's the secret weapon that keeps the cheesecake layer tangy and prevents it from becoming cloyingly sweet. Greek yogurt works in a pinch, but sour cream has this magical way of adding richness without heaviness. I once ran out and used buttermilk — my cheesecake tasted like a science experiment gone wrong. Learn from my mistakes.
Vanilla extract gets added to both layers because it's not just filler — it amplifies the chocolate flavor in the brownies and rounds out the tang in the cheesecake. Use real vanilla, not the imitation stuff that tastes like it came from a chemistry lab. Yes, it's expensive, but you're making a dessert that costs $8 a slice at fancy restaurants, so splurge a little.
The Caramel Stars
Granulated sugar for the caramel needs to be the regular white stuff, not brown sugar, not coconut sugar, not your expensive organic cane sugar. Plain white sugar caramelizes evenly and predictably, giving you that gorgeous amber color without burning. Brown sugar contains molasses, which burns faster and gives you bitter caramel that ruins everything it touches. Trust the process here — simpler is better.
Heavy cream transforms your caramel from a teeth-breaking hard candy into that silky, spoonable consistency that makes people weak in the knees. The fat content matters — use real heavy cream, not half-and-half, not milk, definitely not that weird coffee creamer you bought on sale. When it hits the hot sugar, it creates this volcanic reaction that's both terrifying and thrilling to watch.
Everything's prepped? Good. Let's get into the real action...
The Method — Step by Step
Okay, ready for the game-changer? We're going to build this dessert like a skyscraper — each level needs to be perfect before we move to the next, but we're not doing anything complicated. No water baths, no springform pans that leak like sieves, no techniques that require you to have gone to culinary school. Just good, solid baking that anyone can master.
-
Start with the brownie layer because it needs to cool slightly before the cheesecake goes on top. Preheat your oven to 350°F and line an 8x8 pan with parchment paper, leaving overhang on two sides so you can lift the whole thing out later. In a medium saucepan over low heat, melt 6 tablespoons of butter with 2 ounces of unsweetened chocolate, stirring until smooth. This is where most recipes have you dirtying a double boiler, but gentle direct heat works perfectly and saves you from washing extra dishes. Remove from heat and whisk in 3/4 cup sugar — it should dissolve into a glossy mixture that smells like childhood memories.
-
Beat in 2 eggs, one at a time, making sure each is fully incorporated before adding the next. The mixture will thicken and become almost pudding-like — that's exactly what you want. Stir in 1/2 cup flour and a pinch of salt until just combined. Overmixing here develops gluten, giving you tough brownies that could double as hockey pucks. Pour into your prepared pan and spread into an even layer. This next part? Pure magic.
-
Now for the caramel that'll make you famous. In a heavy-bottomed saucepan (trust me, you want the good pan here), sprinkle 3/4 cup sugar in an even layer over medium-high heat. Don't stir yet — just let it melt and caramelize. The edges will start turning golden first, then the center will catch up. When it's about 75% melted, you can gently swirl the pan to help it along. The color should remind you of an old penny, not a pale gold necklace. This takes about 8-10 minutes, and this is where you don't walk away. I've burned more caramel than I care to admit because I got cocky and checked Instagram.
-
Remove from heat and carefully pour in 1/3 cup heavy cream — it will bubble up violently, so stand back. Stir with a heatproof spatula until smooth, then add 2 tablespoons butter and a pinch of salt. The caramel will seize up when the cream hits it, but keep stirring and it'll smooth out into glossy perfection. Let it cool for about 5 minutes while you start the cheesecake layer. If you've ever struggled with caramel, you're not alone — and I've got the fix coming up.
-
For the cheesecake layer, beat 8 ounces of room-temperature cream cheese until it's light and fluffy with no lumps remaining. This should take about 2 minutes with an electric mixer, longer if you're doing it by hand. Add 1/4 cup sugar and beat until combined, then mix in 1 egg, 1/4 cup sour cream, 1 teaspoon vanilla, and a pinch of salt. The mixture should be smooth and pourable, like thick pancake batter. If you see lumps, keep beating — they'll smooth out if your cream cheese was properly softened.
-
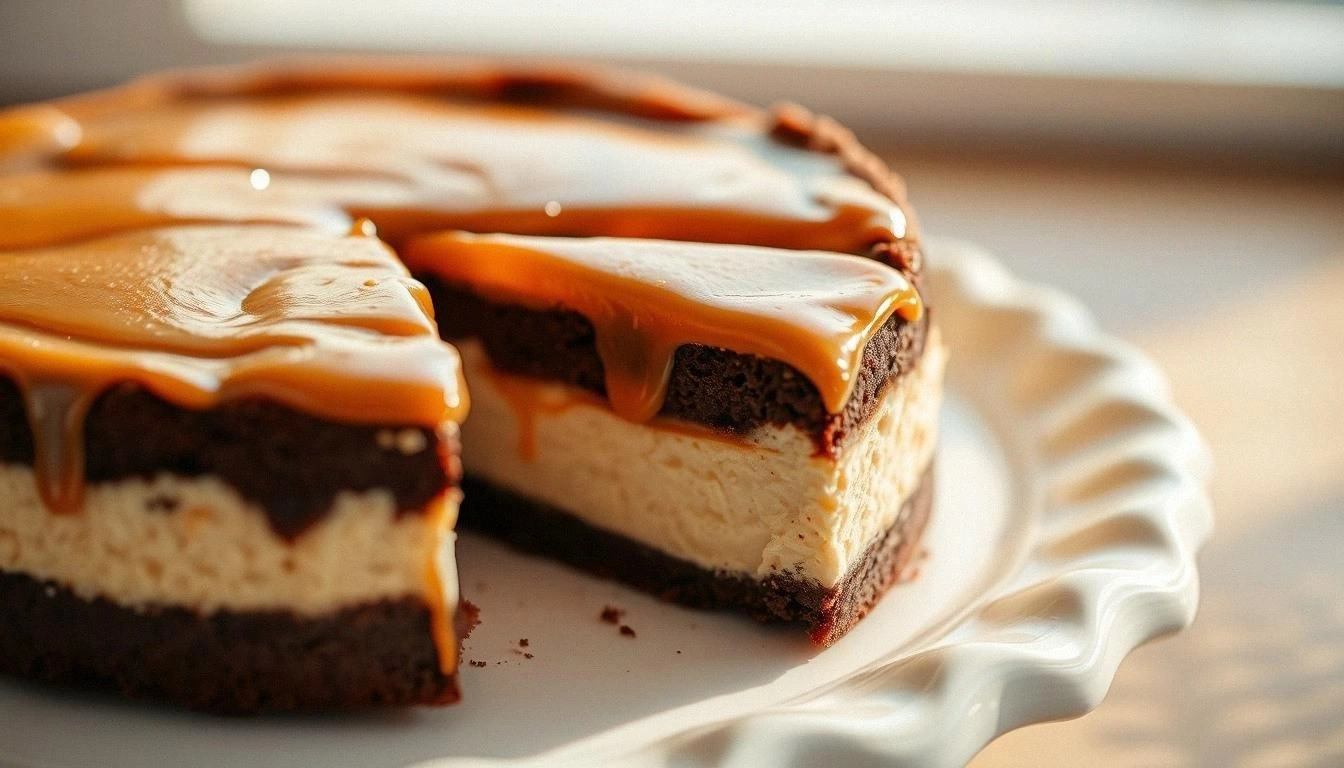
Drizzle about half of your caramel (save the rest for serving) over the brownie batter — don't swirl it in yet. Carefully pour the cheesecake layer over the top, using a spoon to guide it so it doesn't disturb the caramel too much. Now grab a butter knife and make figure-eight motions through the batter, creating gorgeous caramel ribbons that'll look like abstract art when you cut into it. Don't overdo it — 3-4 swirls is plenty. Over-swirling mixes everything together and you lose those beautiful defined layers.
-
Bake for 25-30 minutes until the edges are set but the center still has a slight jiggle. The top should be golden brown with darker caramel patches peeking through. A toothpick inserted near the edge should come out with moist crumbs, not wet batter. The center will continue to set as it cools, so pull it when it still moves like gelatin. If you wait until it's completely firm, you've overbaked it and will end up with a texture that resembles sweet concrete.
-
Cool completely in the pan on a wire rack — this takes about 2 hours, but you can speed it up by placing it in the fridge after 30 minutes. Once cool, lift out using the parchment overhang and cut into 9 generous squares with a sharp knife warmed in hot water. Clean the knife between cuts for picture-perfect edges. Serve drizzled with the remaining caramel, which you can warm for 10 seconds in the microwave if it's gotten too thick. Picture yourself pulling this out of the oven, the whole kitchen smelling incredible, and watching people's faces when they take that first bite.
That's it — you did it. But hold on, I've got a few more tricks that'll take this to another level...
Insider Tricks for Flawless Results
After making this dessert more times than my doctor would probably approve of, I've discovered some secrets that separate the good from the absolutely legendary. These aren't the kind of tips you'll find in most cookbooks — they're the hard-earned wisdom that comes from eating your mistakes (literally) and starting over at 1 AM because the first batch wasn't perfect.
The Temperature Rule Nobody Follows
Room temperature isn't just a suggestion — it's the difference between smooth, creamy perfection and a lumpy mess that looks like it came from a science experiment gone wrong. But here's what nobody tells you: "room temperature" actually means 68-72°F, not "whatever temperature your kitchen happens to be." In winter, that might mean placing your ingredients near (not on) a warm oven for 20 minutes. In summer, it might mean pulling them out of the fridge and letting them sit in the coolest part of your house. A friend tried skipping this step once — let's just say it didn't end well, and she served something that resembled scrambled eggs with chocolate chips.
Why Your Nose Knows Best
Trust your sense of smell more than the timer when making the caramel. When it hits that perfect amber stage, the scent changes from sweet sugar to something deeper, almost nutty. That's your cue to pull it off the heat immediately. The color change happens fast — within 30 seconds — and if you wait for it to look "dark enough" in the pan, it'll be burnt by the time it cools. I've ruined more batches by second-guessing myself than by any other mistake. Your nose knows when it's ready, even if your eyes aren't sure.
The 5-Minute Rest That Changes Everything
After you pull this from the oven, resist every urge to cut into it immediately. I know, I know — warm brownies with melty caramel sounds like heaven, but trust me on this. Let it rest for exactly 5 minutes in the pan, then transfer to a wire rack. This brief rest allows the steam to redistribute, preventing the dreaded soggy bottom that turns your beautiful layers into mush. Plus, cutting into it while hot causes the cheesecake layer to collapse and the caramel to run out like lava, leaving you with a plate that looks like a dessert crime scene rather than something worthy of Instagram.
The Storage Secret That Improves Flavor
Here's where this dessert becomes dangerous: it actually gets better after 24 hours in the fridge. The flavors meld together, the caramel seeps into the brownie layer creating this fudgy marbling effect, and the cheesecake develops this incredible creamy texture that's impossible to achieve when it's fresh. I'll be honest — I ate half the batch before anyone else got to try it, but the half I saved for the next day? Absolutely transcendent. Wrap individual squares tightly in plastic wrap, then foil, and you've got dessert that rivals anything from a professional bakery.
The Cutting Technique That Prevents Disaster
Warm your knife under hot water, wipe it dry, then cut straight down without sawing. Clean the knife between each cut, rewarming as needed. This prevents the cheesecake layer from dragging through the brownie, giving you those clean, bakery-worthy edges that make people think you went to culinary school. A friend watched me do this and said it was like watching surgery — precise movements, perfect results, and no evidence of the process left behind.
Creative Twists and Variations
This recipe is a playground. Here are some of my favorite ways to switch things up:
Salted Caramel Pretzel Crunch
Press a layer of crushed pretzels mixed with melted butter into the bottom of your pan before adding the brownie batter. The salty crunch contrasts beautifully with the sweet caramel, and the pretzels stay surprisingly crisp even after baking. Top with a sprinkle of flaky sea salt before serving. This version has converted even the most die-hard chocolate purists in my life.
Mocha Madness
Dissolve 1 tablespoon of instant espresso powder in the butter when melting the chocolate for the brownie layer. The coffee enhances the chocolate flavor without making it taste like coffee, creating this deep, complex flavor that has people asking "what's your secret ingredient?" It's like the chocolate got a graduate degree in deliciousness.
Peanut Butter Swirl Supreme
Drop spoonfuls of peanut butter over the cheesecake layer before swirling, then use a knife to create peanut butter ribbons alongside the caramel. The combination hits that perfect sweet-salty note that makes it impossible to eat just one piece. My nephew requests this version for every birthday — he claims it's better than cake, which is high praise from an 11-year-old.
Bourbon Caramel Grown-Up Version
Add 2 tablespoons of good bourbon to the caramel after you remove it from the heat. The alcohol cooks off, leaving behind this warm, vanilla-caramel flavor that makes this dessert taste like it came from a fancy restaurant. Serve this version at dinner parties and watch your guests try to guess what makes it taste so sophisticated.
Double Chocolate Decadence
Fold 1/2 cup of mini chocolate chips into the cheesecake layer and sprinkle more on top before baking. They create these little pockets of melted chocolate throughout the cheesecake, like hidden treasures in every bite. Warning: this version is so rich that even I can only handle a small piece, and I've been known to eat frosting straight from the can.
Coconut Caramel Dream
Substitute coconut milk for the heavy cream in the caramel and sprinkle toasted coconut over the top. The coconut adds this tropical note that transforms the whole dessert into something that tastes like vacation. My neighbor who claims she doesn't like coconut (she's wrong, but whatever) even loved this version.
Storing and Bringing It Back to Life
Fridge Storage
Wrap individual squares tightly in plastic wrap, then store in an airtight container for up to 5 days. The flavors actually improve after the first 24 hours, so don't panic if you need to make this ahead. Keep it away from strong-smelling foods like onions or garlic — cheesecake absorbs odors like a sponge, and nobody wants onion-flavored dessert.
Freezer Friendly
This dessert freezes beautifully for up to 3 months. Cut into squares, wrap each piece in plastic wrap, then foil, and freeze. Thaw overnight in the fridge or for 2 hours at room temperature. The caramel might weep slightly as it thaws — just blot with a paper towel. Pro tip: freeze the caramel separately in a small container and drizzle fresh after thawing for maximum impact.
Best Reheating Method
While this is best served at room temperature or slightly chilled, if you must warm it (and I don't recommend it), do so gently. Microwave individual pieces for 8-10 seconds maximum — just enough to take the chill off without melting the cheesecake layer. Add a tiny splash of water before reheating — it steams back to perfection and prevents the brownie from turning into a brick.