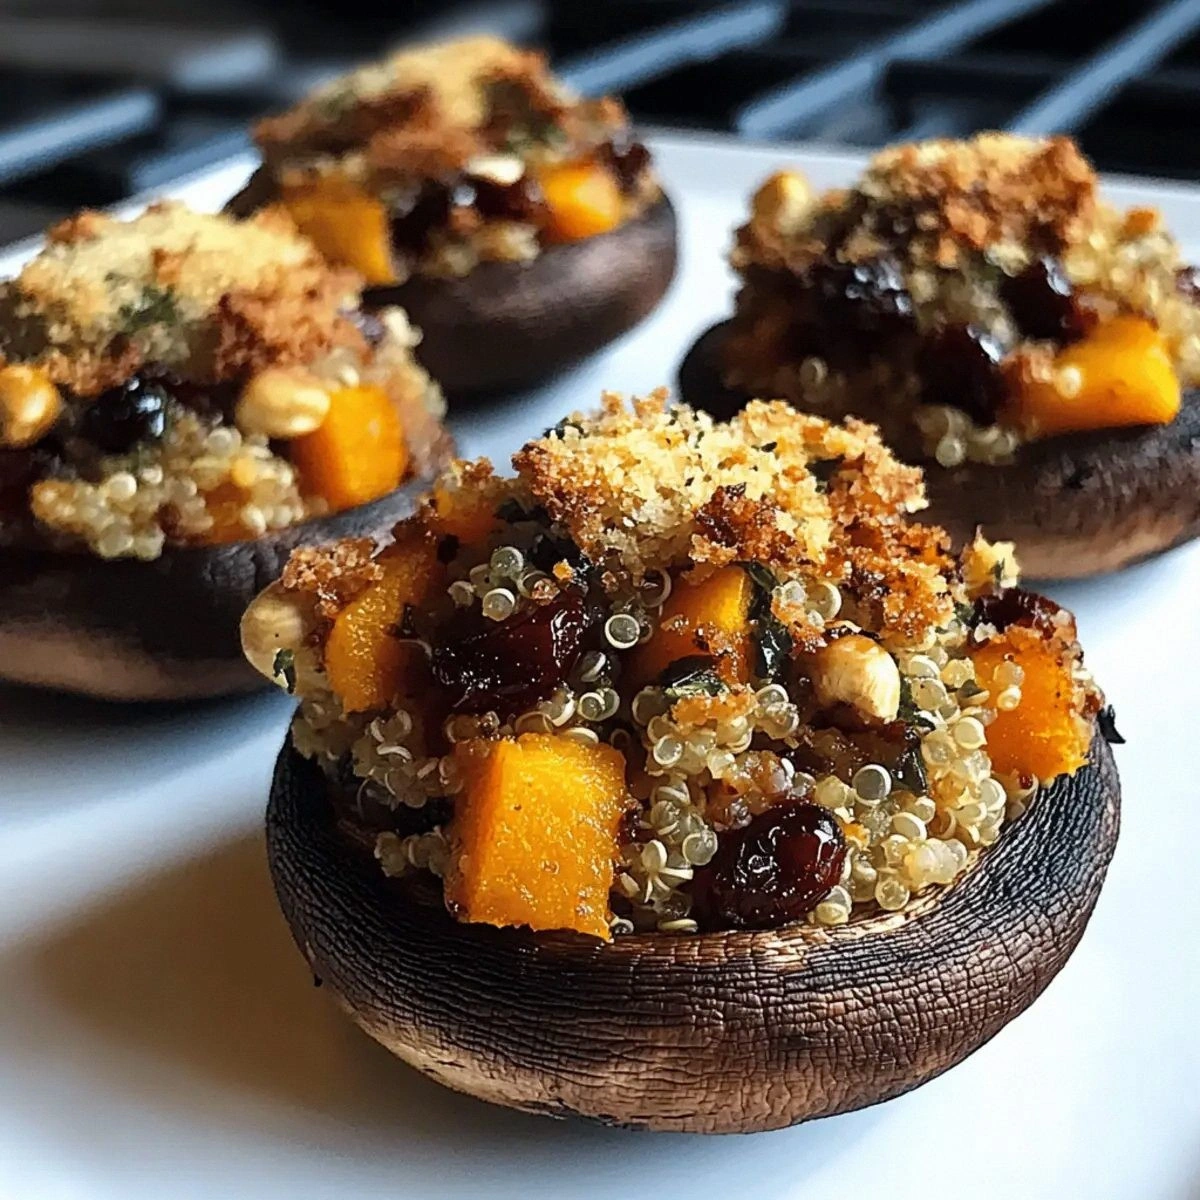
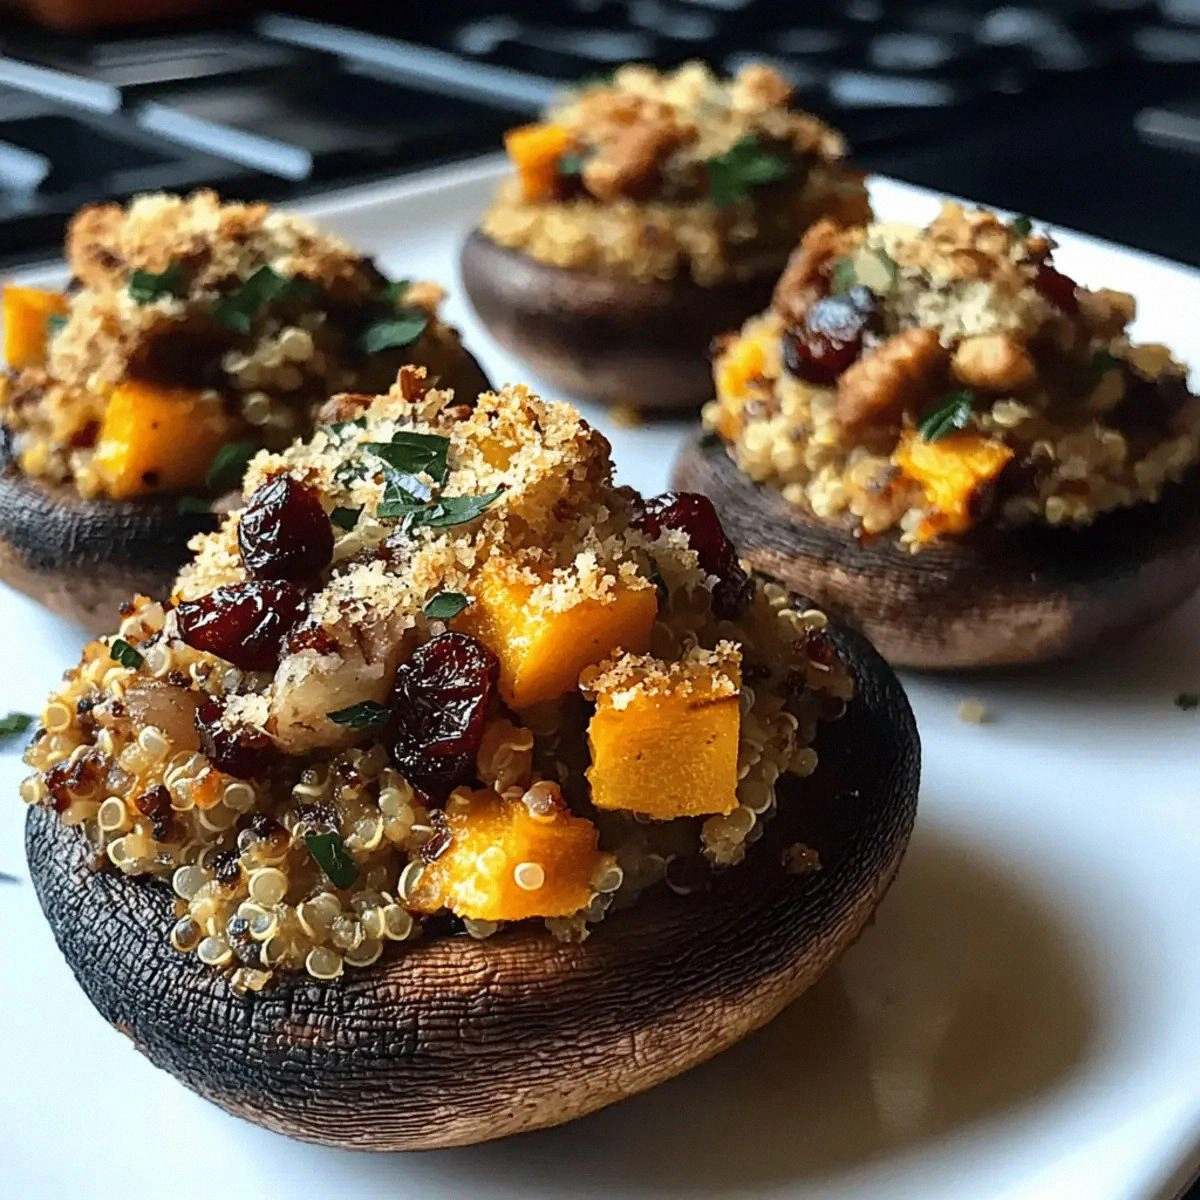
I burned the quinoa the first time I made these stuffed portobellos. Not just a little scorched—I'm talking full-on smoke alarm symphony, windows flung open, neighbor knocking to check if I was conducting some bizarre kitchen exorcism. But you know what? That culinary disaster led me to the most ridiculously good autumn recipe I've ever developed. These Autumn Harvest Stuffed Portobello Mushrooms aren't just another pretty face on your dinner plate; they're the edible equivalent of wrapping yourself in a cashmere blanket while watching leaves drift past your window.
Picture this: It's 6:30 PM, the sky outside is doing that gorgeous amber fade thing it does in October, and your kitchen smells like someone bottled up fall and turned it into a candle. The earthy portobellos are roasting away, their caps turning into the perfect umami-packed vessels for what I can only describe as harvest season's greatest hits. Sweet butternut squash mingles with nutty quinoa, while tart cranberries pop against crunchy walnuts, all bound together with herbs that make you want to bury your face in the pan. That sizzle when the garlic hits the olive oil? Absolute perfection.
Here's where I get bossy for a second: if you've been making stuffed mushrooms with bland breadcrumbs and calling it a day, you're committing a crime against autumn produce. This version takes everything you love about fall flavors and amplifies it by a thousand. The secret isn't just in what goes inside—though trust me, that quinoa mixture is pure magic—but in how we treat each component like it matters, because it does. Every ingredient gets its moment to shine, from the way we roast the squash until its edges caramelize like tiny autumn sunsets, to how we toast the walnuts until they smell like someone's baking a woodland bakery.
What I'm about to share with you isn't just a recipe; it's your new favorite way to impress dinner guests without breaking a sweat, your answer to "what do vegetarians even eat at Thanksgiving," and quite possibly the reason you'll find yourself buying portobellos in bulk. Stay with me here—this is worth it. Let me walk you through every single step—by the end, you'll wonder how you ever made it any other way.
What Makes This Version Stand Out
Umami Bomb: Most stuffed mushroom recipes treat the portobello like a mere container, but we're maximizing its meaty, earthy depth by roasting the caps first with olive oil and garlic. This concentrates their flavor until they taste almost steak-like, creating a base that can stand up to bold fillings without getting soggy or bland. The result is a mushroom that actually tastes like something, not just a vehicle for stuffing.
Textural Symphony: Where others go mushy, we go multi-dimensional. The quinoa provides pleasant pop and nuttiness, the walnuts add rich crunch, the cranberries offer chewy tartness, and the roasted squash brings creamy sweetness. Each bite is a different experience, keeping your palate engaged from first forkful to last. No more monotonous mouthfuls of homogenous stuffing.
One-Pan Wonder: Everything except the final assembly happens on a single sheet pan, which means fewer dishes and more time to enjoy that glass of wine you poured. The mushrooms roast while the quinoa mixture comes together on the same pan—talk about efficiency. You'll spend 15 minutes actively cooking, then let the oven do all the heavy lifting while you binge your latest show.
Make-Ahead Champion: These beauties can be stuffed and refrigerated up to 24 hours before baking, making them perfect for dinner parties or holiday meals. The flavors actually improve as they meld together overnight, so you're not just getting convenience—you're getting better taste. Just pop them in the oven when guests arrive and watch everyone think you're a culinary genius.
Nutritional Powerhouse: We're talking complete protein from quinoa, immune-boosting compounds from mushrooms, heart-healthy fats from walnuts, and a rainbow of vitamins from the produce. This isn't comfort food that'll put you in a food coma—this is comfort food that makes you feel genuinely good after eating it. Your body will thank you as much as your taste buds.
Impressive Presentation: These look like they came from a fancy restaurant, with their bronzed caps overflowing with jewel-toned filling. Yet they're easier to make than scrambled eggs once you know the technique. Serve them at a dinner party and prepare for the compliments to roll in—just don't tell anyone how simple they actually were.
Seasonal Flexibility: While this is peak autumn in a dish, the base technique works year-round with seasonal swaps. Summer version with zucchini and corn? Spring edition with asparagus and peas? Once you master this method, the possibilities are endless. This recipe is a template for stuffed mushroom greatness, not just a one-hit wonder.
Inside the Ingredient List
The Flavor Foundation
Let's start with the portobellos themselves—those magnificent umbrellas of umami. When selecting yours, look for caps that are about 4-5 inches across with tight, unblemished gills. The darker the gills, the more intense the mushroom flavor, which is exactly what we want here. Avoid any that look slimy or smell overly pungent; fresh portobellos should have a subtle, earthy aroma. Pro tip: if you can only find smaller ones, that's fine—just plan on two per person instead of one large one.
The garlic isn't just there for show—it forms the aromatic backbone that ties everything together. I use fresh cloves because pre-minced garlic tastes like disappointment and resentment. Smash them with the flat of your knife first to release their oils, then mince finely so it distributes evenly. If you're a garlic lover like me, you might even add an extra clove. The thyme is non-negotiable in my book; its woodsy, slightly lemony notes are autumn personified. Fresh is best here—dried thyme tastes like hay in comparison.
The Texture Crew
Quinoa might seem basic, but it's the MVP of this dish. Not only does it provide complete protein and a delightful pop, but it also acts like tiny flavor sponges, soaking up all the vegetable broth and seasonings. Rinse it first unless you enjoy bitter, soapy-tasting stuffing. The butternut squash brings the sweet, creamy element that balances the earthiness of the mushrooms. When roasted, its edges caramelize into little candy-like bits that will have you "tasting for seasoning" more times than necessary.
The walnuts aren't just filler—they add crucial richness and crunch. Toast them first, and they'll taste like they came from a much more expensive nut. If walnuts aren't your thing (or you're cooking for someone allergic), pecans work beautifully too. The key is getting them to that perfect golden-brown stage where they smell like you're roasting them for a fancy cheese board. Dried cranberries provide those bright pops of tartness that make the whole dish sing. Don't even think about substituting with raisins unless you want to ruin everything.
The Unexpected Star
Parmesan might seem like an afterthought, but it's the secret weapon that makes everything taste more complex. Its salty, nutty depth enhances all the other flavors without screaming "cheese!" at you. Use the real stuff—pre-grated Parmesan in a can is sawdust in comparison. Save some to sprinkle on top for that gorgeous golden crust. The olive oil needs to be good quality since we're using it to roast the mushrooms. A peppery, fruity oil will add another layer of flavor.
The Final Flourish
Salt and pepper seem obvious, but they're crucial here. The mushrooms need aggressive seasoning since they're our flavor base. I use kosher salt for its clean flavor and coarse texture. Freshly ground black pepper is worth the effort—pre-ground tastes like dust. Taste as you go, but remember that the Parmesan will add saltiness too. Everything's prepped? Good. Let's get into the real action...
The Method — Step by Step
- Preheat your oven to 400°F. This temperature is crucial for getting those mushrooms properly roasted without turning them into leather. While it's heating, line a large sheet pan with parchment paper—yes, you need parchment, not foil, unless you enjoy scrubbing mushroom juices off your pan later. Clean your portobellos by gently wiping them with a damp paper towel. Never rinse them under running water unless you want soggy mushrooms that steam instead of roast. Pop out the stems and save them for later. The gills can stay on—they're packed with flavor and create that gorgeous dark color.
- Brush the mushroom caps generously with olive oil on both sides. Be thorough here—every bit of surface area should glisten. This isn't just for flavor (though it adds richness); it prevents them from drying out and helps them achieve that beautiful bronzed exterior. Season aggressively with salt and pepper on both sides. I'm talking more salt than you think you need—like you're salting a steak. Place them gill-side up on your prepared sheet pan, ready to receive their delicious cargo.
- Start the quinoa by bringing your vegetable broth to a boil in a medium saucepan. The broth is crucial here—water makes boring quinoa, and we want every element bursting with flavor. Once boiling, add the rinsed quinoa, reduce to a simmer, cover, and cook for 15 minutes. Here's the part most people mess up: after it's done, let it sit covered for 5 minutes before fluffing. This allows the grains to absorb any remaining liquid and gives you perfectly fluffy quinoa instead of a mushy mess.
- While the quinoa cooks, dice your butternut squash into 1/4-inch cubes. This size ensures they cook quickly and get those caramelized edges without remaining crunchy inside. Toss them with a tablespoon of olive oil, salt, and pepper, then spread on a corner of your mushroom pan. They'll roast alongside the mushrooms, picking up some of those delicious mushroom juices. The smell that starts wafting through your kitchen right about now? That's autumn calling.
- Toast the walnuts in a dry skillet over medium heat, shaking frequently. This is non-negotiable—raw walnuts taste like cardboard compared to their toasted glory. Watch them like a hawk because they go from perfect to burnt in about 30 seconds. You'll know they're done when they smell like you're walking past a nut shop and they take on a slightly darker color. Immediately transfer to a plate to stop the cooking. Chop them roughly once cool enough to handle.
- Remove the mushrooms from the oven after 15 minutes—they should be tender and have released some of their liquid, but still hold their shape. Don't panic if they look a bit shrunken; that's normal. The squash should be tender with caramelized edges. If your oven has hot spots, some pieces might be done before others—just remove those to a plate. This is the moment of truth when your kitchen starts smelling like you know what you're doing.
- In a large bowl, combine the cooked quinoa, roasted squash, toasted walnuts, dried cranberries, minced garlic, and fresh thyme. The cranberries will plump slightly from the heat, releasing their tart sweetness throughout the mixture. Add the Parmesan, reserving some for topping, and drizzle with the remaining olive oil. Season with salt and pepper, tasting as you go. This mixture should be so good you could eat it straight from the bowl (and honestly, I won't judge if you do).
- Stuff each mushroom cap generously with the quinoa mixture, pressing down gently to pack it in. The mushrooms should be heaping but not overflowing. Sprinkle the reserved Parmesan on top—this will create that gorgeous golden crust. Return to the oven for another 10-12 minutes until everything is heated through and the cheese is melted and lightly golden. Don't walk away from the oven here—these can go from perfect to overdone quickly.
- Let them rest for 5 minutes before serving. I know you're tempted to dig in immediately, but this brief rest allows the flavors to settle and prevents molten-hot filling from burning your tongue. Garnish with extra fresh thyme leaves if you're feeling fancy. Serve these beauties warm, ideally with a glass of something crisp and white, or a light red if that's more your speed.
That's it—you did it. But hold on, I've got a few more tricks that'll take this to another level...
Insider Tricks for Flawless Results
The Temperature Rule Nobody Follows
Here's the thing about mushroom cookery that most recipes gloss over: temperature matters more than timing. Your oven might run hot or cold, and mushrooms vary in moisture content. The foolproof method is to trust your eyes and nose over the clock. When the mushrooms have released their liquid and the edges start pulling away slightly from the pan, they're ready for stuffing. This usually happens around 15 minutes, but could be 12 or 18 depending on your oven. The filling should be sizzling when you add it—if not, your mushrooms aren't hot enough yet.
Why Your Nose Knows Best
Don't underestimate the power of aromatics in this dish. When you add the garlic to the hot pan, it should perfume your kitchen immediately, not burn and turn bitter. Same with the thyme—when it hits the warm quinoa mixture, you should get a waft of woodsy, slightly lemony fragrance. If you're not getting these sensory signals, your heat is wrong or your ingredients aren't fresh. Trust your instincts here; cooking is as much about smell as it is about taste. A friend tried skipping this step once—let's just say it didn't end well.
The 5-Minute Rest That Changes Everything
I cannot stress this enough: let these beauties rest before serving. Not only does it prevent tongue-burning incidents, but the filling sets slightly and the mushrooms absorb some of the flavors from the stuffing. It's like the difference between eating a sandwich immediately versus letting it sit for a few minutes—the ingredients get to know each other better. Cover loosely with foil if you need to hold them for more than 5 minutes, but no longer than 10 or they'll start to steam and lose that lovely texture.
Creative Twists and Variations
This recipe is a playground. Here are some of my favorite ways to switch things up:
The Mediterranean Makeover
Swap the butternut squash for roasted red peppers, use pine nuts instead of walnuts, and add chopped olives and sun-dried tomatoes to the quinoa. Finish with crumbled feta instead of Parmesan. The result tastes like a Greek island vacation in mushroom form. Oregano works beautifully here instead of thyme.
The Southwestern Remix
Replace the butternut squash with roasted corn and black beans, use pepitas instead of walnuts, and add cumin and cilantro to the quinoa mixture. Top with cotija cheese and serve with a squeeze of lime. It's like a vegetarian taco that decided to dress up for dinner.
The French Countryside Version
Use roasted fennel instead of squash, add herbes de Provence, swap walnuts for hazelnuts, and finish with goat cheese. The anise notes from the fennel paired with the tangy goat cheese create this sophisticated flavor profile that feels like you're dining in Provence.
The Protein Powerhouse
Add a cup of cooked French lentils to the quinoa mixture for extra protein and earthiness. This turns the stuffed mushrooms from a side dish into a main course that even your most carnivorous friends will devour. The lentils add this wonderful meaty texture that makes the whole thing more substantial.
The Spicy Autumn
Add a diced jalapeño to the quinoa mixture and swap the cranberries for dried cherries. The heat from the pepper plays beautifully against the sweet cherries and earthy mushrooms. A sprinkle of smoked paprika on top adds depth and a gorgeous color.
The Breakfast-for-Dinner Edition
Top each stuffed mushroom with a poached egg right before serving. The runny yolk creates this luxurious sauce that mingles with the quinoa filling. Add some crispy bacon bits if you're not keeping it vegetarian. It's like the best parts of brunch and dinner had a delicious baby.
Storing and Bringing It Back to Life
Fridge Storage
These stuffed mushrooms keep beautifully in the refrigerator for up to 4 days. Store them in an airtight container with a paper towel underneath to absorb any excess moisture. Don't stack them or the filling will get squished. They actually taste even better the next day as the flavors meld together. Just bring them to room temperature before reheating for best results.
Freezer Friendly
Freeze the stuffed mushrooms before the final baking step for up to 2 months. Wrap each one individually in plastic wrap, then place in a freezer bag. Thaw overnight in the refrigerator before baking as directed, adding an extra 5-10 minutes to the cooking time. The texture won't be quite as perfect as fresh, but they're still delicious and make for an impressive emergency dinner.
Best Reheating Method
Skip the microwave unless you enjoy rubbery mushrooms. Instead, reheat in a 350°F oven for 10-12 minutes until warmed through. Add a tiny splash of water to the pan before covering with foil—it steams back to perfection. If you're reheating from room temperature, 8 minutes should do it. The goal is to warm them through without drying them out or overcooking the filling.