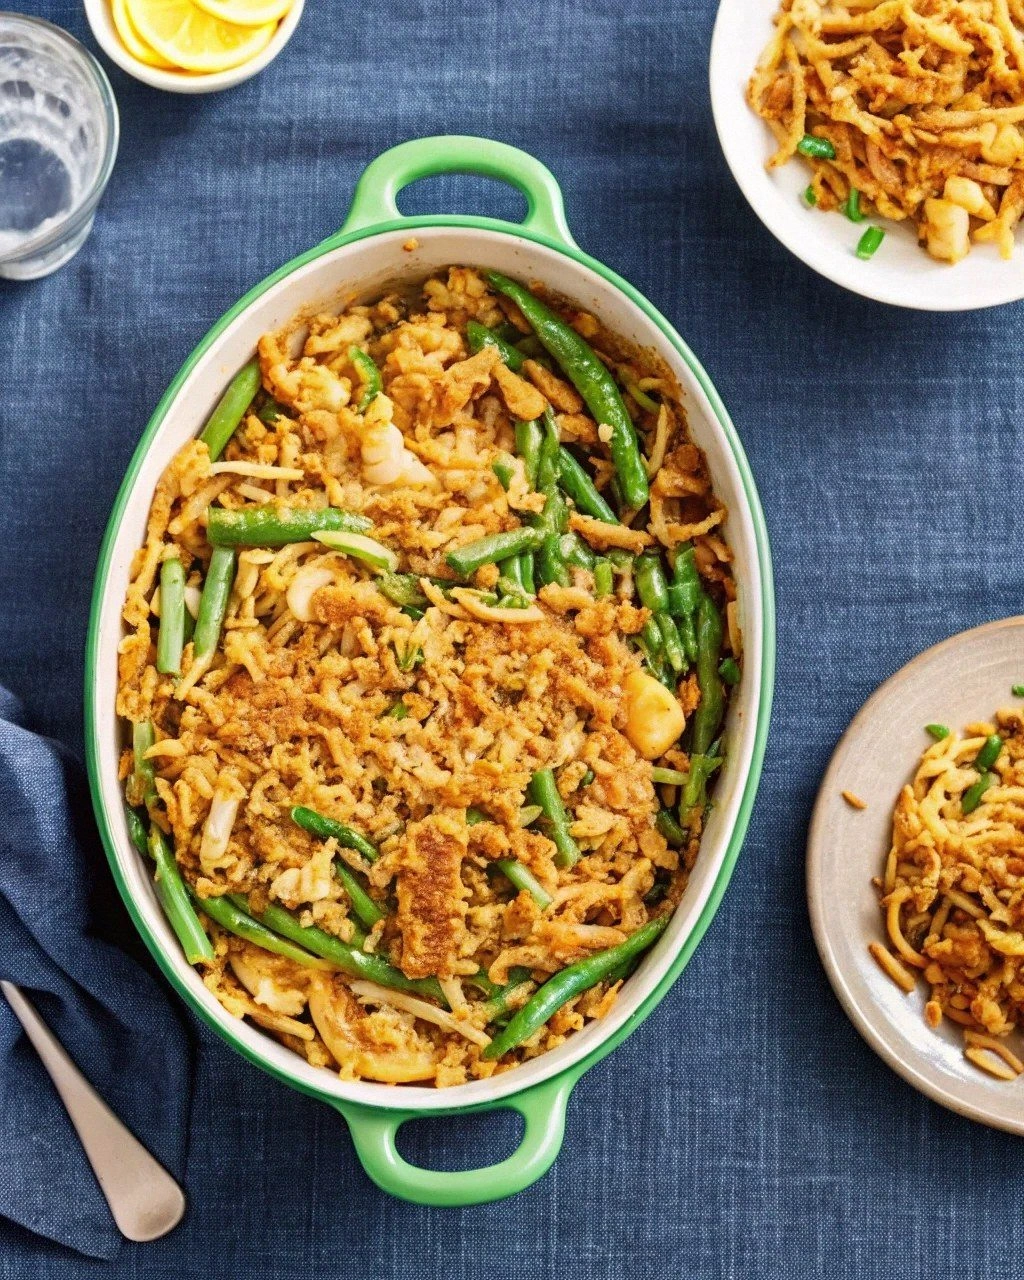
I'll be honest — I used to think green bean casserole was that sad, mushy thing that showed up at potlucks, swimming in a can of grayish soup and topped with those stale fried onions that tasted like cardboard had a baby with a salt lick. You know the one. It sat there, congealing on the buffet table, while everyone politely took a spoonful and then secretly scraped it into the trash when nobody was looking. But here's the thing: I love a culinary underdog story. So one Thanksgiving, I decided to rescue this classic from the clutches of canned mediocrity and turn it into something that would make people actually fight over the last scoop. Picture yourself pulling this out of the oven, the whole kitchen smelling incredible — like butter and herbs and something deeply savory that's been bubbling away into pure comfort. The sauce coats every green bean like velvet, and those crispy onions? They're not from a can, my friend. They're golden shards of glory that shatter like thin ice when you bite into them. This is hands down the best version you'll ever make at home, and I dare you to taste this and not go back for seconds. Stay with me here — this is worth it.
Okay, ready for the game-changer? We're starting from scratch, but don't panic — this isn't one of those recipes that requires culinary school and three days of your life. Most recipes get this completely wrong by using canned soup, which basically tastes like someone dissolved a bouillon cube in sadness. Instead, we're building a mushroom cream sauce that's so good, you'll want to eat it with a spoon straight from the pan. I'll confess — I ate half the batch before anyone else got to try it. The secret is in the layering: fresh green beans that still have snap, a sauce rich with real mushrooms and shallots, and those homemade crispy onions that will ruin you for the canned kind forever. If you've ever struggled with watery casserole or beans that taste like library paste, you're not alone — and I've got the fix.
Here's where it gets fun. We're going to blanch our green beans so they stay that gorgeous vibrant green instead of turning army-mush colored. Then we'll make a roux that smells like Thanksgiving had a baby with a French bistro — butter and flour dancing together until they smell like toasted nuts. The mushrooms get seared until they're golden and concentrating all their earthy magic. That sizzle when they hit the pan? Absolute perfection. And now the fun part — we're going to deglaze with a splash of sherry that makes the whole kitchen smell like you've been cooking for hours, even though it's been fifteen minutes. Let me walk you through every single step — by the end, you'll wonder how you ever made it any other way.
What Makes This Version Stand Out
Fresh Everything: No cans, no condensed soup, no shortcuts that taste like regret. Every ingredient started as a real food that you can pronounce, and the difference is shocking. The green beans snap instead of sag, the sauce tastes like actual cream and mushrooms instead of sodium and thickener, and those onions? They're crispy in a way that makes you close your eyes when you bite into them.
Texture Symphony: Most versions are one-note mush, but this has contrast that keeps you interested through the whole pan. Crispy onions on top, tender-crisp beans in the middle, and that creamy sauce holding everything together like the world's most delicious glue. Each bite has something to discover, and that's what separates good food from great food.
Make-Ahead Magic: Here's what actually works — you can prep every component ahead and assemble when you're ready. The beans can be blanched and chilled, the sauce can be made two days early, and those onions? They'll stay crispy for three days in an airtight container. Picture yourself calmly assembling this while everyone else is panicking about their turkey.
Flavor Depth: We're not just dumping cream of mushroom soup and calling it a day. We're building layers — shallots that melt into sweetness, mushrooms that get golden and concentrated, sherry that adds nutty complexity, and fresh thyme that makes the whole thing taste like it came from a much fancier kitchen than yours.
Crowd Conversion: I've watched self-proclaimed casserole haters go back for thirds. Kids who won't touch vegetables devour this. That uncle who only eats meat and potatoes? He asked for the recipe. This is the dish that makes people text you weeks later asking if you're bringing "that green bean thing" to the next gathering.
Simple Elegance: Despite sounding fancy, this uses supermarket ingredients and basic techniques. If you can boil water and stir, you can make this. It's comfort food dressed up for company, but it's still the approachable classic everyone recognizes.
Alright, let's break down exactly what goes into this masterpiece...
Inside the Ingredient List
The Flavor Foundation
The green beans are the star here, and they deserve better than being boiled into submission. Look for haricots verts if you can find them — they're thinner and more tender than regular green beans, with a slightly sweet flavor that plays beautifully with the rich sauce. If you're stuck with regular green beans, no worries — just trim the ends and snap them in half so they're bite-sized. The key is buying them fresh, not those sad bagged ones that have been sitting in the produce section since last Tuesday. When you're picking them, they should snap cleanly when you bend them — if they bend like rubber, keep walking.
Butter is non-negotiable here, and I don't want to hear about your diet. We're building flavor, and butter is the foundation of everything good in this world. Use the good stuff — European-style butter has more fat and less water, which means richer flavor and better browning. The mushrooms need real butter to get that gorgeous golden color that concentrates their earthy flavor into something magical. Skip the margarine or olive oil here — this is not the time for health food, this is the time for soul food.
The Texture Crew
Shallots are the sophisticated cousin of onions, and they make everything taste like you know what you're doing. They melt into the sauce, providing a subtle sweetness that regular onions can't match. If you can't find shallots, a sweet onion will work, but you'll miss that gentle sophistication that makes people ask what your secret ingredient is. Dice them fine — they'll disappear into the sauce, leaving only their flavor behind like a culinary ghost.
Flour is our thickening agent, but we're not just dumping it in willy-nilly. We're making a proper roux, cooking the flour in butter until it smells like toasted nuts and looks like beach sand. This step eliminates that raw flour taste that can ruin a cream sauce, and it gives our sauce body without making it gloopy. The roux is what separates a luxurious sauce from library paste, so don't rush this step — good things come to those who wait and stir.
The Unexpected Star
Sherry is the secret weapon that makes people ask why this tastes so much better than any green bean casserole they've ever had. Just a splash adds nutty, complex depth that makes the mushrooms taste more mushroomy and the cream taste creamier. Use dry sherry, not the sweet stuff your grandma sips — we want the kind that smells like almonds and forgotten dreams. If you don't have sherry, white wine works, but sherry is worth buying a bottle just for this recipe.
Fresh thyme brings an herbal note that lightens all the richness, like a breath of forest air in the middle of winter. Strip the leaves from the stems — the stems are woody and will stab your guests' mouths like tiny nature knives. The thyme should be fresh, not dried, because dried thyme tastes like dust and regret. Fresh thyme has a lemony, slightly minty flavor that makes everything taste more alive.
The Final Flourish
Heavy cream is what makes this indulgent instead of just okay. Don't substitute half-and-half or milk — they won't have the fat content to create that luxurious mouthfeel that makes people close their eyes when they eat it. The cream should coat the back of a spoon like velvet, not slide off like water. This is not the time to worry about calories — this is holiday food, and holiday food should feel like a warm hug from someone who loves you unconditionally.
Those crispy onions on top aren't just garnish — they're the crunchy exclamation point at the end of every bite. We're making them from scratch because the canned ones taste like they've been sitting in a warehouse since the Clinton administration. Thin-sliced onions get tossed in seasoned flour and fried until they're golden and shatter like autumn leaves. Make extra — you'll thank me when you find yourself snacking on them while the casserole bakes.
Everything's prepped? Good. Let's get into the real action...
The Method — Step by Step
- Start by bringing a large pot of salted water to a rolling boil — it should taste like the ocean, not like a gentle suggestion of salt. While you're waiting, fill a large bowl with ice water and add a handful of salt. This is your shocking station, and it's what keeps your green beans that gorgeous vibrant green instead of the color of overcooked broccoli. Once the water's boiling like it's angry at you, add the trimmed green beans and cook for exactly 3 minutes — set a timer because 30 seconds too long and you'll have mush. The beans should be bright green and still have snap when you bite one. Drain them immediately and plunge them into the ice bath, stirring gently to stop the cooking process. This step is what separates restaurant-quality vegetables from the sad ones your grandma boiled into submission.
- Now for the mushrooms — heat a large skillet over medium-high heat and add 2 tablespoons of butter. When the butter stops foaming and starts to smell nutty, add the sliced mushrooms in a single layer. Here's the crucial part: don't stir them for the first 2 minutes. Let them sit and develop that gorgeous golden-brown color that concentrates their flavor into something magical. Once they're golden on one side, give them a stir and let them brown on the other side. They'll release their liquid — keep cooking until that liquid evaporates and they start to caramelize. This is the moment of truth when they transform from boring fungus into flavor bombs.
- Push the mushrooms to the side of the pan and add another tablespoon of butter. Toss in the minced shallots and let them cook until they're translucent and sweet-smelling, about 2 minutes. Stir everything together and add the minced garlic, cooking just until fragrant — about 30 seconds. Garlic burns faster than a teenager's attention span, so don't walk away here. The mixture should smell like the best parts of Thanksgiving and a French bistro had a delicious baby.
- Sprinkle the flour over the mushroom mixture and stir constantly for 2 minutes. This is your roux, and it's what transforms your sauce from watery disappointment to luxurious coating. The flour should disappear into the butter and mushrooms, turning everything into a cohesive paste that smells like toasted nuts. If it looks dry, add another pat of butter — better too much fat than too little when you're building flavor. Keep stirring so nothing burns on the bottom, because burnt roux tastes like disappointment and regret.
- Slowly pour in the sherry while stirring constantly — the mixture will seize up like it's angry at you, then relax into a smooth paste. Let the sherry bubble away for about a minute, cooking off the alcohol and leaving behind its nutty essence. The smell should make you want to dive face-first into the pan, but resist — we're not done yet. Add the fresh thyme, salt, and pepper, stirring to combine everything into a fragrant, mushroomy masterpiece.
- Gradually whisk in the heavy cream, adding it in a slow stream while stirring constantly to prevent lumps. The sauce should thicken immediately, coating the back of a spoon like liquid velvet. If it's too thick, thin it with a splash of milk; if it's too thin, let it simmer for another minute. Taste and adjust seasoning — it should make you want to eat it with a spoon straight from the pan (and honestly, I won't judge if you do).
- Add the blanched green beans to the sauce and fold gently to coat every bean in that luxurious cream. The beans should be swimming in sauce but not drowning — think of it as a cozy blanket, not a heavy winter coat. Transfer everything to a buttered baking dish, spreading it into an even layer. The sauce should peek through between the beans, promising creamy goodness in every bite. This is where you can cover and refrigerate if you're making ahead — it'll keep for up to 2 days at this point.
- For the crispy onions, heat oil in a heavy pot to 350°F — use a thermometer because too cool and they'll be greasy, too hot and they'll burn like your ex's bridges. Toss thin-sliced onions in seasoned flour, shaking off excess, and fry in small batches until they're golden and shatter-crisp. They'll continue to darken slightly after you pull them out, so err on the side of light golden. Drain on paper towels and sprinkle with salt while they're still hot — they'll stay crispy for hours and make the most addictive snack you've ever tasted.
- When you're ready to bake, preheat the oven to 375°F and sprinkle those glorious crispy onions over the top in an even layer. Bake for 20-25 minutes until the sauce is bubbling around the edges and the onions are re-crisped and golden. The edges should be caramelized and slightly crusty, while the center stays creamy and luxurious. Let it rest for 5 minutes before serving — this allows the sauce to thicken slightly and prevents molten cream explosions when people dive in.
That's it — you did it. But hold on, I've got a few more tricks that'll take this to another level...
Insider Tricks for Flawless Results
The Temperature Rule Nobody Follows
Here's what actually works: every ingredient should be at room temperature before you start cooking. Cold cream will make your sauce seize up like it's having a panic attack, and cold beans will cool everything down and make the sauce break. Take everything out of the fridge 30 minutes before you start — yes, even the butter and cream. This isn't just chef nonsense — it's the difference between a smooth, luxurious sauce and a curdled mess that looks like it already went through someone. A friend tried skipping this step once — let's just say it didn't end well, and she had to lie about what happened to half the casserole.
Why Your Nose Knows Best
Don't trust the clock — trust your senses. The mushrooms are done when they smell like concentrated earth and look golden around the edges. The roux is ready when it smells like toasted nuts and looks like wet sand. The onions are perfectly fried when they smell like the best burger joint you've ever visited and sound hollow when you tap them with a spoon. Your nose and ears are more reliable than any timer, especially if you're cooking in an unfamiliar kitchen or using different equipment than usual. That moment when everything smells perfect? That's pure magic happening right there.
The 5-Minute Rest That Changes Everything
I know you're tempted to dig in immediately — the smell is driving you crazy and everyone's hovering with forks ready. But here's the game-changer: let it rest for exactly 5 minutes after baking. This isn't just about preventing mouth burns (though that's important too). During this rest, the sauce thickens slightly and the flavors meld together into something greater than their parts. The crispy onions absorb just enough steam to become slightly chewy in the most addictive way, while staying crisp on top. It's like the difference between a good first date and finding your soulmate — those extra minutes make everything better.
The Make-Ahead Miracle
This recipe is a playground for planners and procrastinators alike. You can blanch the beans up to 3 days ahead and store them in the fridge, wrapped in paper towels to absorb moisture. The sauce can be made completely and refrigerated for 2 days — just reheat gently with a splash of cream to loosen it up. Those crispy onions? They'll stay shatter-crisp for a week in an airtight container, though good luck keeping them around that long. Assemble everything except the onions, cover tightly, and you've got a casserole ready to bake when you are. This is why this dish shows up at every holiday gathering I host — I can actually enjoy my guests instead of being chained to the stove.
The Salt Strategy
Most recipes get this completely wrong by having you salt everything at every step, which results in a final dish that tastes like a salt lick had a baby with the Dead Sea. Here's what actually works: salt the blanching water heavily (this seasons the beans from the inside out), but go easy on the sauce. Taste the finished casserole before adding more salt — those crispy onions on top are salted, and they provide the final seasoning when you break through them with your fork. It's like having a built-in salt delivery system that keeps every bite perfectly seasoned instead of overwhelming your palate.
Creative Twists and Variations
This recipe is a playground. Here are some of my favorite ways to switch things up:
The Bacon Bourbon Version
Replace half the butter with bacon fat for smoky depth, and swap the sherry for bourbon — it adds caramel notes that make the mushrooms taste like they were kissed by a campfire. Crumble crispy bacon over the top with the onions for the ultimate indulgence. This version disappears faster than free drinks at an open bar, and I've seen vegetarians break their rules for "just one bite.'
The French Onion Soup Mashup
Add caramelized onions to the sauce along with fresh thyme and a splash of white wine. Top with Gruyère cheese before adding the crispy onions — it melts into the sauce and creates those Instagram-worthy cheese pulls. This version tastes like someone took the best parts of French onion soup and green bean casserole and made them have a beautiful, delicious baby.
The Spicy Southern Belle
Add a diced jalapeño to the mushrooms, swap half the cream for cream cheese for extra richness, and season with Cajun spices instead of just salt and pepper. The crispy onions get tossed with cayenne before frying for a kick that builds slowly and makes people reach for their drinks in the best way. It's comfort food with attitude, and it's what happens when Southern hospitality meets spice.
The Mediterranean Makeover
Swap the sherry for dry white wine, add sun-dried tomatoes and Kalamata olives to the sauce, and use fresh oregano instead of thyme. Top with crispy shallots seasoned with lemon zest and serve with crumbled feta on the side. It's like the casserole went on vacation to Greece and came back with stories and souvenirs.
The Truffle Luxe Version
Add a drizzle of truffle oil to the finished sauce (truffle oil loses its flavor when heated, so add it at the end), use a mix of wild mushrooms instead of button mushrooms, and finish with shaved truffles if you're feeling particularly fancy. This version costs about five times more but tastes like eating in a three-star restaurant while wearing your pajamas — pure luxury without the dress code.
The Vegan Victory
Replace the butter with olive oil, use coconut cream instead of heavy cream (don't worry, it doesn't taste like coconut once seasoned), and make crispy onions using chickpea flour for extra protein. Nutritional yeast gives the sauce that umami depth that mushrooms alone can't provide. Even die-hard carnivores devour this version and ask for seconds, usually followed by 'Wait, this is vegan?'
Storing and Bringing It Back to Life
Fridge Storage
Leftovers (if you have any) will keep for up to 4 days in the refrigerator, but store the crispy onions separately in an airtight container or they'll become soggy shadows of their former glory. The casserole itself should be covered tightly with foil or transferred to an airtight container — the sauce has a tendency to absorb fridge odors, and nobody wants their Thanksgiving leftovers tasting like last night's leftover takeout. If the sauce seems thick when reheating, add a splash of cream or milk to loosen it up. The beans will continue to soften in the fridge, so this is actually better the next day when the flavors have melded into something even more delicious.
Freezer Friendly
This casserole freezes beautifully, but here's the trick — freeze it before baking, without the crispy onions. Wrap it tightly in plastic wrap, then foil, and it'll keep for up to 2 months. When you're ready to bake, thaw it overnight in the fridge, then add fresh crispy onions before baking. The texture stays perfect because the beans haven't been cooked twice. I've got one in my freezer right now for emergency comfort food situations, which in 2023 seems to be every Tuesday. Don't freeze it with the onions already on top — they'll become soggy and sad, like wet tissue paper, and nobody wants that texture surprise.
Best Reheating Method
Forget the microwave — it turns the sauce grainy and the beans rubbery. Instead, cover the casserole with foil and reheat in a 350°F oven for about 20 minutes, removing the foil for the last 5 minutes to re-crisp the top. Add a tiny splash of cream or milk before reheating — it steams back to perfection and brings everything back to life like culinary CPR. If you're reheating individual portions, a toaster oven works better than the big oven and keeps those crispy onions from becoming casualties. The goal is to warm it through without cooking it further, so keep an eye on it and pull it when it's hot and bubbly around the edges but not dried out.