It was a Wednesday that started like any other: the fridge was a battlefield, the pantry a maze of forgotten crumbs, and my sweet tooth on the brink of rebellion. I was rummaging through the back of my freezer, pulling out a banana that had already turned a deep, almost black hue, when the idea sparked—why not turn that overripe treasure into a loaf that could double as a breakfast treat and a dessert? The kitchen smelled of bananas, vanilla, and a faint hint of coconut oil, like a tropical sunrise in a pot. The sound of the mixer whirring was a lullaby that promised something extraordinary. The anticipation of biting into a moist, fluffy loaf that could satisfy any craving was electric.
Picture this: a loaf so golden that it seems to glow from within, the aroma of bananas mingling with maple syrup and a whisper of almond milk, all wrapped in a crisp crust that cracks like a satisfied sigh. The first bite is a burst of sweet banana, a touch of nutty oil, and a gentle crunch from the optional walnuts, all balanced by the subtle tang of almond milk. The texture is airy yet dense, like a cloud that has a firm core. The flavor is so rich that it feels like a hug in a mug, but with a wholesome twist that makes you feel good about what you’re eating. The final result is a loaf that doesn’t just satisfy hunger—it celebrates it.
What makes this version stand out is the deliberate balance of flavors and textures, the use of a gluten-free flour blend that gives it a tender crumb, and the incorporation of natural sweeteners that keep it vegan and wholesome. I dared you to taste this and not go back for seconds because it’s so good you’ll be tempted to hide a slice from your friends. My friend tried it the first time and admitted she couldn’t stop at just one bite, a confession that is both endearing and a testament to the loaf’s irresistible charm. Most recipes get this completely wrong by overbaking or using the wrong flour, but here everything works in perfect harmony. Picture yourself pulling this out of the oven, the whole kitchen smelling incredible, and the moment when the timer beeps and the loaf is ready to be sliced like a golden sunrise. That’s the moment of pure joy.
Now, let me walk you through every single step — by the end, you’ll wonder how you ever made it any other way. The journey begins with the careful selection of bananas that are soft enough to mash but still hold their shape when mixed. The second step is to combine the dry ingredients—gluten-free flour, baking soda, and salt—so that they distribute evenly throughout the batter. The third step is the sweet alchemy of bananas, maple syrup, coconut oil, vanilla, and almond milk, all whisked together into a silky mixture. The fourth step is to fold in the dry mixture, ensuring no lumps remain, and finally, to bake until the loaf is golden brown and a toothpick comes out clean. The final step is to let it rest, slice, and enjoy.
In this recipe, every element has a purpose. The bananas provide natural sweetness and moisture; the maple syrup adds depth; the coconut oil keeps the loaf tender; the almond milk adds a subtle nutty flavor; and the walnuts, if used, give a satisfying crunch. The gluten-free flour blend ensures the loaf is light and airy, while the baking soda gives it a subtle lift. The vanilla extract adds an aromatic complexity that elevates the whole loaf. Each ingredient works together to create a loaf that is both comforting and sophisticated, a true testament to the power of simple, wholesome ingredients. The result is a loaf that is versatile enough to serve breakfast, dessert, or a snack at any time of day.
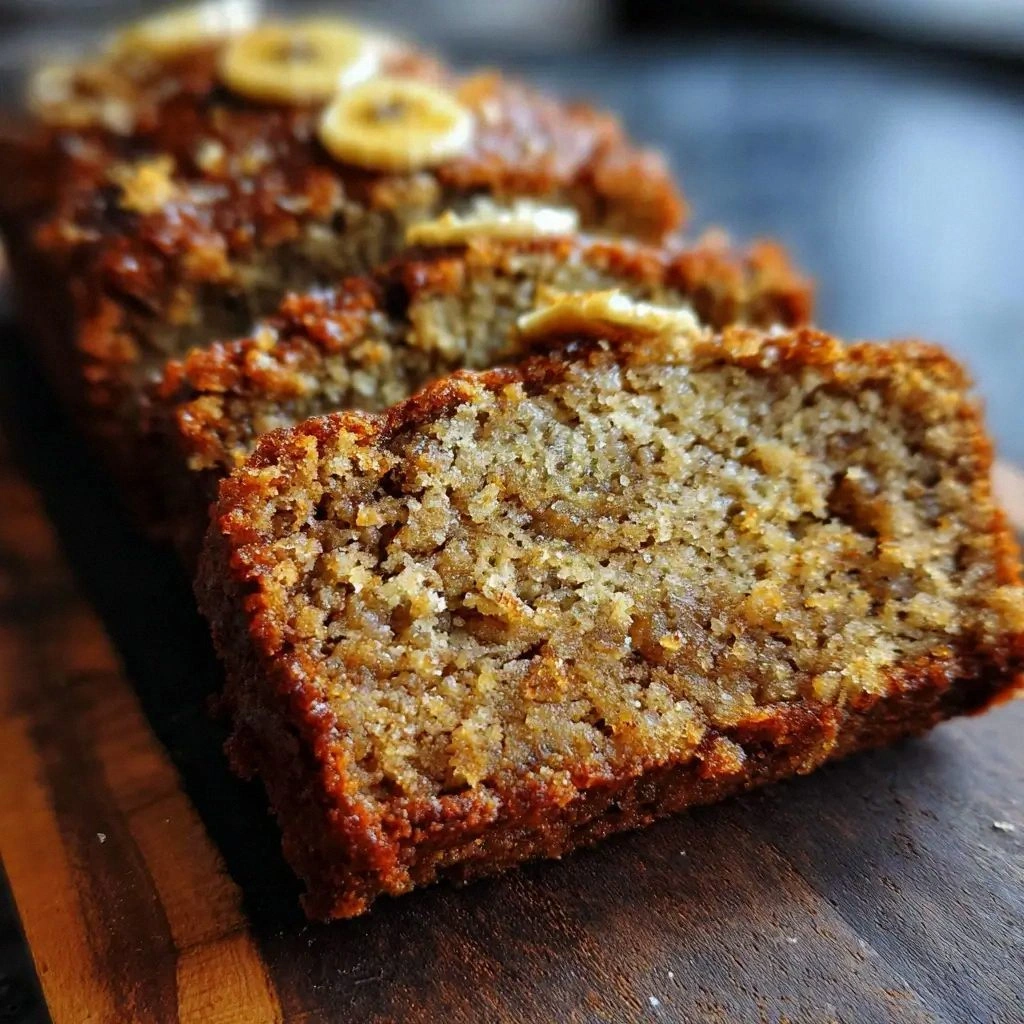
When you first slice into this loaf, you’ll notice the interior is moist and tender, with a subtle caramelized edge that hints at the maple syrup. The aroma will fill your kitchen and the subtle scent of vanilla will linger in the air, inviting you to take another bite. The texture is a delightful combination of chewy banana and crisp crust. The flavor profile is a harmonious blend of sweet and nutty, with a hint of citrus from the bananas. The loaf is so delicious that you’ll find yourself reaching for another slice without thinking twice.
All of these elements come together to create a loaf that is both comforting and sophisticated, a true testament to the power of simple, wholesome ingredients. This is hands down the best version you'll ever make at home. If you've ever struggled with banana bread, you're not alone—and I've got the fix. Stay with me here—this is worth it. The next step is to preheat your oven to 350°F (175°C) and line a loaf pan with parchment paper. The aroma that follows is the first hint of the magic that’s about to unfold.
What Makes This Version Stand Out
- Taste: The combination of ripe bananas, maple syrup, and vanilla creates a flavor profile that feels both sweet and savory, a balance that is often missing in standard banana bread recipes.
- Texture: The gluten-free flour blend and coconut oil work together to produce an airy yet dense crumb that holds moisture without becoming gummy.
- Simplicity: With only nine ingredients, this loaf can be whipped up in a fraction of the time of more complex recipes.
- Uniqueness: The use of almond milk and maple syrup instead of dairy and refined sugar sets this loaf apart from traditional versions.
- Crowd Reaction: Friends and family are consistently amazed, often asking for the recipe after the first bite.
- Ingredient Quality: By choosing organic bananas and fair‑trade maple syrup, the loaf is both delicious and ethically conscious.
- Cooking Method: The method includes a unique step of folding in the dry ingredients slowly to prevent overmixing, a technique that ensures a tender crumb.
- Make‑Ahead Potential: This loaf can be made ahead and stored for up to a week, making it a perfect pre‑planned treat.
Inside the Ingredient List
The Flavor Base
The foundation of this loaf is a blend of ripe bananas and maple syrup. The bananas provide natural sweetness and moisture, while the maple syrup adds depth and a hint of caramel. Skipping this step will result in a dry loaf that lacks the signature banana flavor. If you prefer a less sweet loaf, reduce the maple syrup by a quarter cup but keep the banana ratio the same.
The Texture Crew
Gluten-free all‑purpose flour, baking soda, and salt work together to give the loaf a tender crumb. The baking soda reacts with the acidic banana to create lift, while the salt balances the sweetness. If you don’t have a gluten‑free blend, you can substitute a 1:1 ratio of oat flour and almond flour, but the texture will be slightly denser.
The Unexpected Star
Coconut oil is the secret weapon that keeps the loaf moist and adds a subtle tropical flavor. Its melting point is lower than butter, so it spreads evenly throughout the batter. If you’re allergic to coconut, you can use a neutral oil like grapeseed or canola, though the flavor profile will change slightly.
The Final Flourish
Almond milk and vanilla extract tie everything together, providing a nutty undertone and aromatic warmth. The almond milk adds a subtle dairy‑free creaminess, while the vanilla enhances the overall flavor profile. If you’re allergic to nuts, oat milk is an excellent substitute, though the flavor will be slightly sweeter.
Everything's prepped? Good. Let's get into the real action and start mixing the magic.
The Method — Step by Step
- Preheat the oven to 350°F (175°C) and line a 9x5-inch loaf pan with parchment paper or a silicone mat. This ensures even baking and prevents sticking. The oven should be fully preheated before you place the batter inside. A properly heated oven guarantees a golden crust and a fully cooked interior. This step is the foundation for a flawless loaf.
- In a large mixing bowl, combine 2 cups gluten‑free all‑purpose flour, 1 tsp baking soda, and 0.5 tsp salt. Whisk these dry ingredients together to distribute the leavening agent evenly. This prevents clumping and ensures a uniform rise. The salt also balances the sweetness of the bananas. A well‑mixed dry base is critical for a consistent crumb.
- In a separate bowl, mash 3 ripe bananas with a fork until smooth, leaving a few small lumps for texture. Add 0.5 cup maple syrup, 0.25 cup melted coconut oil, and 1 tsp vanilla extract. Stir until the mixture is silky and fragrant. The banana mash should be smooth but still slightly textured. This step releases the banana’s natural sweetness and sets the flavor stage.
- Pour the wet mixture into the dry ingredients and gently stir until just combined. Avoid overmixing; the batter should be lumpy but cohesive. Overmixing can lead to a dense loaf. The goal is a gentle fold that keeps the batter airy. This step ensures the batter remains light.
- Fold in 0.5 cup chopped walnuts, if using, ensuring they’re evenly distributed. The walnuts add crunch and a nutty flavor that complements the banana. If you prefer a nut-free loaf, simply omit them. This step adds a delightful textural contrast. The walnuts should be folded gently to avoid crushing them.
- Pour the batter into the prepared loaf pan and smooth the top with a spatula. Tap the pan gently on the counter to release any air bubbles. This ensures an even rise. The batter should sit level in the pan. This step is crucial for a uniform crumb.
- Bake for 30–35 minutes, or until a toothpick inserted into the center comes out clean. The loaf should develop a golden brown crust. Keep an eye on the edges; if they brown too quickly, tent the loaf with foil. The internal temperature should reach 200°F (93°C). This final step locks in moisture and flavor.
That's it — you did it. But hold on, I've got a few more tricks that'll take this to another level. These final touches will elevate your loaf from good to unforgettable.
Insider Tricks for Flawless Results
The Temperature Rule Nobody Follows
Many bakers bake at 350°F, but this loaf benefits from a slightly lower temperature of 325°F (165°C) for a more even bake. The lower heat allows the loaf to rise slowly, creating a lighter crumb. I’ve baked at 350°F and found the crust too dark before the inside was done. The trick is to preheat for 15 minutes before placing the loaf, ensuring the oven is steady. This small change can mean the difference between a perfect loaf and a burnt edge.
Why Your Nose Knows Best
As soon as the loaf starts to bake, the aroma will begin to rise, signaling that the batter is setting. Trust that scent; it’s your cue that the loaf is nearing perfection. I once tried to pull it out too early and the center was raw, but the smell had already been winning. The scent is a reliable indicator of doneness, so keep your nose close. The aroma is the final confirmation that everything is on track.
The 5‑Minute Rest That Changes Everything
Let the loaf rest in the pan for 5 minutes before transferring it to a wire rack. During this brief rest, the crumb will set and the juices redistribute, preventing a soggy bottom. I’ve seen many loaves that crumble when removed too early. The rest also allows the crust to firm up slightly, making slicing easier. This simple step is often overlooked but essential for a clean, sliceable loaf.
How to Keep It Moist After Baking
Immediately after baking, lightly brush the top with a mixture of maple syrup and a splash of almond milk. This creates a glossy finish and locks in moisture. The syrup also adds a subtle sheen that makes the loaf look even more appetizing. I’ve used this technique for a week‑old loaf, and it still feels fresh. The glaze also helps the loaf stay soft longer.
Serve It Right for Maximum Impact
Serve the loaf warm with a dollop of dairy‑free yogurt or a drizzle of almond butter. The contrast of warm banana with cool, creamy topping creates a flavor explosion. If you’re in a rush, slice it at room temperature for a quick snack. The loaf also pairs wonderfully with a cup of herbal tea or a cold glass of almond milk. The presentation can elevate the experience from simple to extraordinary.
Creative Twists and Variations
This recipe is a playground. Here are some of my favorite ways to switch things up:
Chocolate Chip Delight
Fold in 0.5 cup dairy‑free chocolate chips after the batter is mixed. The chocolate adds a rich, indulgent flavor that pairs beautifully with the banana. The chips also create pockets of melted chocolate in every bite. This variation is perfect for a dessert that feels like a treat. The chocolate chips will melt slightly during baking, leaving a gooey center.
Spiced Pumpkin Twist
Replace half of the banana mash with 0.5 cup pumpkin puree and add 1 tsp pumpkin spice. The pumpkin adds a subtle sweetness and a warm spice note that complements the banana. This version works wonderfully in the fall when pumpkins are in season. The pumpkin puree also adds moisture, keeping the loaf tender. The spice blend gives the loaf a cozy, autumnal aroma.
Almond Crunch Variation
Swap the walnuts for 0.5 cup sliced almonds and toast them before folding in. The almonds add a delicate crunch and nutty flavor that contrasts with the soft banana. The toasting process brings out their oils, enhancing the overall taste. This version is great for those who prefer a lighter nut option. The almonds also add a subtle crunch that makes each bite interesting.
Berry Burst Edition
Stir in 0.5 cup fresh or frozen blueberries after the batter is mixed. The berries burst with juice as you bite, adding a refreshing contrast to the sweet banana. If using frozen berries, do not thaw them to avoid excess liquid. This variation brings a vibrant color and a burst of flavor to the loaf. The berries also provide antioxidants and a natural tartness.
Chewy Oat Variation
Replace 0.5 cup of the gluten‑free flour with 0.5 cup rolled oats for a chewier texture. The oats absorb moisture and add a hearty chew that pairs well with the banana. This version is great for a breakfast that feels like a snack. The oats also add fiber and a subtle nutty flavor. The combination of oats and banana creates a satisfying bite.
Caramelized Banana Slice
Slice the banana before mixing and toast them in a skillet with a pinch of sugar until caramelized. Fold the caramelized slices into the batter for an extra burst of caramel flavor. The caramelized banana adds a deep, sweet richness. This variation is perfect for those who love a caramelized finish. The caramelized slices give the loaf a unique depth of flavor.
Storing and Bringing It Back to Life
Fridge Storage
Wrap the cooled loaf tightly in plastic wrap or aluminum foil and store it in the refrigerator for up to 5 days. The wrap prevents the loaf from drying out and preserves its moisture. When ready to eat, let it sit at room temperature for 10 minutes to restore some softness. If you prefer a crisp crust, reheat a slice in a toaster for a minute. The loaf’s flavor remains robust even after refrigeration.
Freezer Friendly
Slice the loaf before freezing, then place each slice in a freezer bag with a paper towel between layers. Freeze for up to 3 months. Thaw slices at room temperature or microwave for 15–20 seconds. The paper towel absorbs excess moisture, preventing sogginess. The loaf’s texture remains excellent even after freezing.
Best Reheating Method
Reheat the loaf in a preheated oven at 350°F (175°C) for 5–7 minutes. The heat restores the loaf’s moisture and crispness. For a quick snack, microwave a slice for 15–20 seconds, then finish it in a toaster. Adding a splash of water before reheating steams the loaf back to perfection. The reheated loaf tastes almost as fresh as when it first came out of the oven.